
Registering a private app
Private apps, aka internal apps, enable you to share your integration with any user/company in Pipedrive via a direct, unlisted installation link. To do so, you must fill out the parts of the app registration form that cover app creation and make your private app live.
How to find Developer Hub
First, go to Settings by clicking on your profile name in the upper right corner of the top navigation bar. Find the company name of your sandbox account and choose Developer Hub from the drop-down menu:

You must have a developer sandbox account for app creation to see Developer Hub.
Register a new private app
NB: Do pick your app type carefully, as it cannot be changed later on Developer Hub.
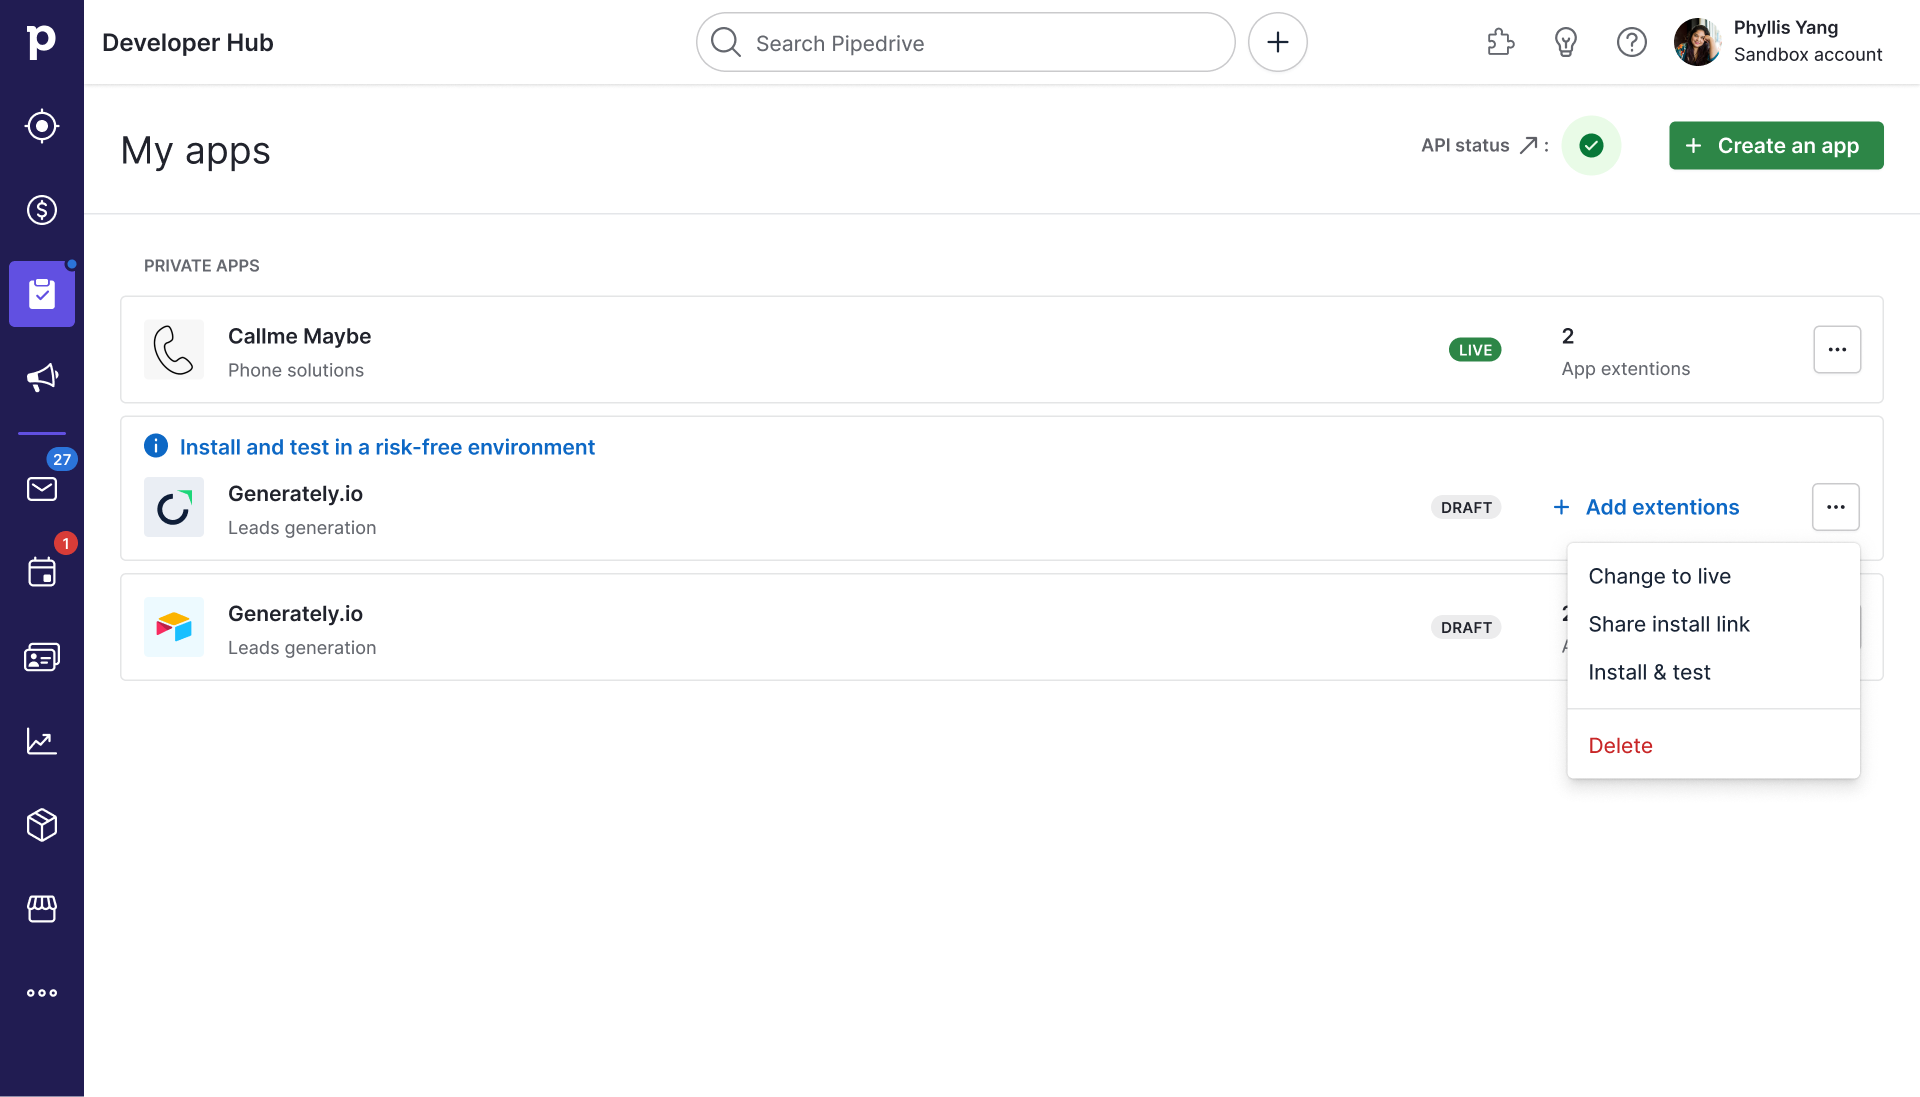
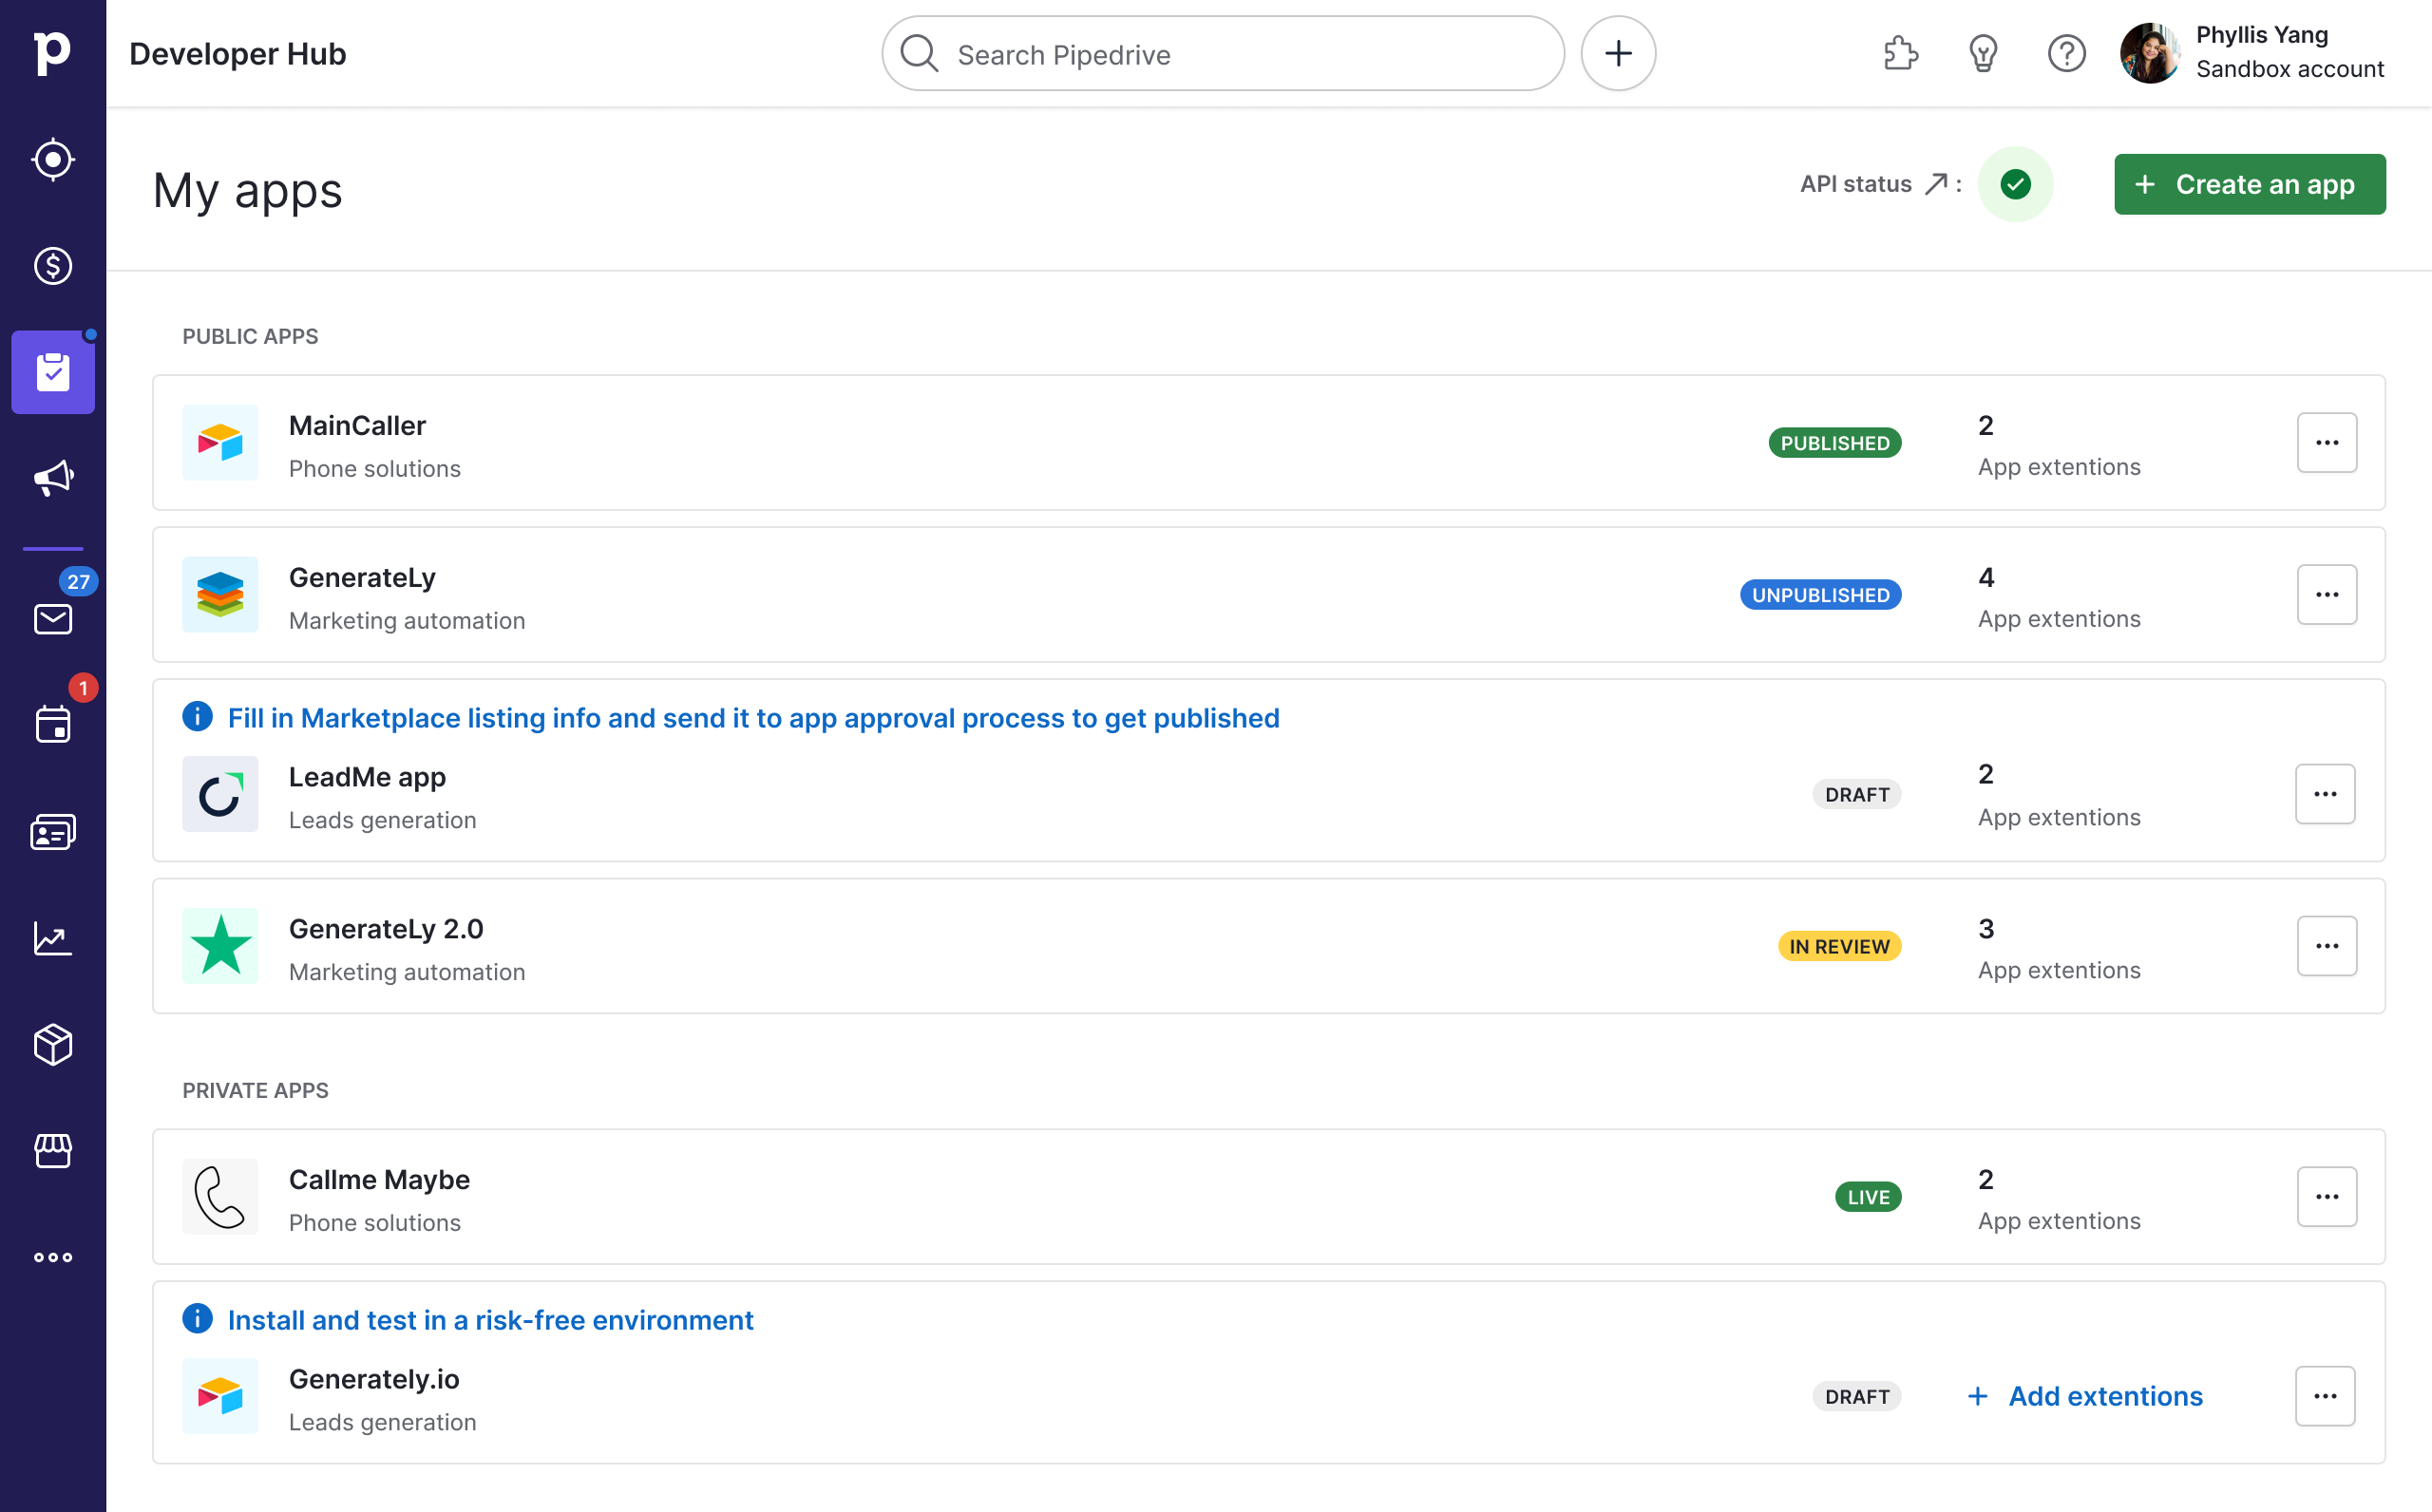
To register a new app, click on the green “Create an app” button (or “+ Create an app” if you have existing apps) followed by “Create private app”. This is also where you’d see a list of your public and private apps if you have any.

App registration form
The app registration form for private apps contains three different tabs.
You can save your app anytime by clicking the green “Save” button and exiting the form by clicking the white “Close app settings” button. This will take you back to your Developer Hub dashboard.
Read on to find out how and what to fill in each tab.
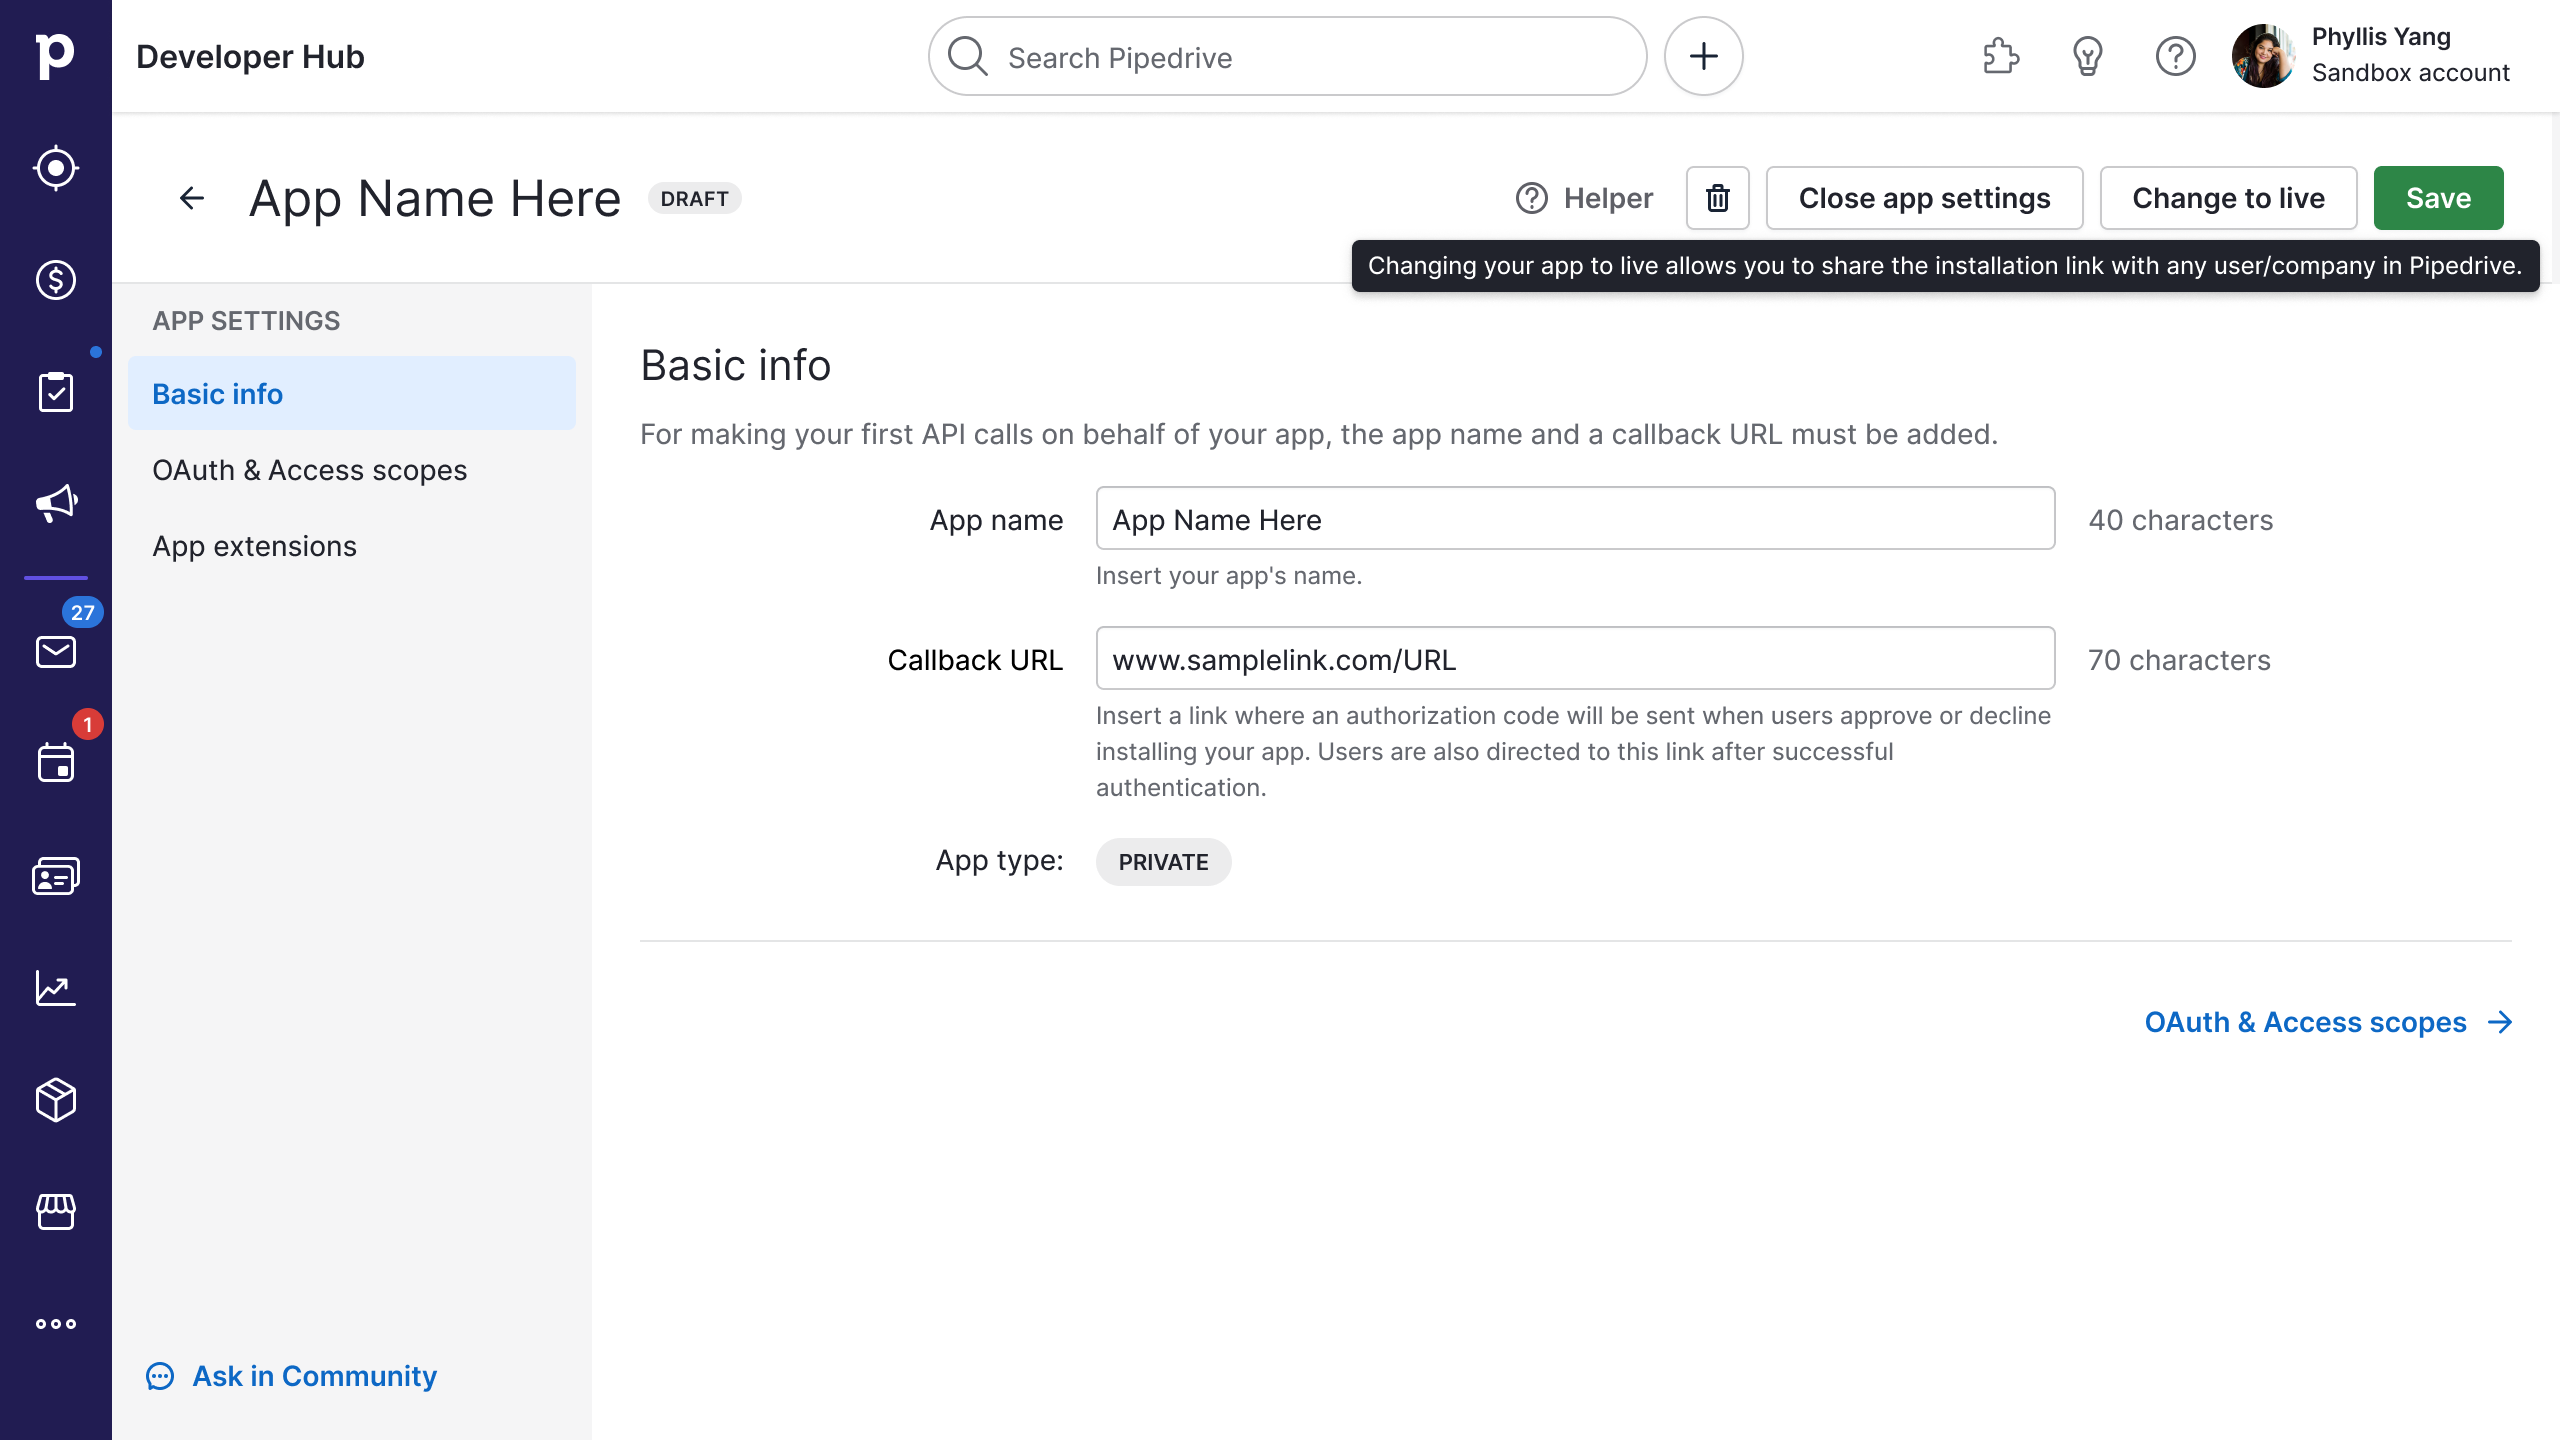
Basic info

This tab has two required fields – App name and OAuth Callback URL. Once you’ve filled this in, click the green “Save” button to save the form. You’ll then be brought to the second tab, “OAuth & access scopes”, where you’ll get your client_id and client_secret and the option to make your app live via the “Change to live” button.
| Field | Description |
|---|---|
| App name (required) | Insert your app’s name by what it’s going to be recognized by in the Marketplace. Example: Car Services App |
| Callback URL (required, one URL per app) | Insert a link where an authorization code will be sent if the user approves or declines the installation of your app. This link is also where we return the user after successful authentication. Technically, a callback URL is the same thing as an OAuth It’s okay to insert a non-functioning URL when creating a new app as long as you can update this field with a proper URL after implementing the logic needed to accept user authorization in your code. Please keep in mind that we allow only one callback URL per app. |
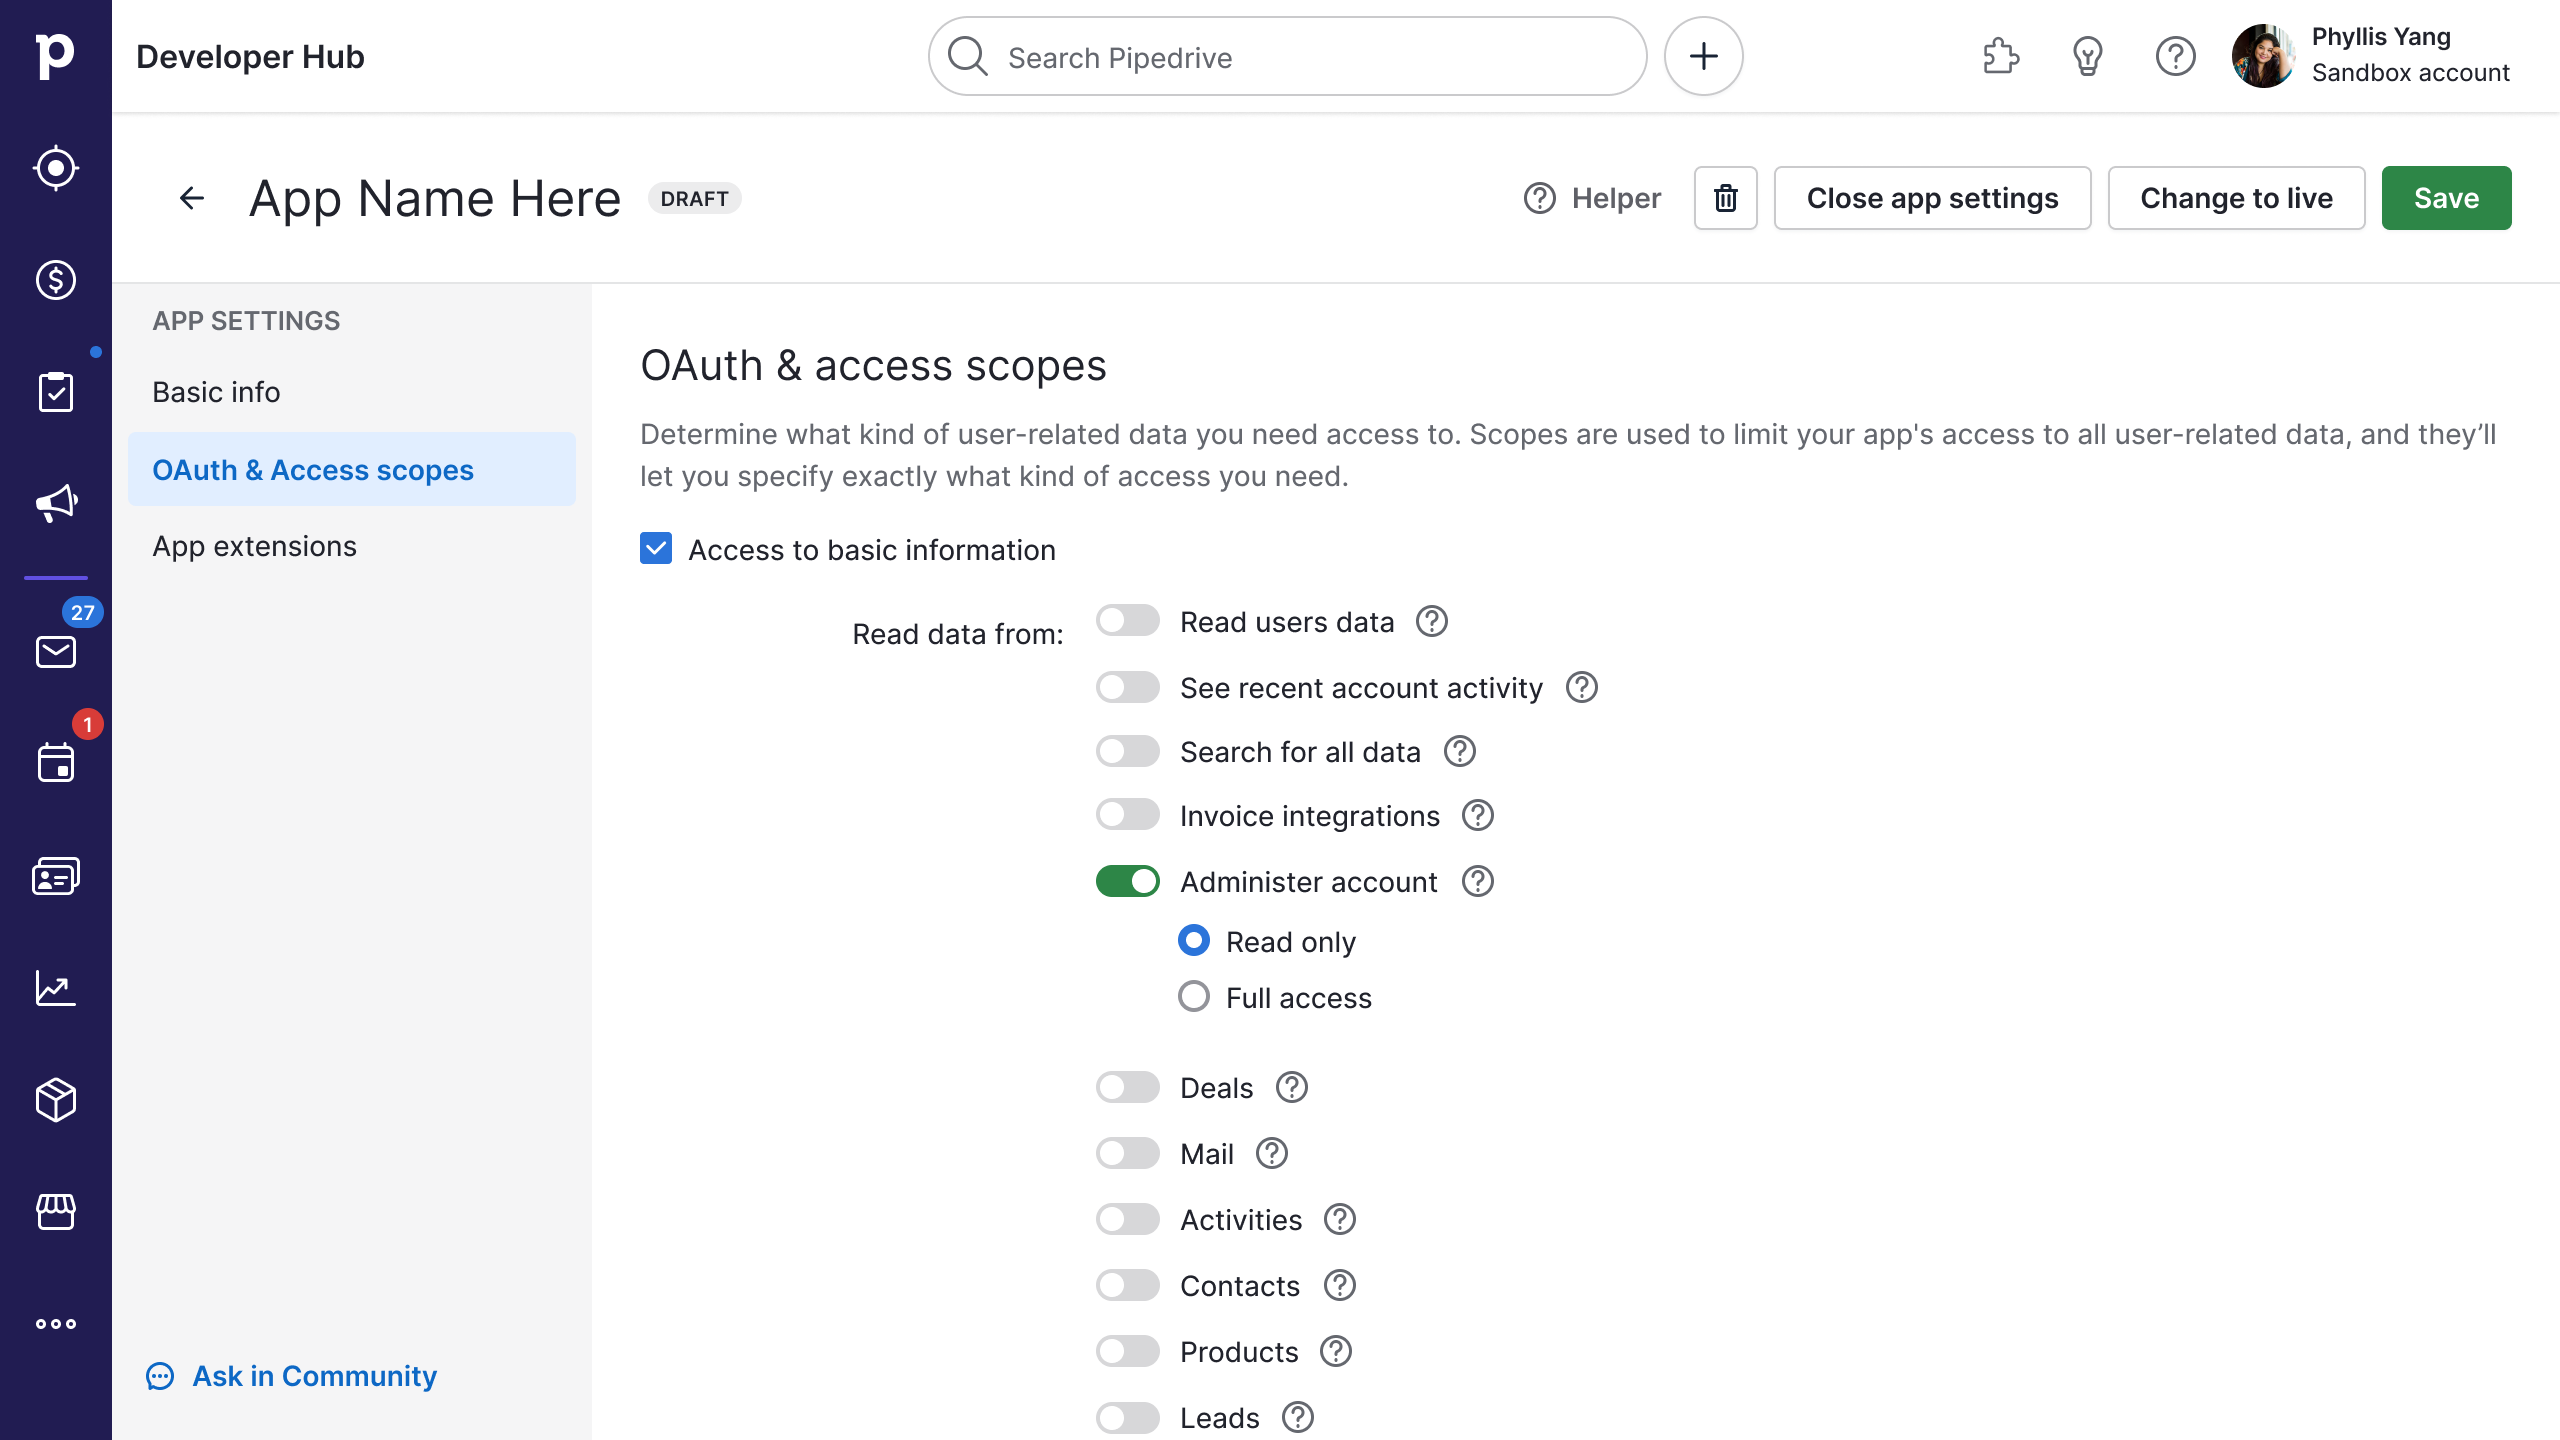
OAuth & Access scopes

| Field | Description |
|---|---|
| Access scopes (required) | Using scopes, you can specify precisely what data access your application needs. Your selection will depend significantly on the endpoints you use in your app. You can also select the respective scope in this section if you are building a manifest-based app extension. Example: |
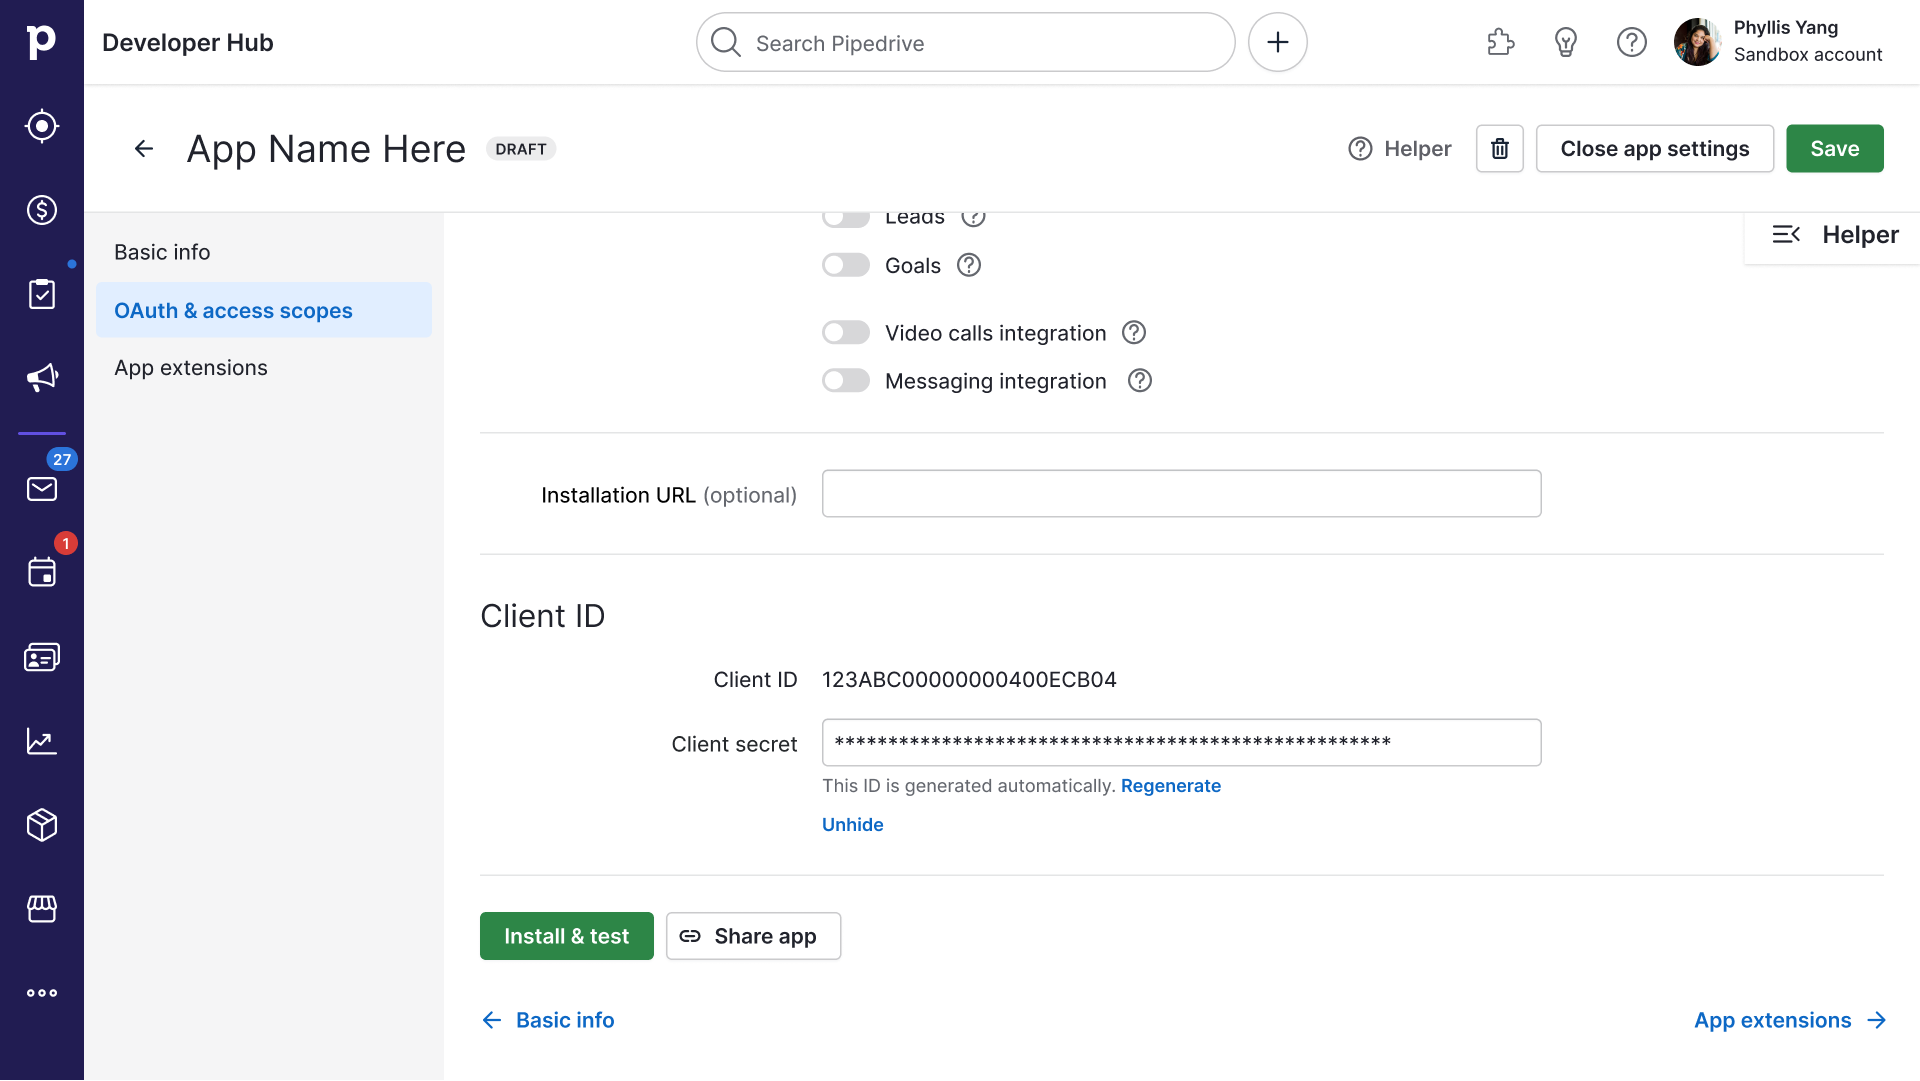
| Installation URL | This is where you can add an optional URL to which users will be redirected when using your direct installation link. Use it when you need to start app authorization outside of Pipedrive, redirect users to a custom landing page, or implement the state parameter for additional security. |
| Client ID | This is where you will get your app’s unique client_id and client_secret for OAuth authorization. |
Once you’ve completed filling up the Basic info and OAuth & access scopes, we advise you to start installing your app and testing it to see how it works. You can do so by clicking on the green “Install & test” button in the bottom left of the tab.
App extensions
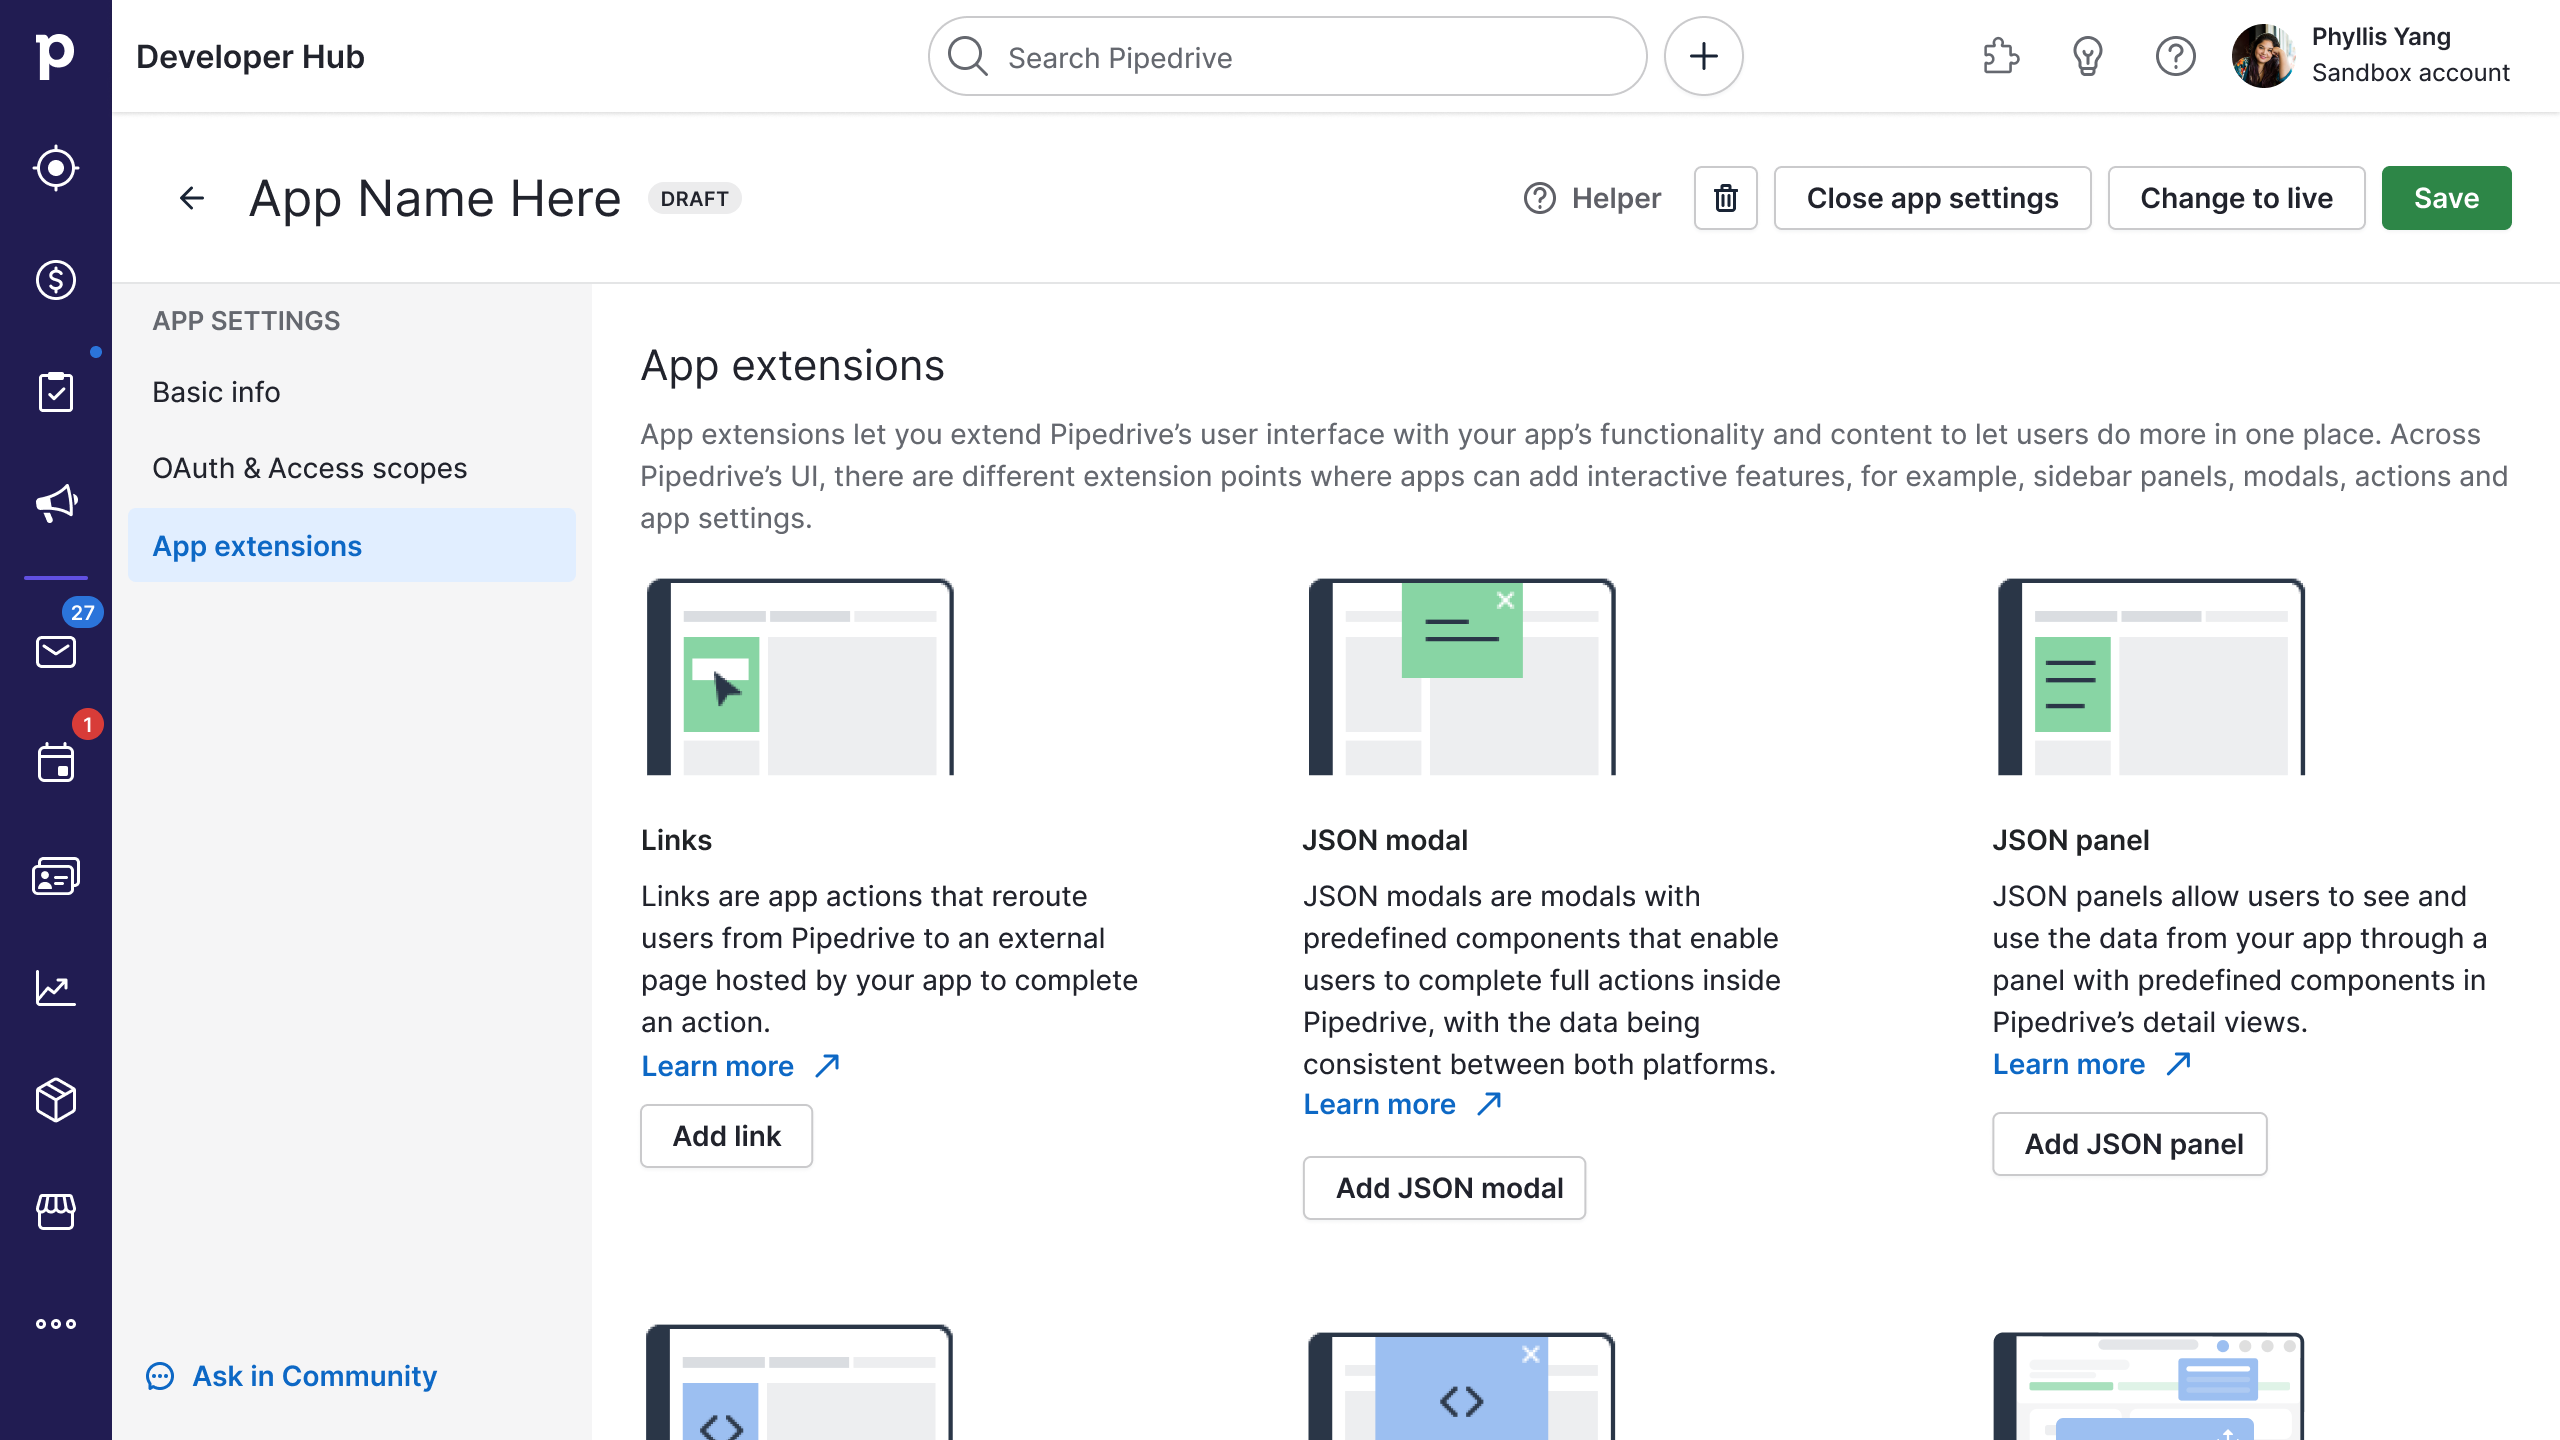
App extensions let you extend Pipedrive’s user interface with your app’s functionality and content to let users do more in one place. Find out more about them here.
Within Developer Hub, the App extensions tab is where you can add new app extensions and manage the ones you’ve added before. A modal with an app extension creation form will open when you click the button to add the respective app extension.
You can also make your app live via this tab's “Change to live” button.
Link actions
Learn more here.
| Field | Description |
|---|---|
| Action name (required) | Insert your app action’s name that will be displayed in the Pipedrive UI. The name should be short, descriptive of the app action, and be in a sentence case format. Example: Send quote - Car Services |
| Action description | To showcase the interactive features of your app, your action’s name and description will appear in the Features section of your Marketplace app listing. Use the description field to let users know what they can do with this action. Optional; max 150 characters. |
| URL link (required) | Add the URL that will redirect the user to the correct app page when an action is clicked. The URL must handle both scenarios of the user being logged into your app and not being logged in. |
| JWT secret | If left empty, client_secret will be used by default. |
| Locations (one required) | Specify in which views the app action will be displayed. There can be a maximum of 3 app actions per app or custom modals in one view, altogether 21 (7 different views x 3 actions per view).
|
JSON modals
Learn more here.
| Field | Description |
|---|---|
| Action name (required) | The name of the JSON modal. The name should be short (max 30 characters), actionable, and sentence-cased (only capitalize the first word). Example: + Prod. details - Car Services |
| Action description | To showcase the interactive features of your app, your action’s name and description will appear in the Features section of your Marketplace app listing. Use the description field to let users know what they can do with this action. Optional; max 150 characters. |
| API endpoint (required) | All API requests related to this action will be sent to this URL. |
| JWT secret | If left empty, client_secret will be used by default. |
| JSON schema (required) | The JSON schema for your JSON modal. |
| Locations (one required) | There can be a maximum of 3 app actions or custom modals per location. Each app can have a total of 21 app actions. See more about available locations in app actions' visibility. Example: Deal details |
JSON panels
Learn more here.
| Field | Description |
|---|---|
| Panel name (required) | Insert your JSON panel’s name that will be displayed in the Pipedrive UI. The JSON panel’s name should be descriptive and have a maximum of 30 characters. Example: Car PM – Car Services |
| Panel description | To showcase the interactive features of your app, your panel’s name and description will appear in the Features section of your Marketplace app listing. Use the description field to let users know what they can do within this panel. Optional; max 150 characters. |
| API Endpoint (required) | The URL of the endpoint which we'll use to fetch the data of the object properties |
| HTTP Auth username (required) and HTTP Auth password (required) | Our service will send the HTTP request with these credentials as the Basic Authentication header to protect your data. To protect your data, we strongly recommend using authenticated HTTPS requests. Note that we do not support self-signed certificates. |
| JWT secret | JWT is required if HTTP Auth is not provided. |
| JSON data structure (required) | A JSON file that describes the structure of your JSON panel as seen in the Pipedrive UI. See here for more information. |
| Panel locations (one required) | Choose where the panel will be displayed: Each app can have one JSON or custom panel in each location. |
Custom modals
Learn more here.
| Field | Description |
|---|---|
| Modal name (required) | The name of your custom modal. Descriptive, max 30 characters and should be sentence-cased (only capitalize the first word). |
| Modal description | To showcase the interactive features of your app, your modal’s name and description will appear in the Features section of your Marketplace app listing. Use the description field to let users know what they can do within this modal. Optional; max 150 characters. |
| Iframe URL (required) | URL of the web content to be shown within the iframe – Please ensure your iframe URL uses HTTPS |
| JWT secret | Optional. Defaults to client secret |
| Entry points | The custom modal will be shown as a link in the actions menu of the chosen entry point(s). Choose the location(s) your custom modal can be triggered from: If no entry points are selected, the only way to open a modal is via the SDK. Maximum 3 app extensions per location. Each app can have a total of 21 custom modals or app actions. |
Custom panels
Learn more here.
| Field | Description |
|---|---|
| Panel name (required) | The name of your custom panel. Descriptive, max 30 characters and should be sentence-cased (only capitalize the first word). |
| Panel description | To showcase the interactive features of your app, your modal’s name and description will appear in the Features section of your Marketplace app listing. Use the description field to let users know what they can do within this panl. Optional; max 150 characters. |
| Iframe URL (required) | URL of the web content to be shown within the iframe – Please ensure your iframe URL uses HTTPS |
| JWT secret | Optional. Defaults to client secret |
| Panel locations (one required) | Choose where the custom panel will be displayed: Each app can have one custom or JSON panel in each location. |
Custom floating window
Learn more here.
| Field | Description |
|---|---|
| Floating window name (required) | The name of your custom floating window. Short and precise, max 30 characters. The name will appear in the window header and Interactive Features section of your Marketplace app listing. |
| Floating window description (required) | Clearly state what users can do within the window so they know how this feature benefits them (max 150 chars). It will appear in the Interactive Features section of your Marketplace app listing. Max 150 characters. |
| Iframe URL (required) | URL of the web content to be shown within the iframe – Please ensure your iframe URL uses HTTPS |
| JWT secret | Optional. Defaults to client secret |
| Entry points | A custom floating window has two entry points: Limited to 1 floating window per app regardless of the entry point. |
App settings page
Learn more here.
| Field | Description |
|---|---|
| Type | Choose how you want your app’s user to access their app settings – External link – Custom UI |
| URL (required) – for external link | Add the URL that will redirect the user to your app settings page |
| Iframe URL (required) – for ustom UI | URL of the web content to be shown within the iframe – Please ensure your iframe URL uses HTTPS |
| JWT Secret – for Custom UI | Optional. Defaults toclient secret. |
Do install and test your app after you add app extensions to see how it works for your users.
Install and test your draft app
Installing and testing your draft app is an important step before making your private app live. It enables you to ensure everything in your app runs smoothly and identify and address potential issues early on.
NB: app testing only works for users in your sandbox account and cannot be shared with external users.
To install and test your app, click the “Install and test” notification above your app’s name or the “Install & test” option from the three-dot menu.
You can also click the green “Install & test” button at the bottom left of the OAuth & access scopes and App extensions tabs.

You will then be brought to the OAuth confirmation dialog where you can allow and install your app to begin testing it.
How to share your private app
There are two steps to sharing your private app with any user/company in Pipedrive:
- Make your private app live
- Get your installation link
Make your private app live
You have to make your private app live before you can share it. You can do this by clicking the “Change to live” button in the app registration form or the “Change to live” option in the three-dot menu next to your private app’s name.
As we will validate your callback URL when you click “Change to live”, please ensure your OAuth callback URL is a functioning one.
Note that live private apps cannot be reverted to draft status. Any changes you make to your live private app will be immediately available for all users once you click ‘Save’.
Change to live – app registration form
For new private apps
After you fill in your app name and callback URL in the Basic info tab and click “Save”, you will be brought to the OAuth & access scopes with the “Change to live” button enabled. Once the “Change to live” button is enabled, you can make your private app live anytime by clicking on it in any tab.
For draft private apps
The “Change to live” button will be enabled once you open your draft private app, as you’ve previously filled in and saved your app name and callback URL. You can make your private app live anytime by clicking “Change to live” in any tab of the app registration form.
Change to live – three-dot menu
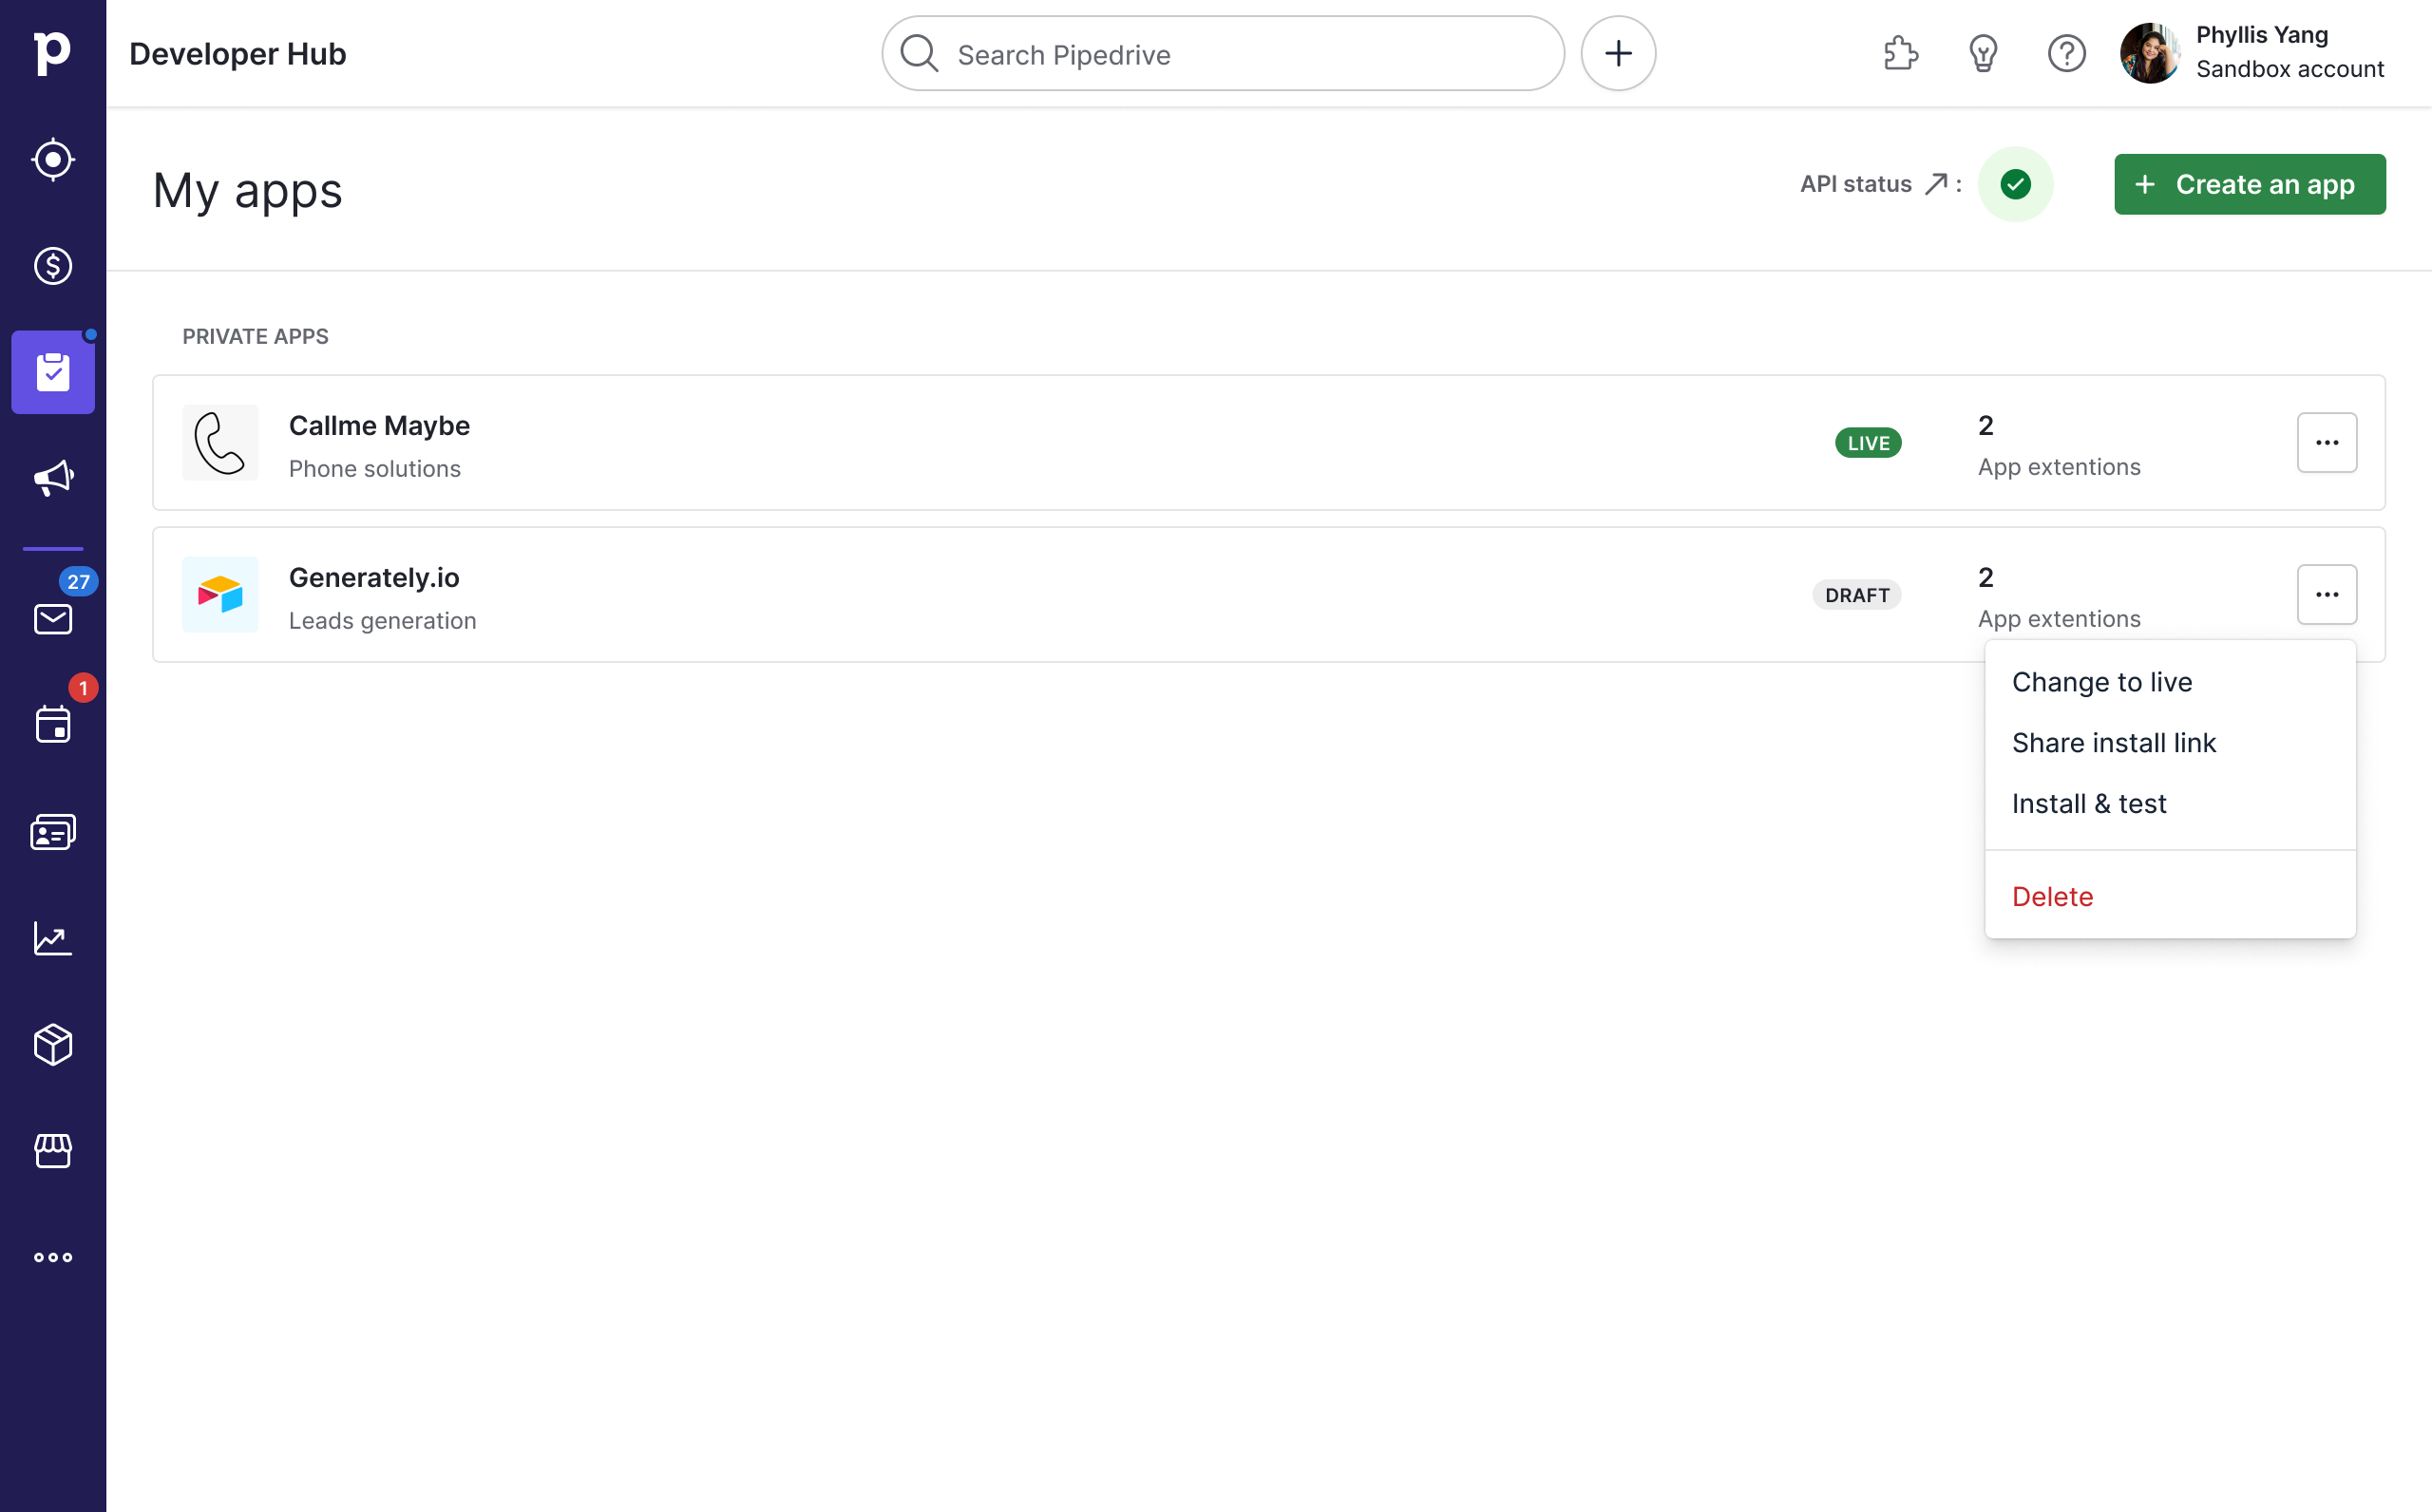
When you click on the three-dot menu next to your private app’s name, you will find the “Change to live” option. Clicking on this will take you to the Basic info tab of your private app, where you must click “Change to live” again to share your app.
Get your installation link
Once your private app is live, you can share it via its installation link. The installation link can be found in the three-dot menu next to your private app’s name in your Developer Hub dashboard.

You can also find the installation link through the “Share app” button at the bottom left of your app’s OAuth & access scopes tab.
App status
Private apps can have two statuses:
| App status | Description |
|---|---|
 | Your app is in a draft state. It can be shared with users in the same Pipedrive company. |
 | Your app is live and can be shared with any company in Pipedrive via its direct, unlisted installation link. |
Updated 8 months ago