
Registering a public app
Requested a developer sandbox account? Ready with your app? Find out how to register your app and send it off for the app approval process.
- How do I find Developer Hub to register my app?
- What do I write in each tab of the app registration form in Developer Hub?
- Install and test your app before sending it for review
- Save your app to send it for review
How to find Developer Hub
First, go to Settings by clicking on your profile name in the upper right corner of the top navigation bar. Find the company name of your sandbox account and choose Developer Hub from the drop-down menu.

You must have a developer sandbox account for app creation to see Developer Hub. Sign up here if you don’t have one.
Register a new public app
NB: Do pick your app type carefully, as it cannot be changed later on Developer Hub.
To register a new app, click on the green “Create an app” button (or “+ Create an app” if you have existing apps) followed by “Create public app”. This is also where you’d see a list of your registered public and private apps if you have any.

App registration form
The app registration form for public apps is divided into two categories containing seven different tabs.
You can save your app anytime by clicking the green “Save” button. To exit the form and return to your Developer Hub dashboard, click the left-pointing arrow next to your app's name.
Read on to find out how and what to fill in each tab.
Disclaimer: The Marketplace team reserves the right to make small changes to text fields and images uploaded to the app's listing to give the best possible user experience and make the page discoverable in search. You'll be notified when something is edited.
Basic info
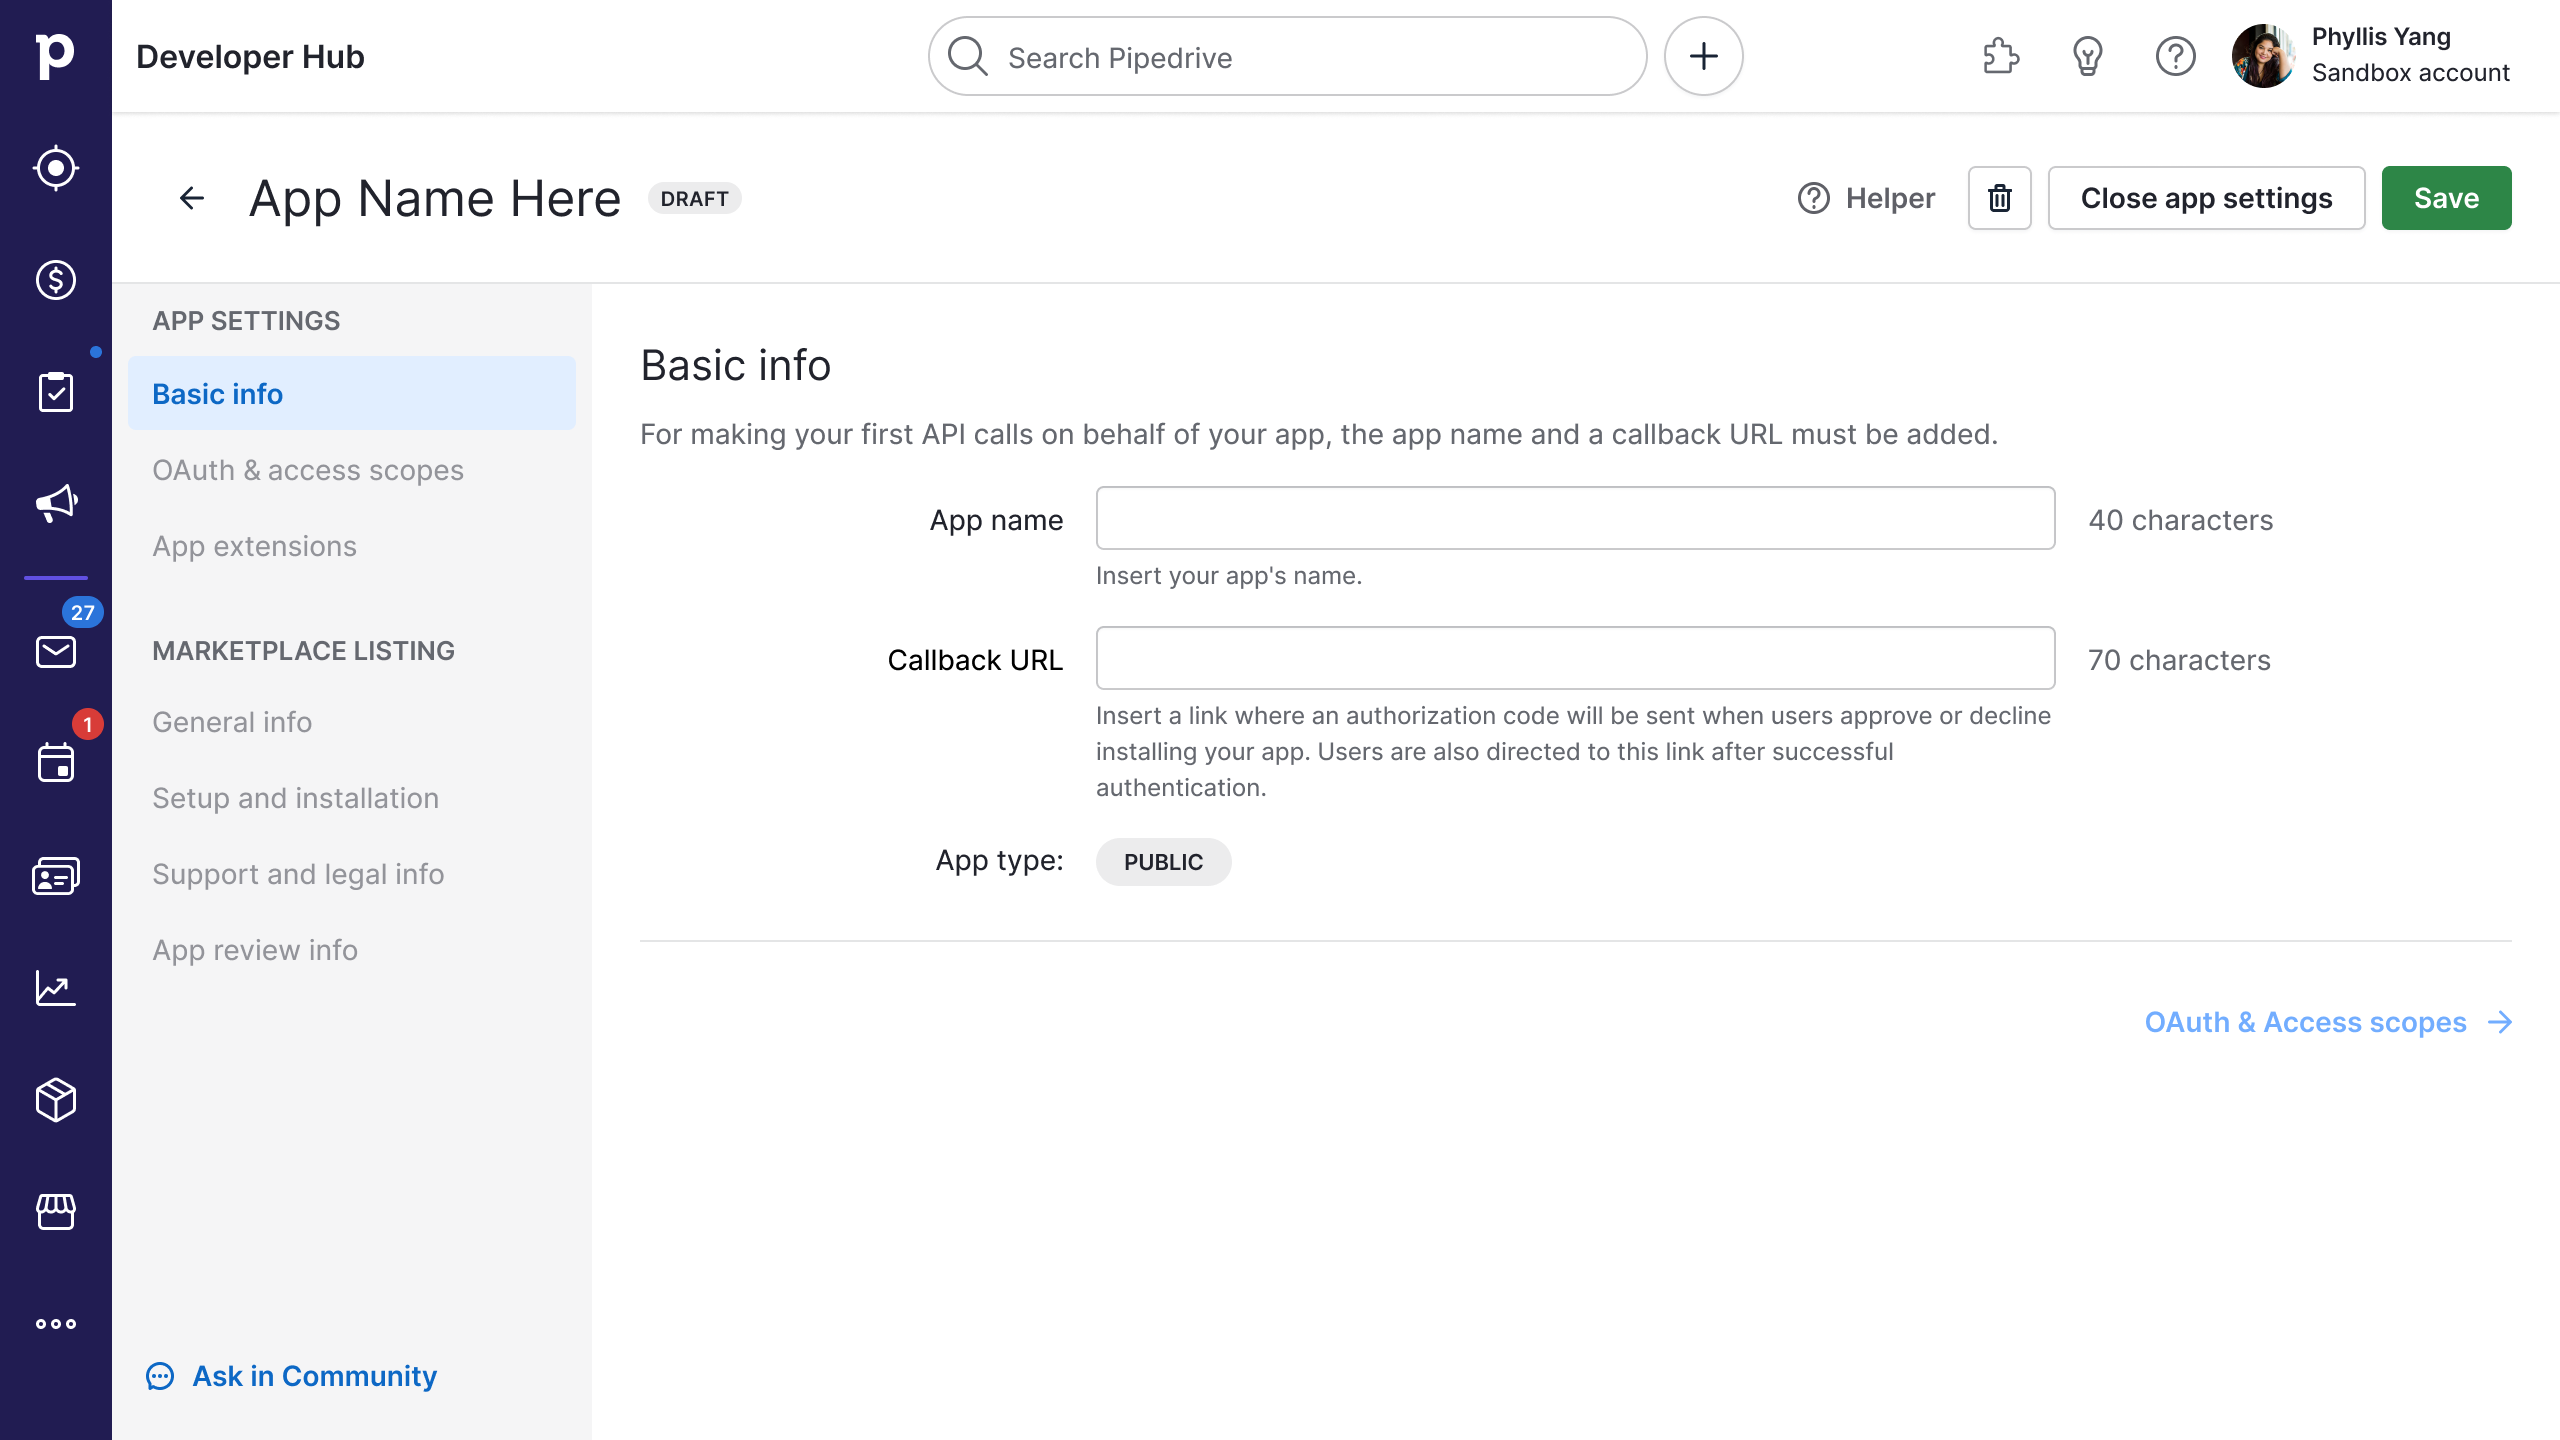
This tab has two required fields – App name and OAuth Callback URL. Once you’ve filled this in, click the green “Save” button to save the form. You’ll then automatically be brought to the second tab – “OAuth & access scopes”, where you’ll get your client_id and client_secret.
| Field | Description |
|---|---|
| App name (required) | Insert your app’s name by how it will be recognized in the Marketplace. Example: Car Services App |
| Callback URL (required, one URL per app) | Insert a link where an authorization code will be sent if the user approves or declines the installation of your app. This link is also where we return the user after successful authentication. Technically, a callback URL is the same thing as an OAuth It’s okay to insert a non-functioning URL when creating a new app if you can update this field with a proper URL after implementing the logic needed to accept user authorization in your code. Please keep in mind that we allow only one callback URL per app. |
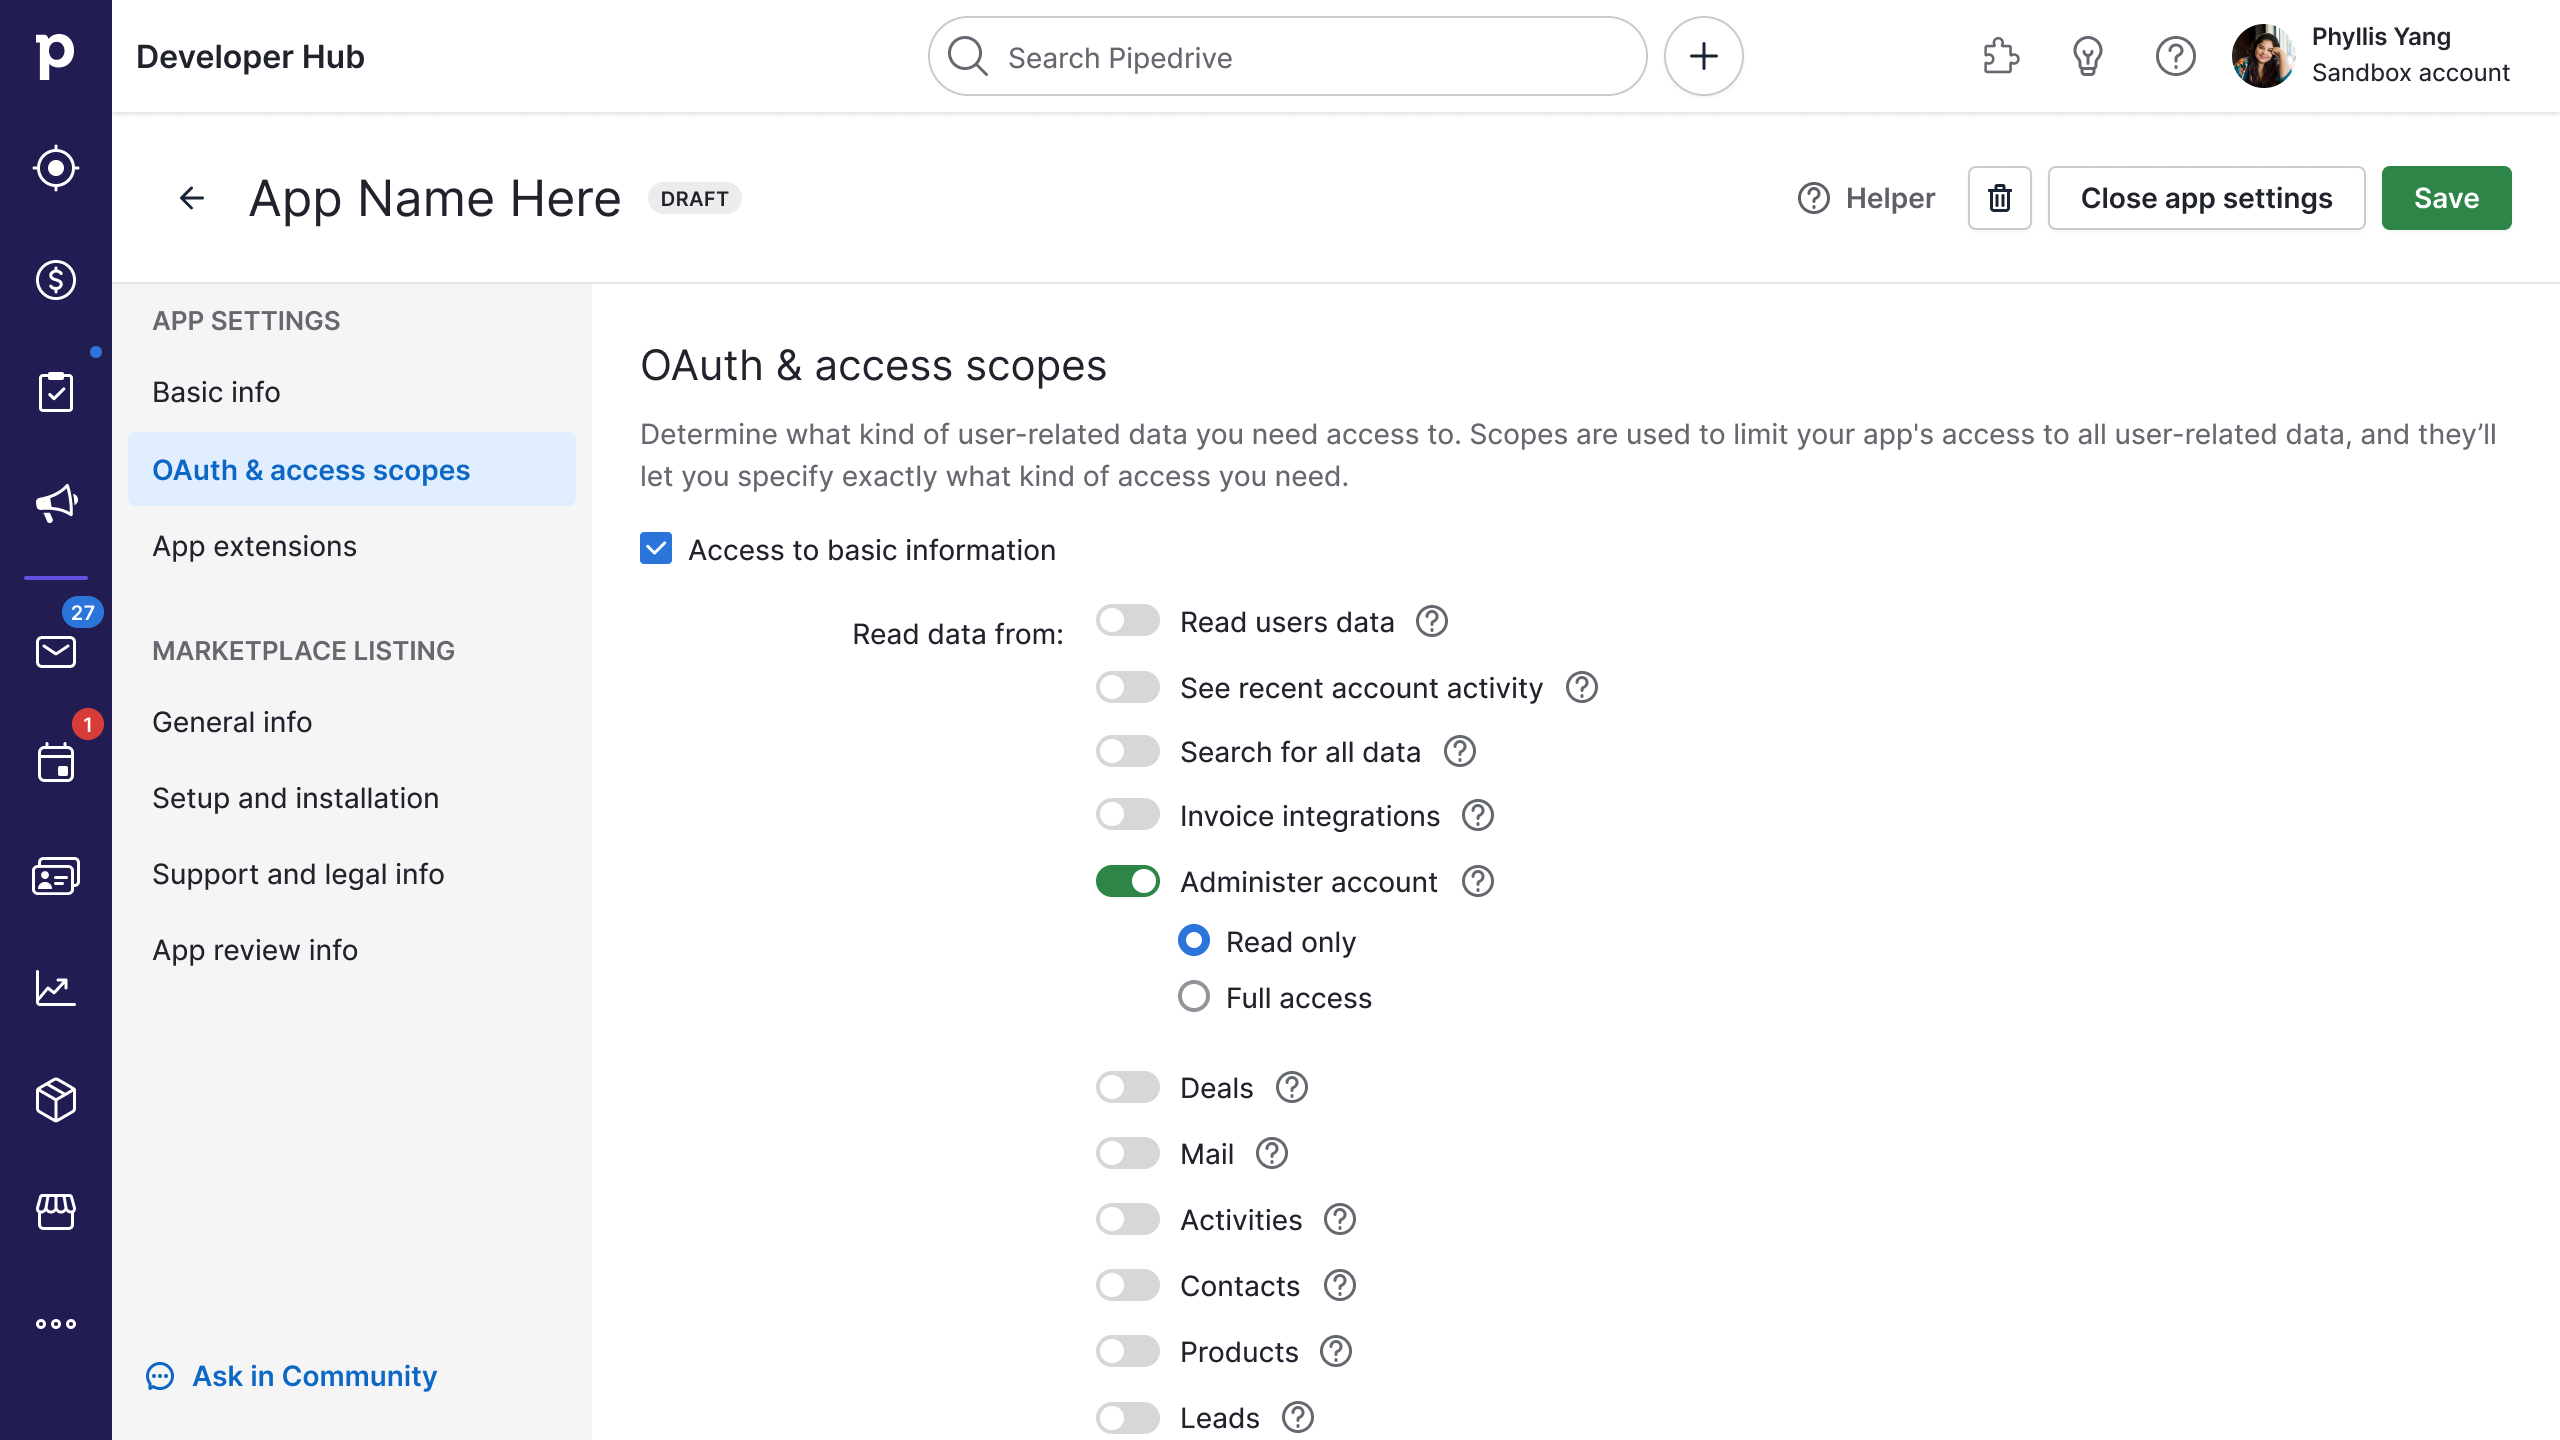
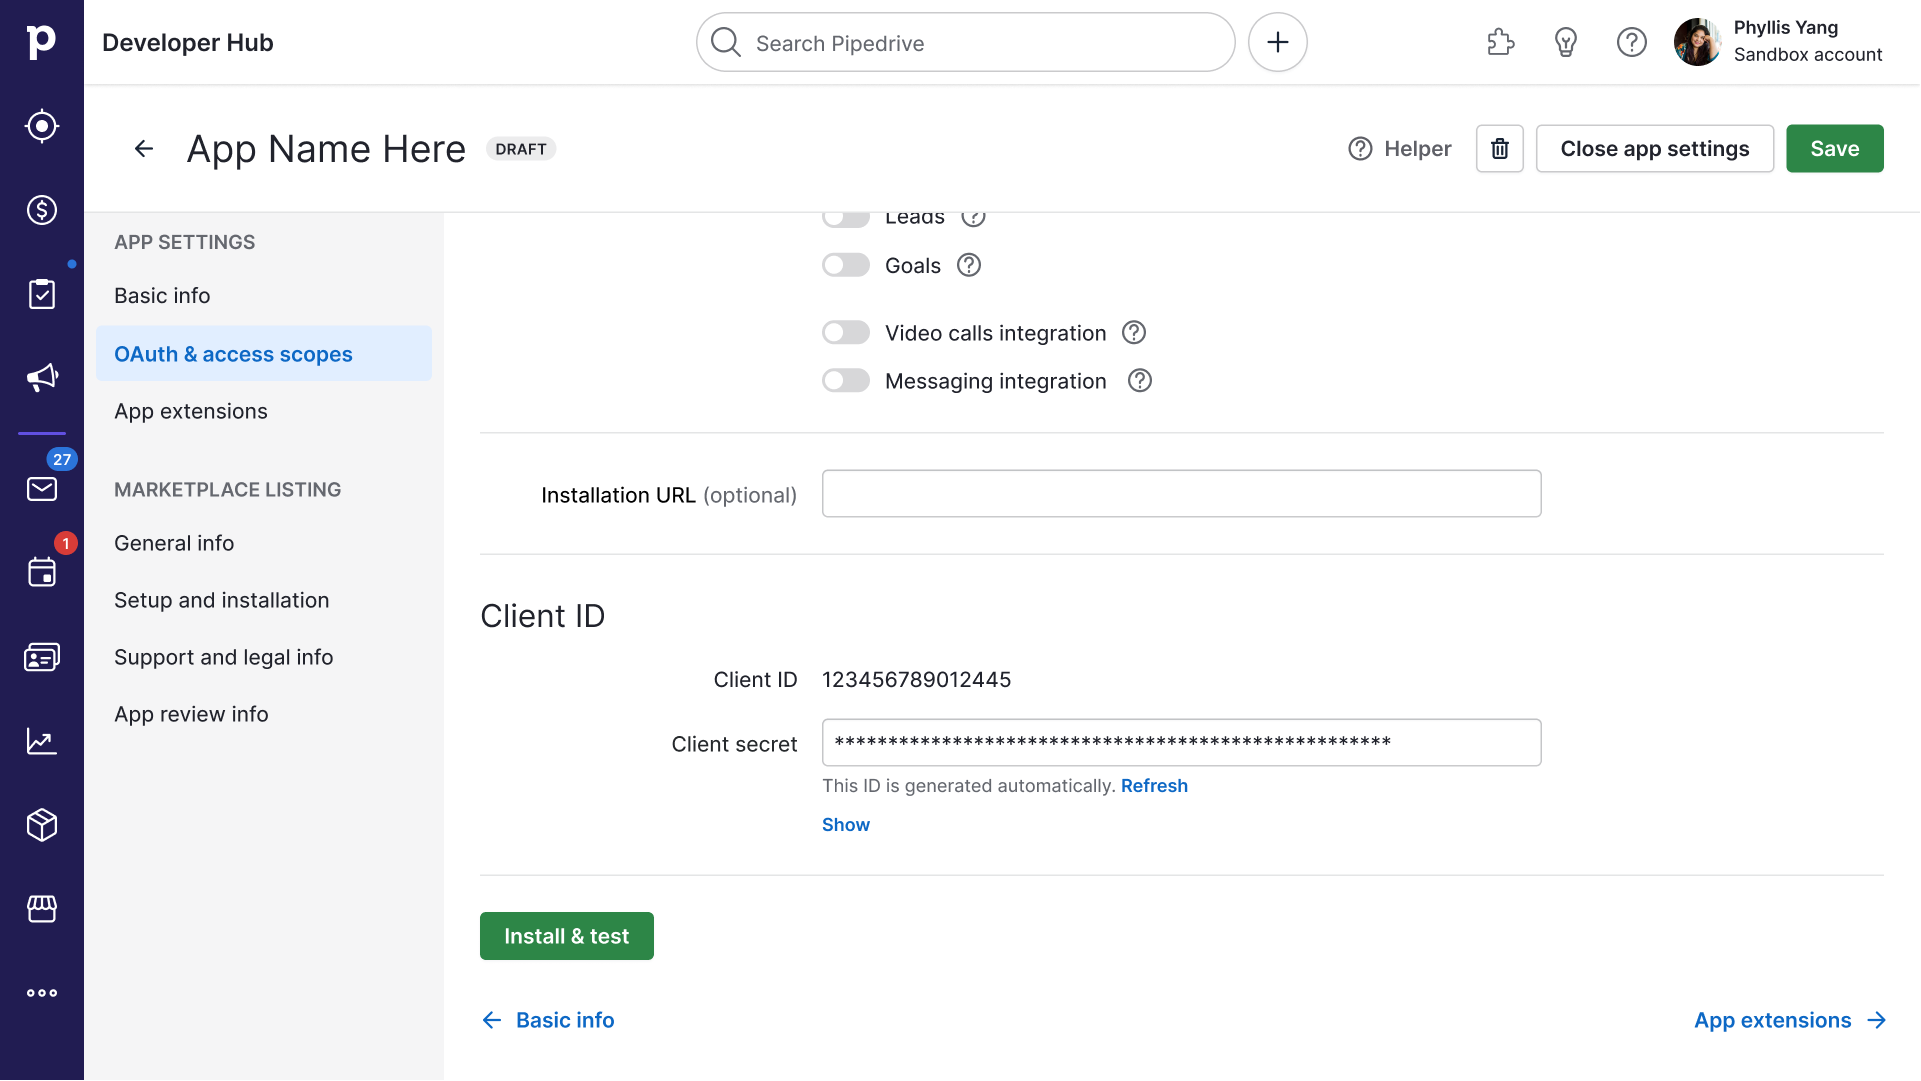
OAuth & access scopes
| Field | Description |
|---|---|
| Access scopes (required) | Using scopes, you can specify precisely what data access your application needs. Your selection will depend significantly on the endpoints you use in your app. You can also select the respective scope in this section if you are building a manifest-based app extension. Example: |
| Installation URL | This is where you can add an optional URL to which users will be redirected when clicking the “Proceed to Install” button in the marketplace listing page. Use it when you need to start app authorization outside of the Marketplace, redirect users to a custom landing page, or implement the state parameter for additional security. |
| Client ID | This is where you will get your app’s unique client_id and client_secret for OAuth authorization. |
The user has the option to either accept or deny all scopes. Because of this, it’s a good idea to build apps that only request necessary scopes for your particular use case.
Once you’ve completed filling up the Basic info and OAuth & access scopes, we advise you to start installing your app and testing it to see how it works. You can do so by clicking on the green “Install & test” button in the bottom left of the tab.
App extensions
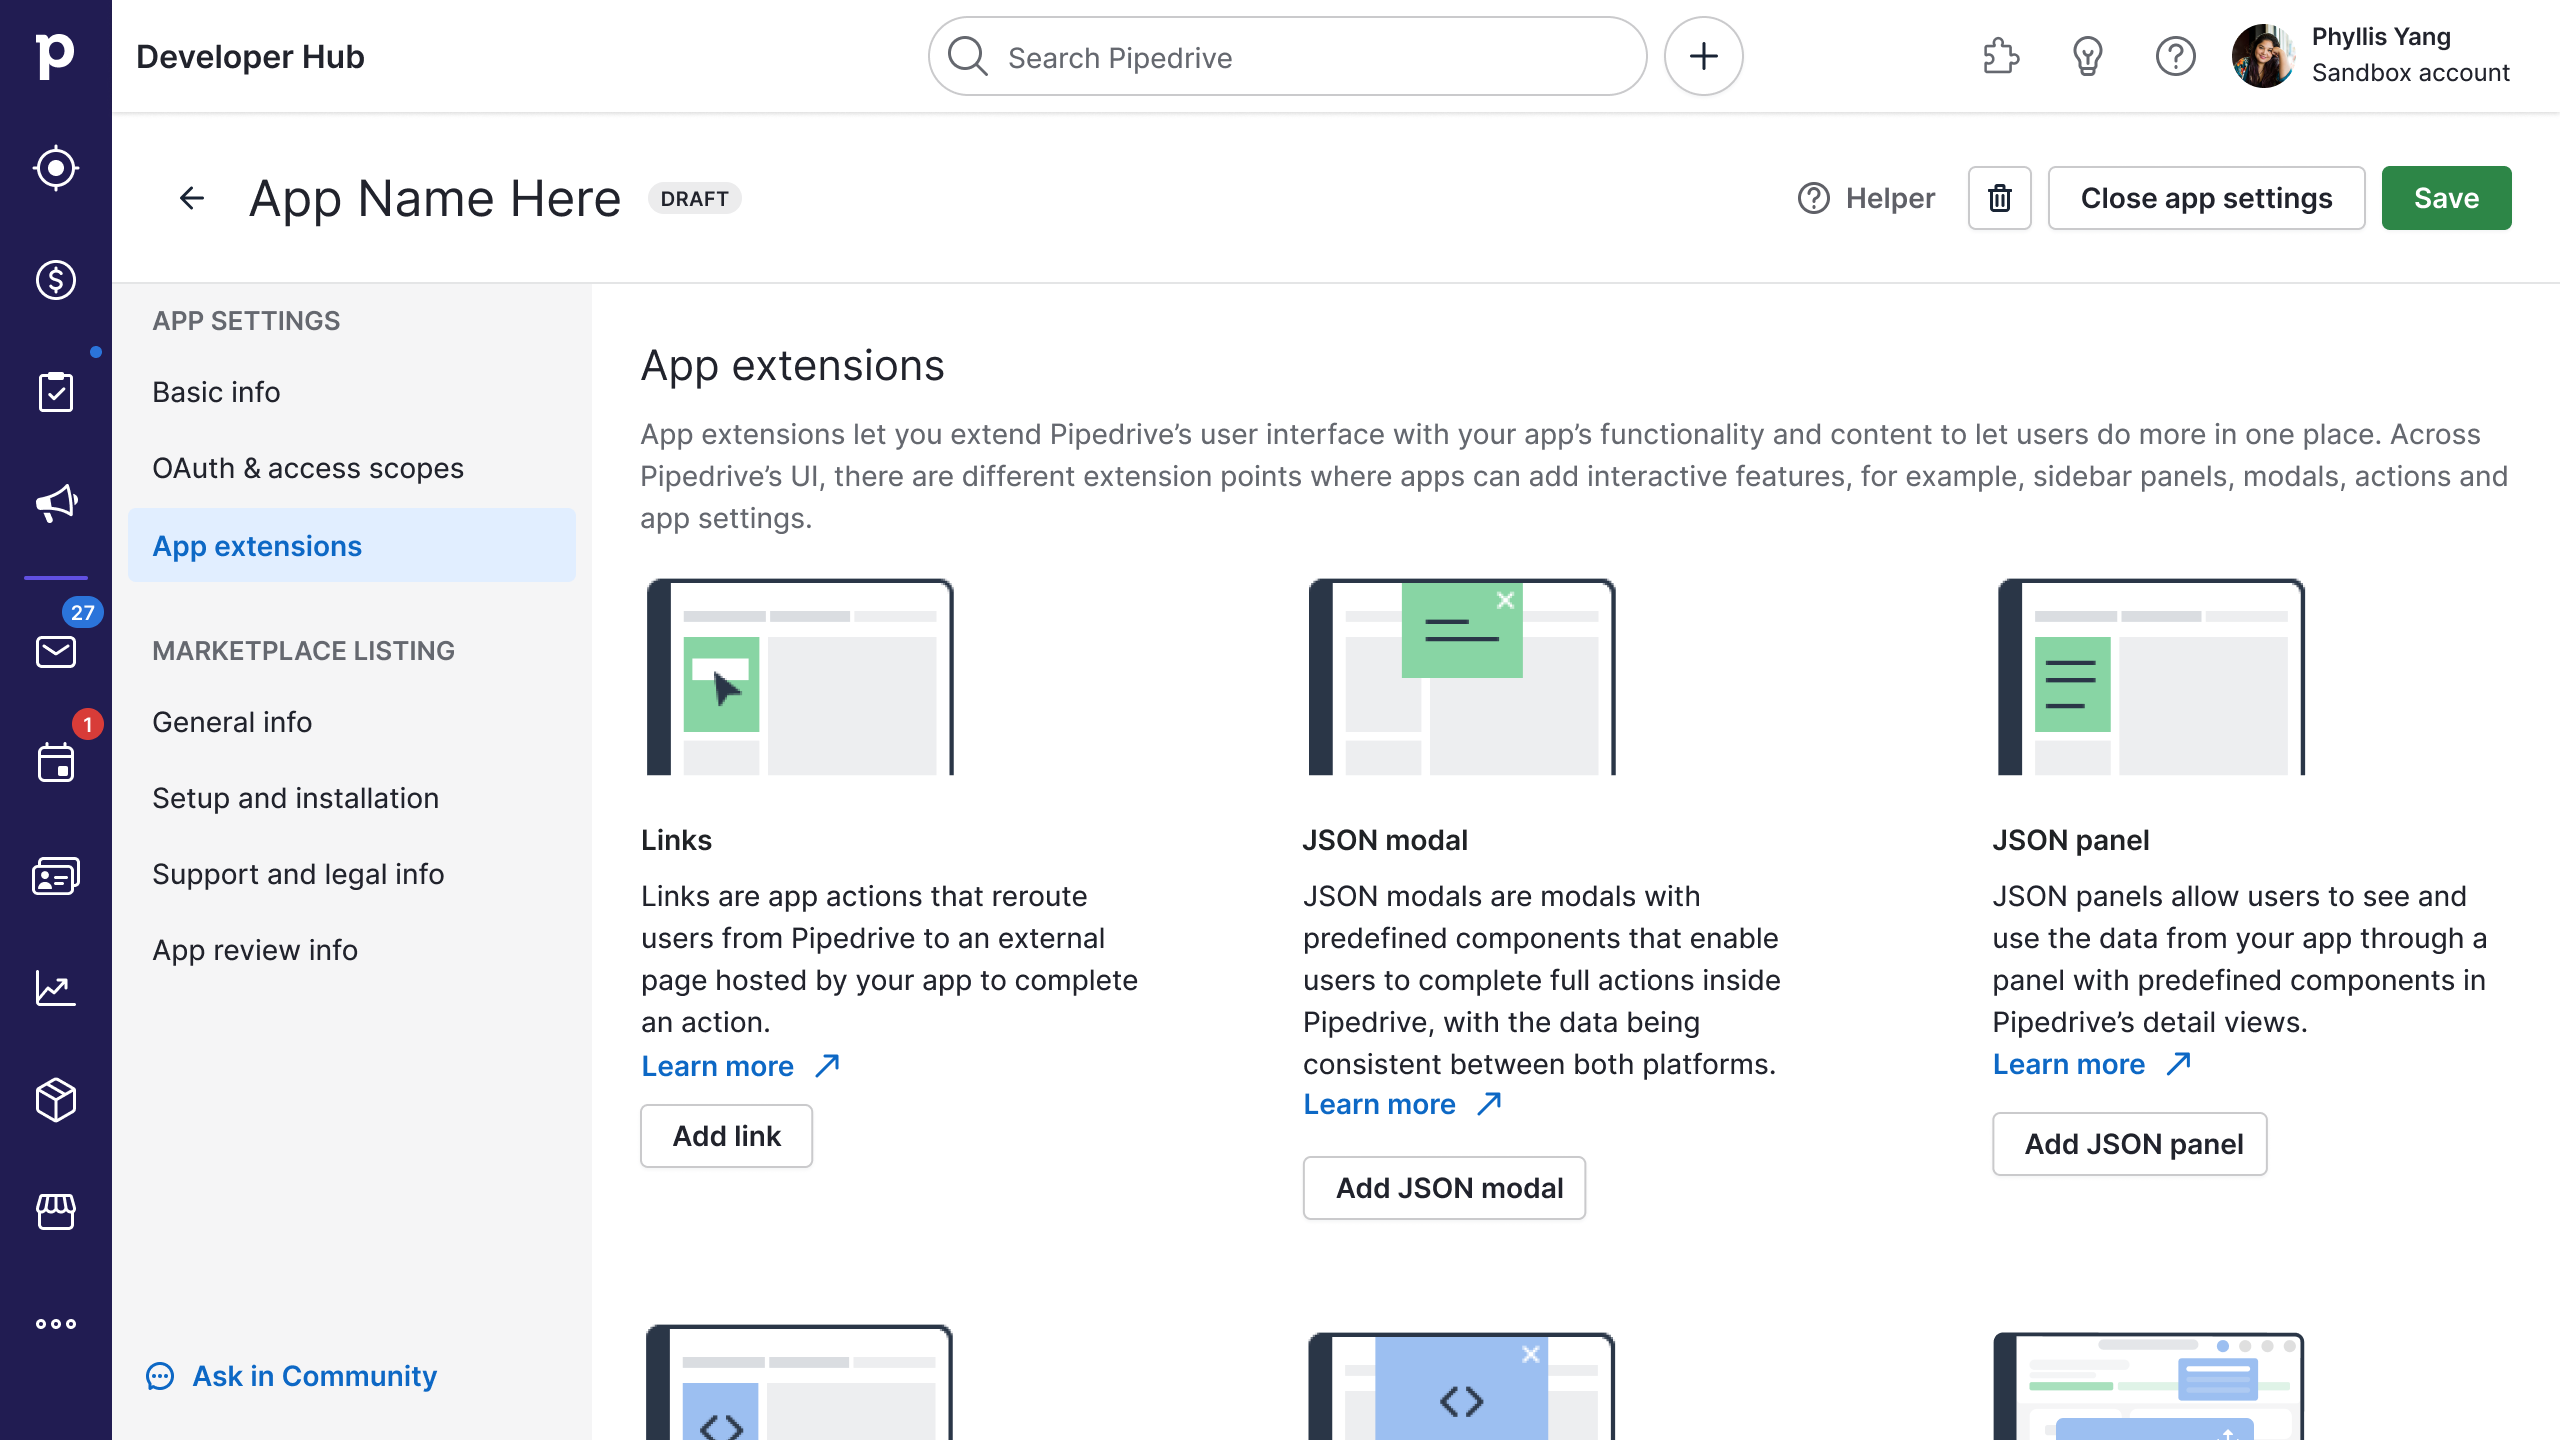
App extensions let you extend Pipedrive’s user interface with your app’s functionality and content to let users do more in one place. Find out more about them here.
Within Developer Hub, the app extensions tab is where you can add new app extensions and manage the ones you’ve added before. A modal with an app extension creation form will open when you click the button to add the respective app extension.
Link actions
Learn more here.
| Field | Description |
|---|---|
| Action name (required) | Insert your app action’s name that will be displayed in the Pipedrive UI. The name should be short, descriptive of the app action, and be in a sentence-case format. Example: Send quote - Car Services |
| Action description | To showcase the interactive features of your app, your action’s name and description will appear in the Features section of your Marketplace app listing. Use the description field to let users know what they can do with this action. Optional; max 150 characters. |
| URL link (required) | Add the URL that will redirect the user to the correct app page when an action is clicked. The URL must handle both scenarios of the user being logged into your app and not being logged in. |
| JWT secret | If left empty, client_secret will be used by default. |
| Locations (one required) | Specify in which views the app action will be displayed. There can be a maximum of 3 app actions per app or custom modals in one view, altogether 21 (7 different views x 3 actions per view). Example: |
JSON modals
Learn more here.
| Field | Description |
|---|---|
| Action name (required) | The name of the JSON modal. The name should be short (max 30 characters), actionable, and sentence-cased (only capitalize the first word). Example: + Prod. details - Car Services |
| Action description | To showcase the interactive features of your app, your action’s name and description will appear in the Features section of your Marketplace app listing. Use the description field to let users know what they can do with this action. Optional; max 150 characters. |
| API endpoint (required) | All API requests related to this action will be sent to this URL. |
| JWT secret | If left empty, client_secret will be used by default. |
| JSON schema (required) | The JSON schema for your JSON modal. |
| Locations (one required) | There can be a maximum of 3 app actions or custom modals per location. Each app can have a total of 21 app actions. See more available locations in app actions’ visibility. Example: Deal details |
JSON panels
Learn more here.
| Field | Description |
|---|---|
| Panel name (required) | Insert your JSON panel’s name that will be displayed in the Pipedrive UI. The JSON panel’s name should be descriptive and have a maximum of 30 characters. Example: Car PM – Car Services |
| Panel description | To showcase the interactive features of your app, your panel’s name and description will appear in the Features section of your Marketplace app listing. Use the description field to let users know what they can do within this panel. Optional; max 150 characters. |
| API Endpoint (required) | The URL of the endpoint which we’ll use to fetch the data of the object properties |
| HTTP Auth username (required) and HTTP Auth password (required) | Our service will send the HTTP request with these credentials as the Basic Authentication header to protect your data. To protect your data, we strongly recommend using authenticated HTTPS requests. Note that we do not support self-signed certificates. |
| JWT secret | JWT is required if HTTP Auth is not provided. |
| JSON data structure (required) | A JSON file that describes the structure of your JSON panel as seen in the Pipedrive UI. See here for more information. |
| Panel locations (one required) | Choose where the panel will be displayed: Each app can have one JSON or custom panel in each location. |
Custom modals
Learn more here.
| Field | Description |
|---|---|
| Modal name (required) | The name of your custom modal. Descriptive, max 30 characters and should be sentence-cased (only capitalize the first word). |
| Modal description | To showcase the interactive features of your app, your modal’s name and description will appear in the Features section of your Marketplace app listing. Use the description field to let users know what they can do within this modal. Optional; max 150 characters. |
| Iframe URL (required) | URL of the web content to be shown within the iframe – Please ensure your iframe URL uses HTTPS |
| JWT secret | Optional. Defaults to client secret |
| Entry points | The custom modal will be shown as a link in the actions menu of the chosen entry point(s). Choose the location(s) your custom modal can be triggered from: If no entry points are selected, the only way to open a modal is via the SDK. You can have a maximum of three app extensions per location. Each app can have a total of 21 custom modals or app actions. |
Custom panels
Learn more here.
| Field | Description |
|---|---|
| Panel name (required) | The name of your custom panel. Descriptive, max 30 characters and should be sentence-cased (only capitalize the first word). |
| Panel description | To showcase the interactive features of your app, your modal’s name and description will appear in the Features section of your Marketplace app listing. Use the description field to let users know what they can do within this panel. Optional; max 150 characters. |
| Iframe URL (required) | URL of the web content to be shown within the iframe – Please ensure your iframe URL uses HTTPS |
| JWT secret | Optional. Defaults to client secret |
| Panel locations (one required) | Choose where the custom panel will be displayed: Each app can have one custom or JSON panel in each location. |
Custom floating window
Learn more here.
| Field | Description |
|---|---|
| Floating window name (required) | The name of your custom floating window. Short and precise, max 30 characters. The name will appear in the window header and Interactive Features section of your Marketplace app listing. |
| Floating window description (required) | Clearly state what users can do within the window so they know how this feature benefits them (max 150 chars). It will appear in the Interactive Features section of your Marketplace app listing. Max 150 characters. |
| Iframe URL (required) | URL of the web content to be shown within the iframe – Please ensure your iframe URL uses HTTPS |
| JWT secret | Optional. Defaults to client secret |
| Entry points | A custom floating window has two entry points: Limited to 1 floating window per app regardless of the entry point. |
App settings page
Learn more here.
| Field | Description |
|---|---|
| Type | Choose how you want your app’s user to access their app settings – External link – Custom UI |
| URL (required) – for external link | Add the URL that will redirect the user to your app settings page |
| Iframe URL (required) – for custom UI | URL of the web content to be shown within the iframe – Please ensure your iframe URL uses HTTPS |
| JWT Secret – for Custom UI | Optional. Defaults to client secret. |
Do install and test your app after you add app extensions to see how it works for your users.
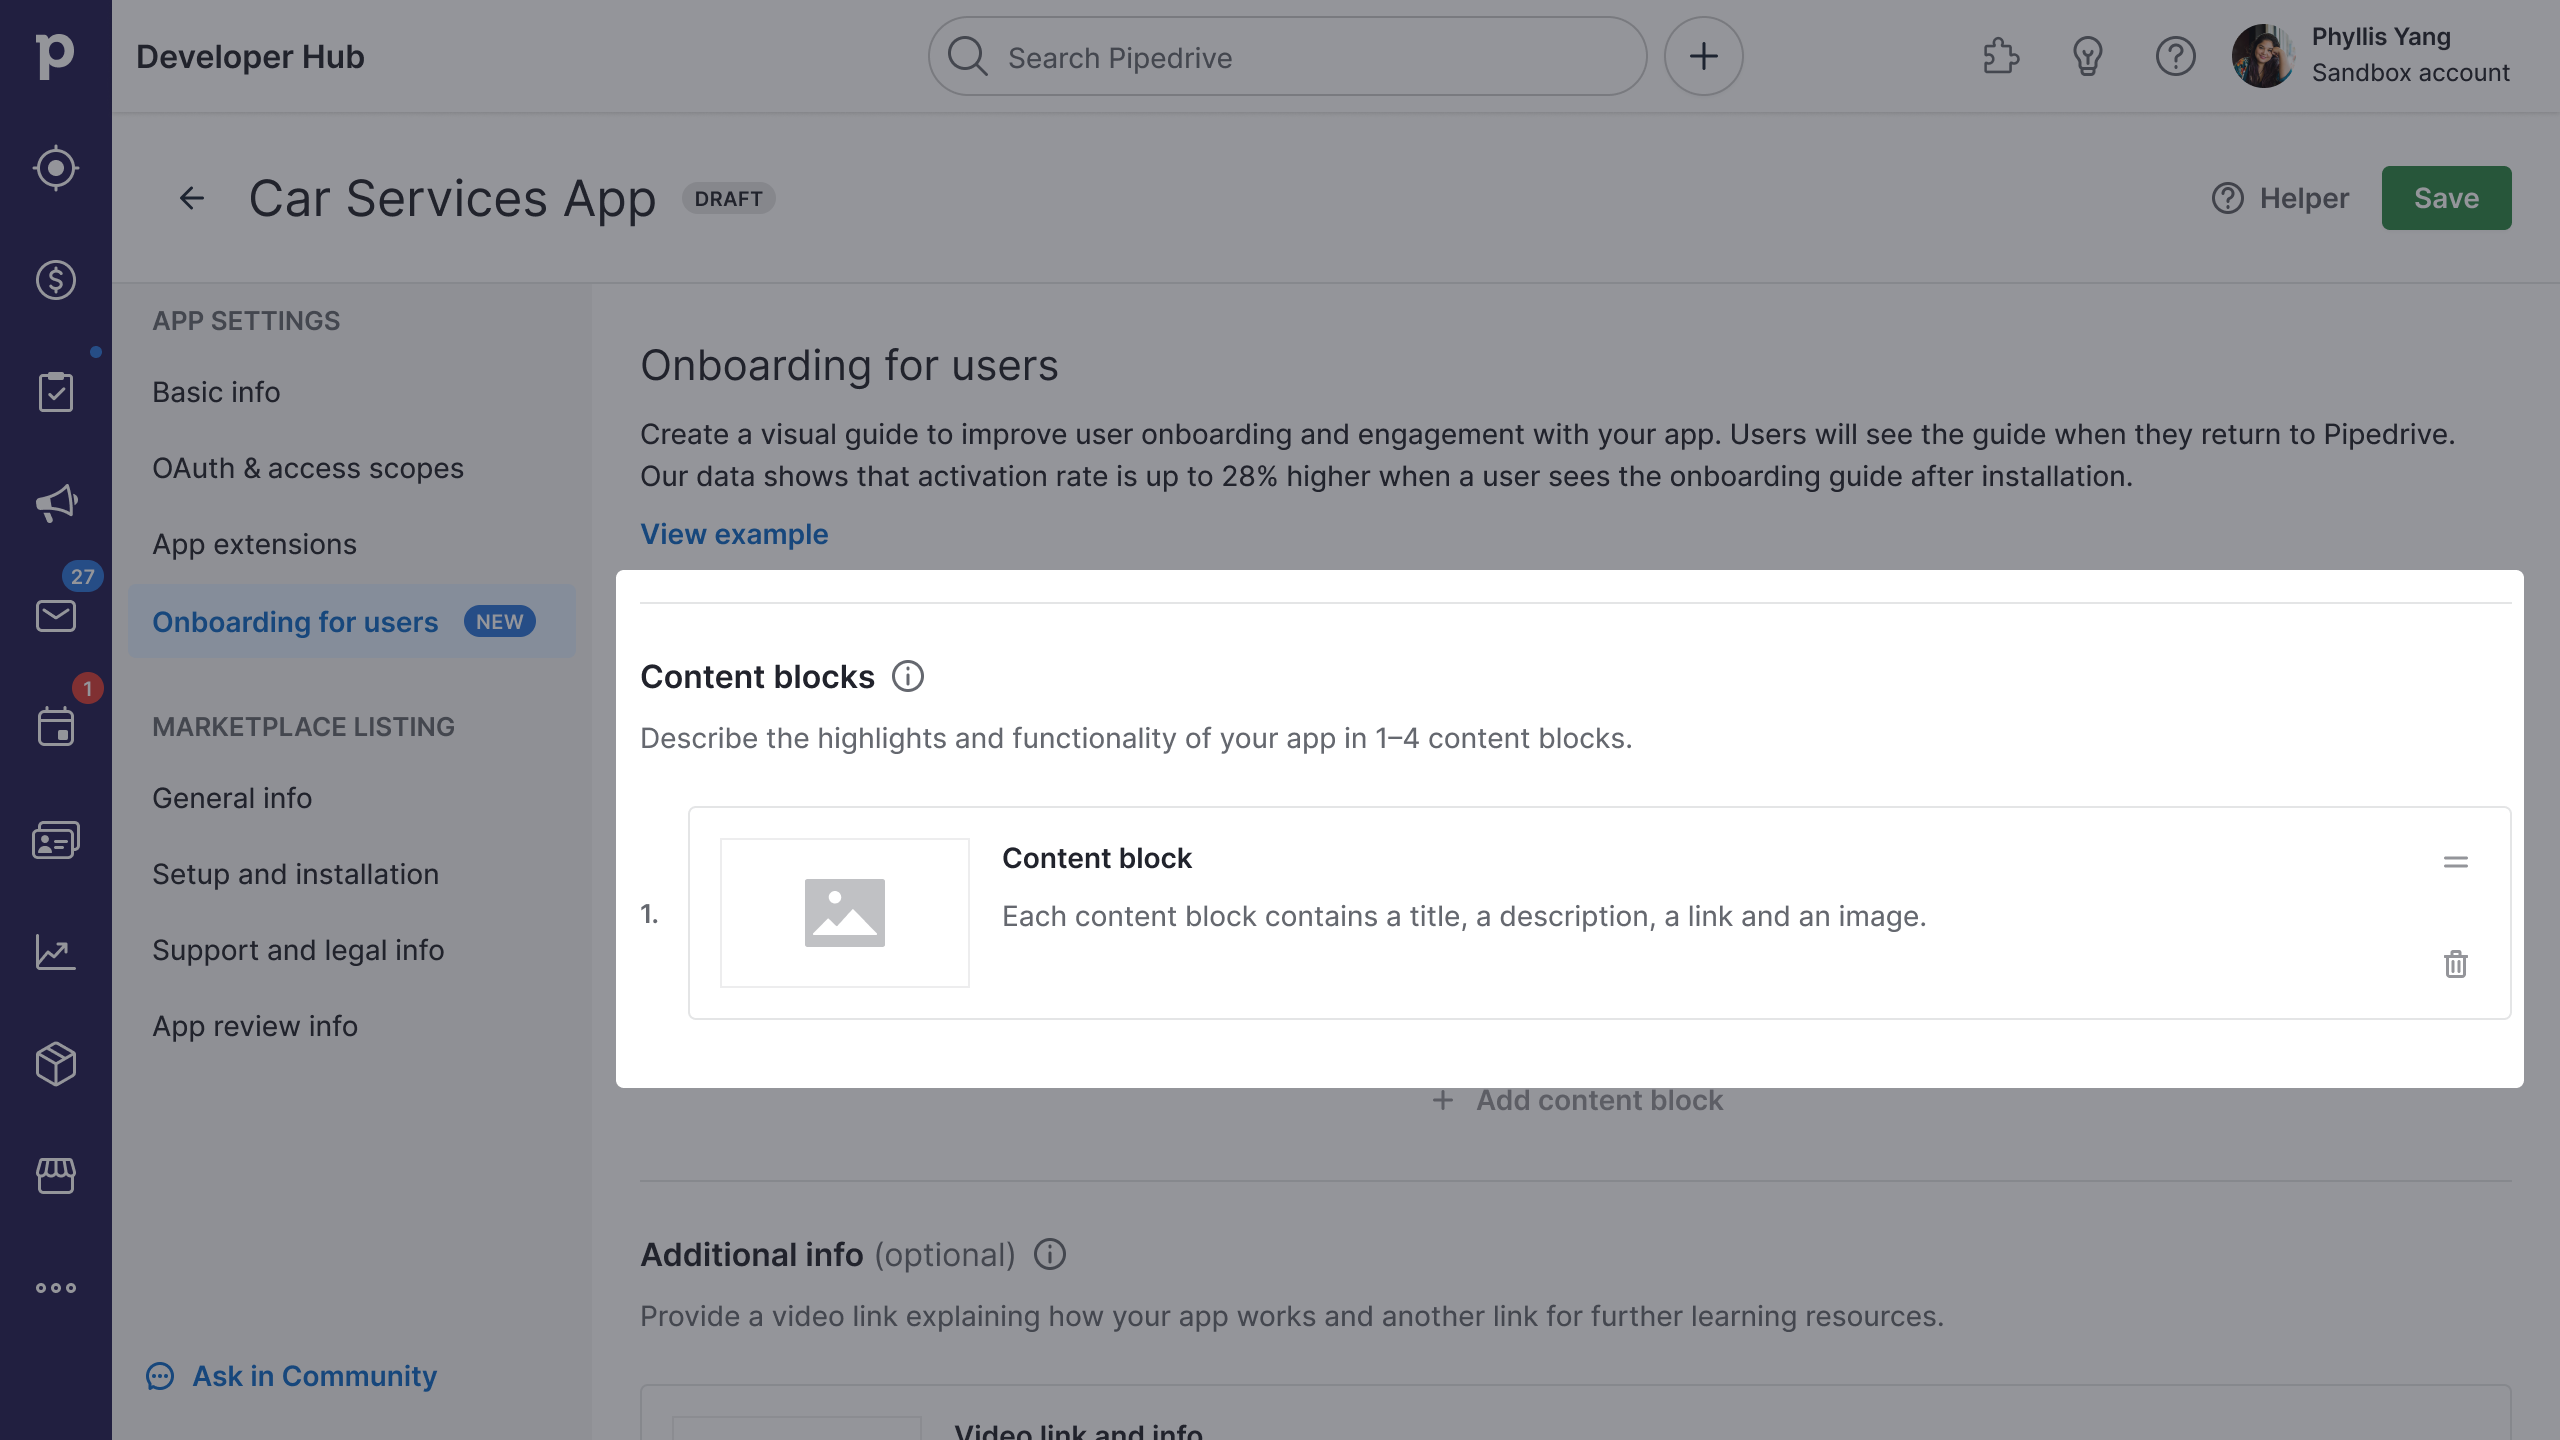
Onboarding for users
With the user onboarding guide, you can onboard users to your app with step-by-step instructions or a feature review to improve app adoption and drive more customers. The guide will appear once users install the app and return to Pipedrive (web app reload is required). Users can access the guide at any time from the app page (Settings → Tools and apps → Marketplace apps).
To publish the onboarding guide, your app needs to pass our app approval process. Once it's approved, you can edit it any time without approval process.
The guide is a separate step in the app creation flow in Developer Hub (App Settings → Onboarding for users).

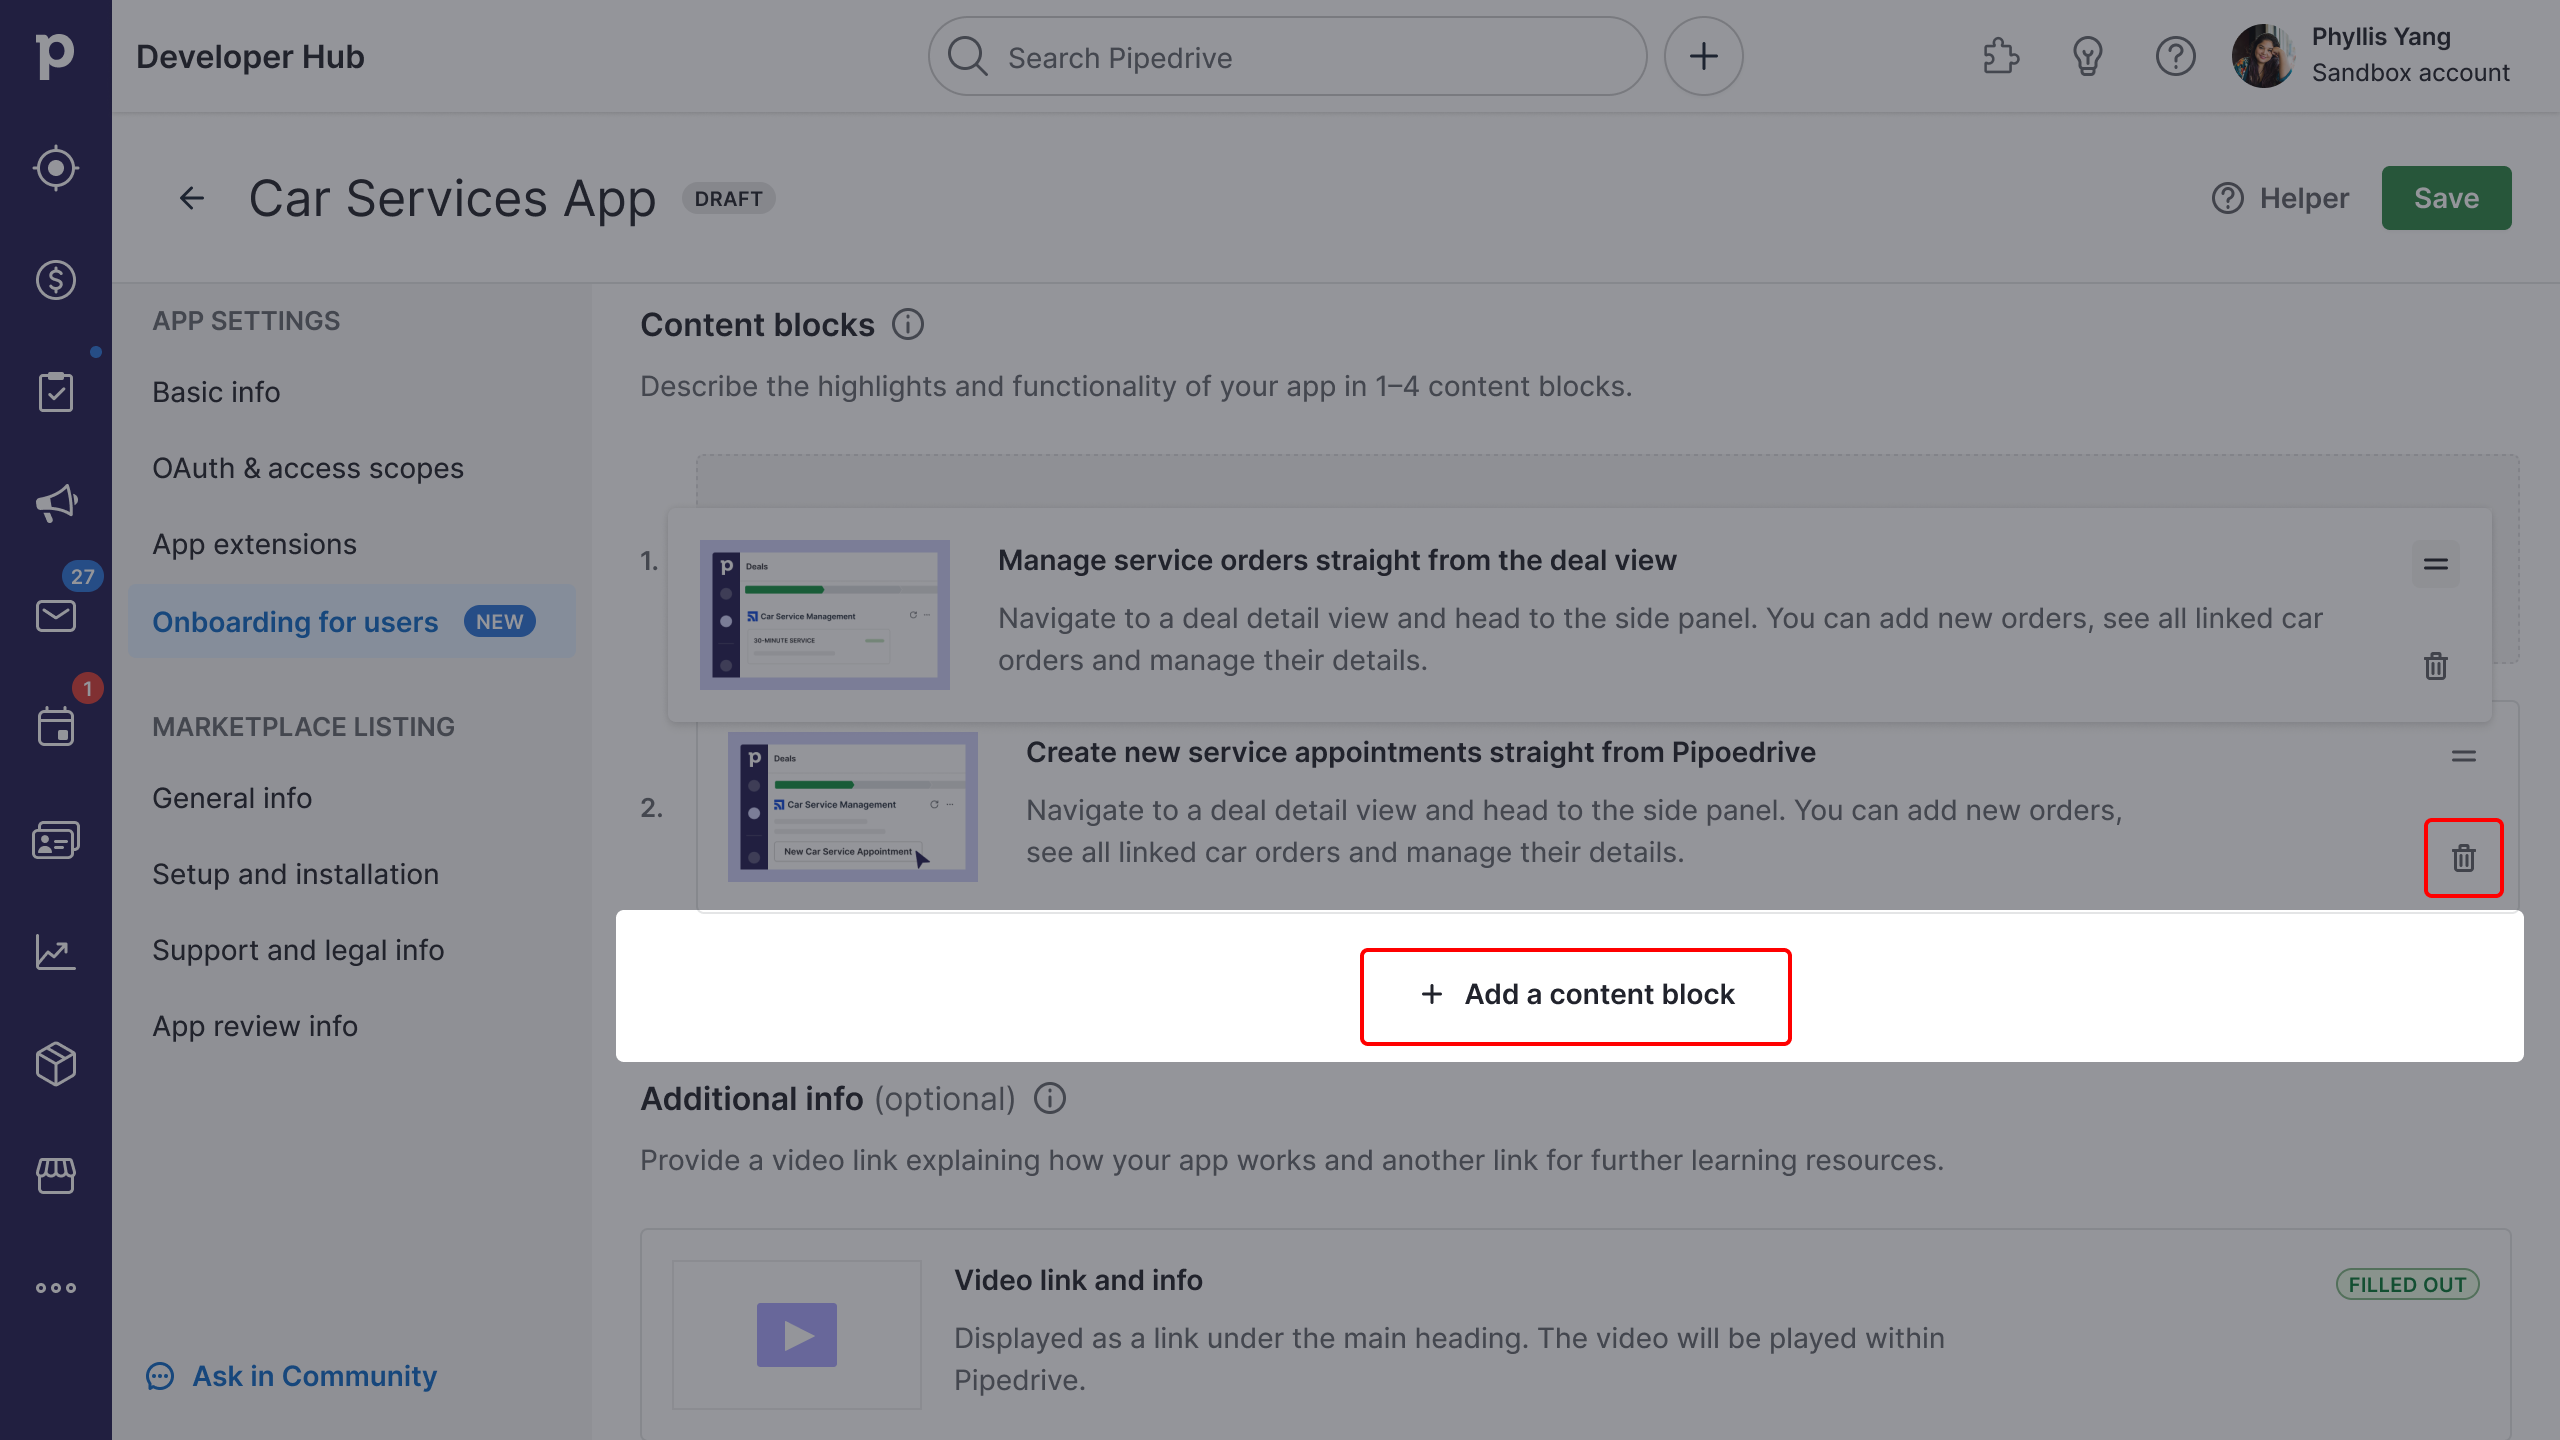
Content blocks
Use content blocks to break your guide into individual segments, either to introduce separate individual features or to guide the user through sequential steps.
Tips for content blocks:
- Make sure the guide is simple to follow.
- If your app has multiple features or steps, select the crucial ones and add a link to an in-depth guide.
- If your guide lists instructions in a specific order, pay attention to the chronological sequence.
- Use arrows to indicate a series of actions. Example: Click “Start” → Select your plan → Check the checkbox to continue.
- Update the onboarding guide when making changes to your app’s flow.
Open the content block and fill out the necessary information.
| Field | Description |
|---|---|
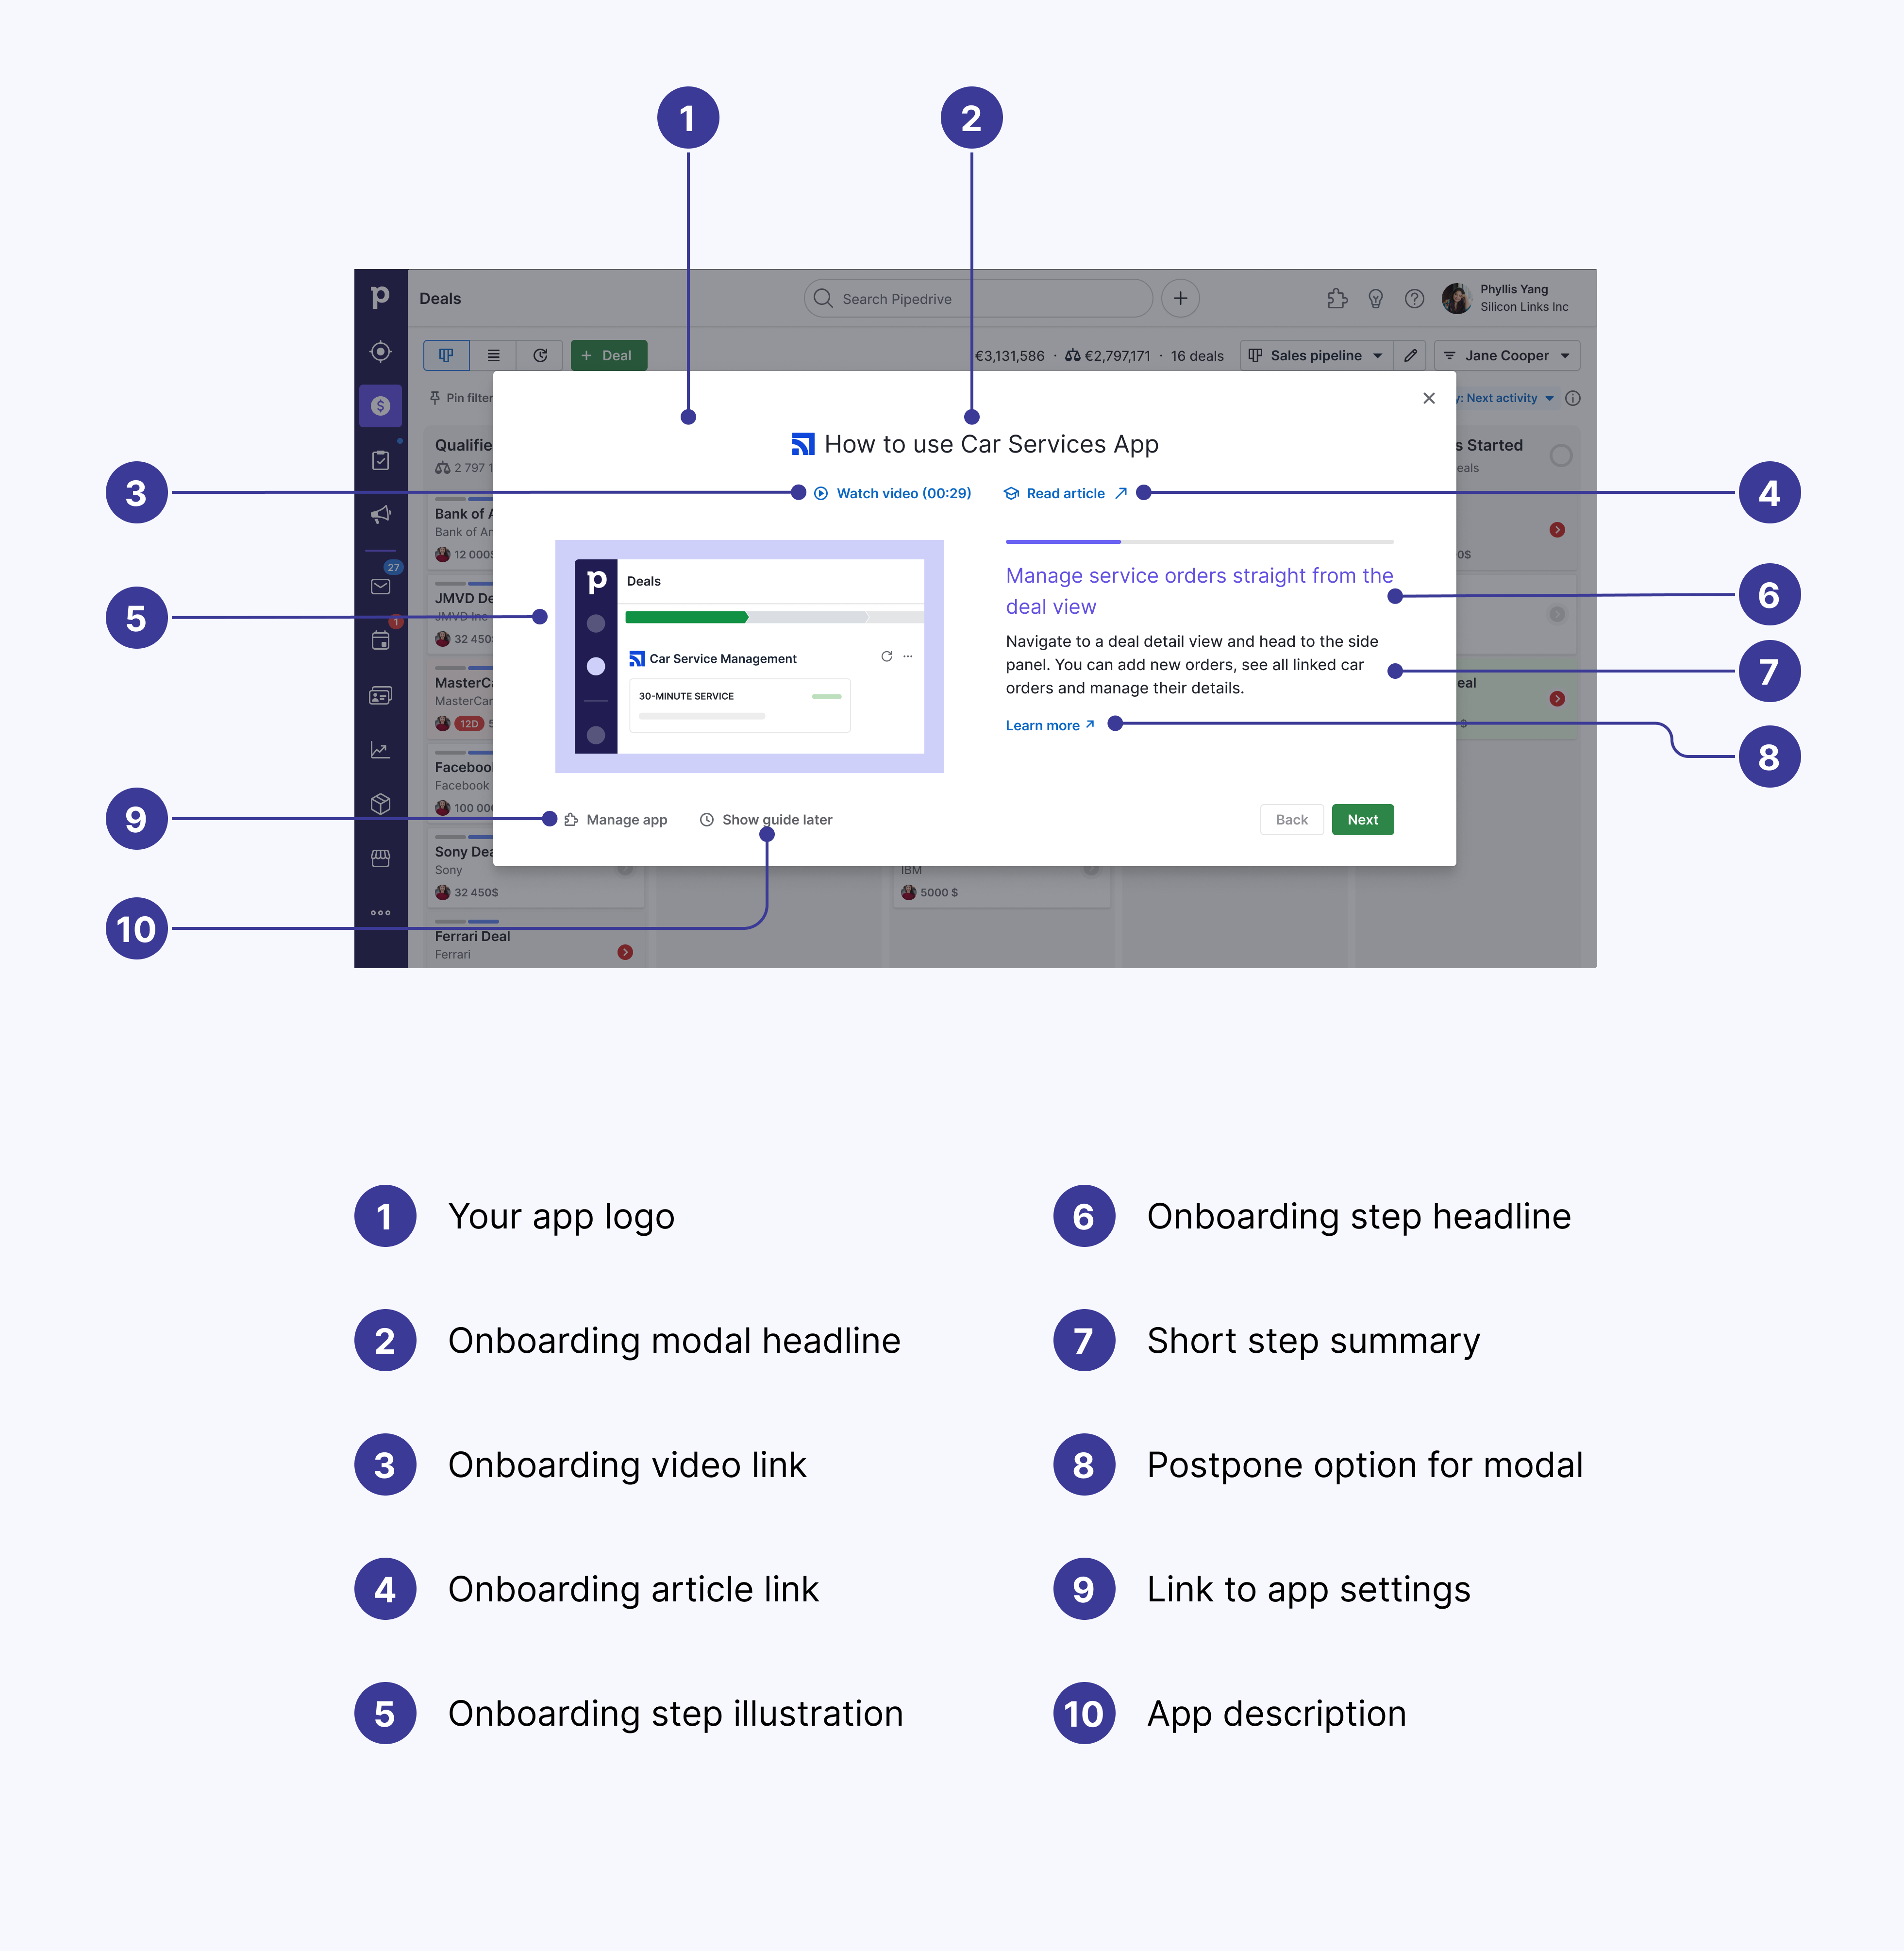
| Title | Write a short title that summarizes the functionality or onboarding step (max 70 characters). The title will appear as the text block header. Example: Manage car orders straight from the deal view |
| Description | Provide a clear and concise overview of the feature and its location or instructions for this step (max 200 characters). The text block description will appear on the modal’s main text block under the title. Example: Navigate to a deal detail view and head to the side panel. You can add new orders, see all linked car orders and manage their details |
| Learn more link (optional) | Here, you can add any additional info about this step with a link to an external page related to it. The page will open in a new tab. Example: https://support.carprojectmanagerapp.com/en/article/pipedrive-integration-setup |
| Image | Add an image to illustrate this feature or onboarding step and indicate its location on the screen. Image requirements: |
Tips for image content:
- The image should contain as little text as possible. Replace text elements with gray blocks wherever possible.
- Prioritize important information so as not to overwhelm users and keep them focused.
- Highlight crucial information with a bright color, different font weight or your own highlighting style.
- Avoid red and yellow color palettes whenever possible. These are associated with error and warning states and may disrupt and confuse users.
- Optimize image size for web content. The smaller the image size, the quicker it will load for the user.
To add an additional content block, click the “+ Add a content block” button below the list. You can include up to four blocks and change their position by dragging them up or down. You can delete any of your blocks by clicking the recycle bin icon.
Additional info
Video link and info
Tip: To improve your guide and increase app adoption, consider including an onboarding tutorial video link that will show your app’s features and functionality. The video will open within Pipedrive.

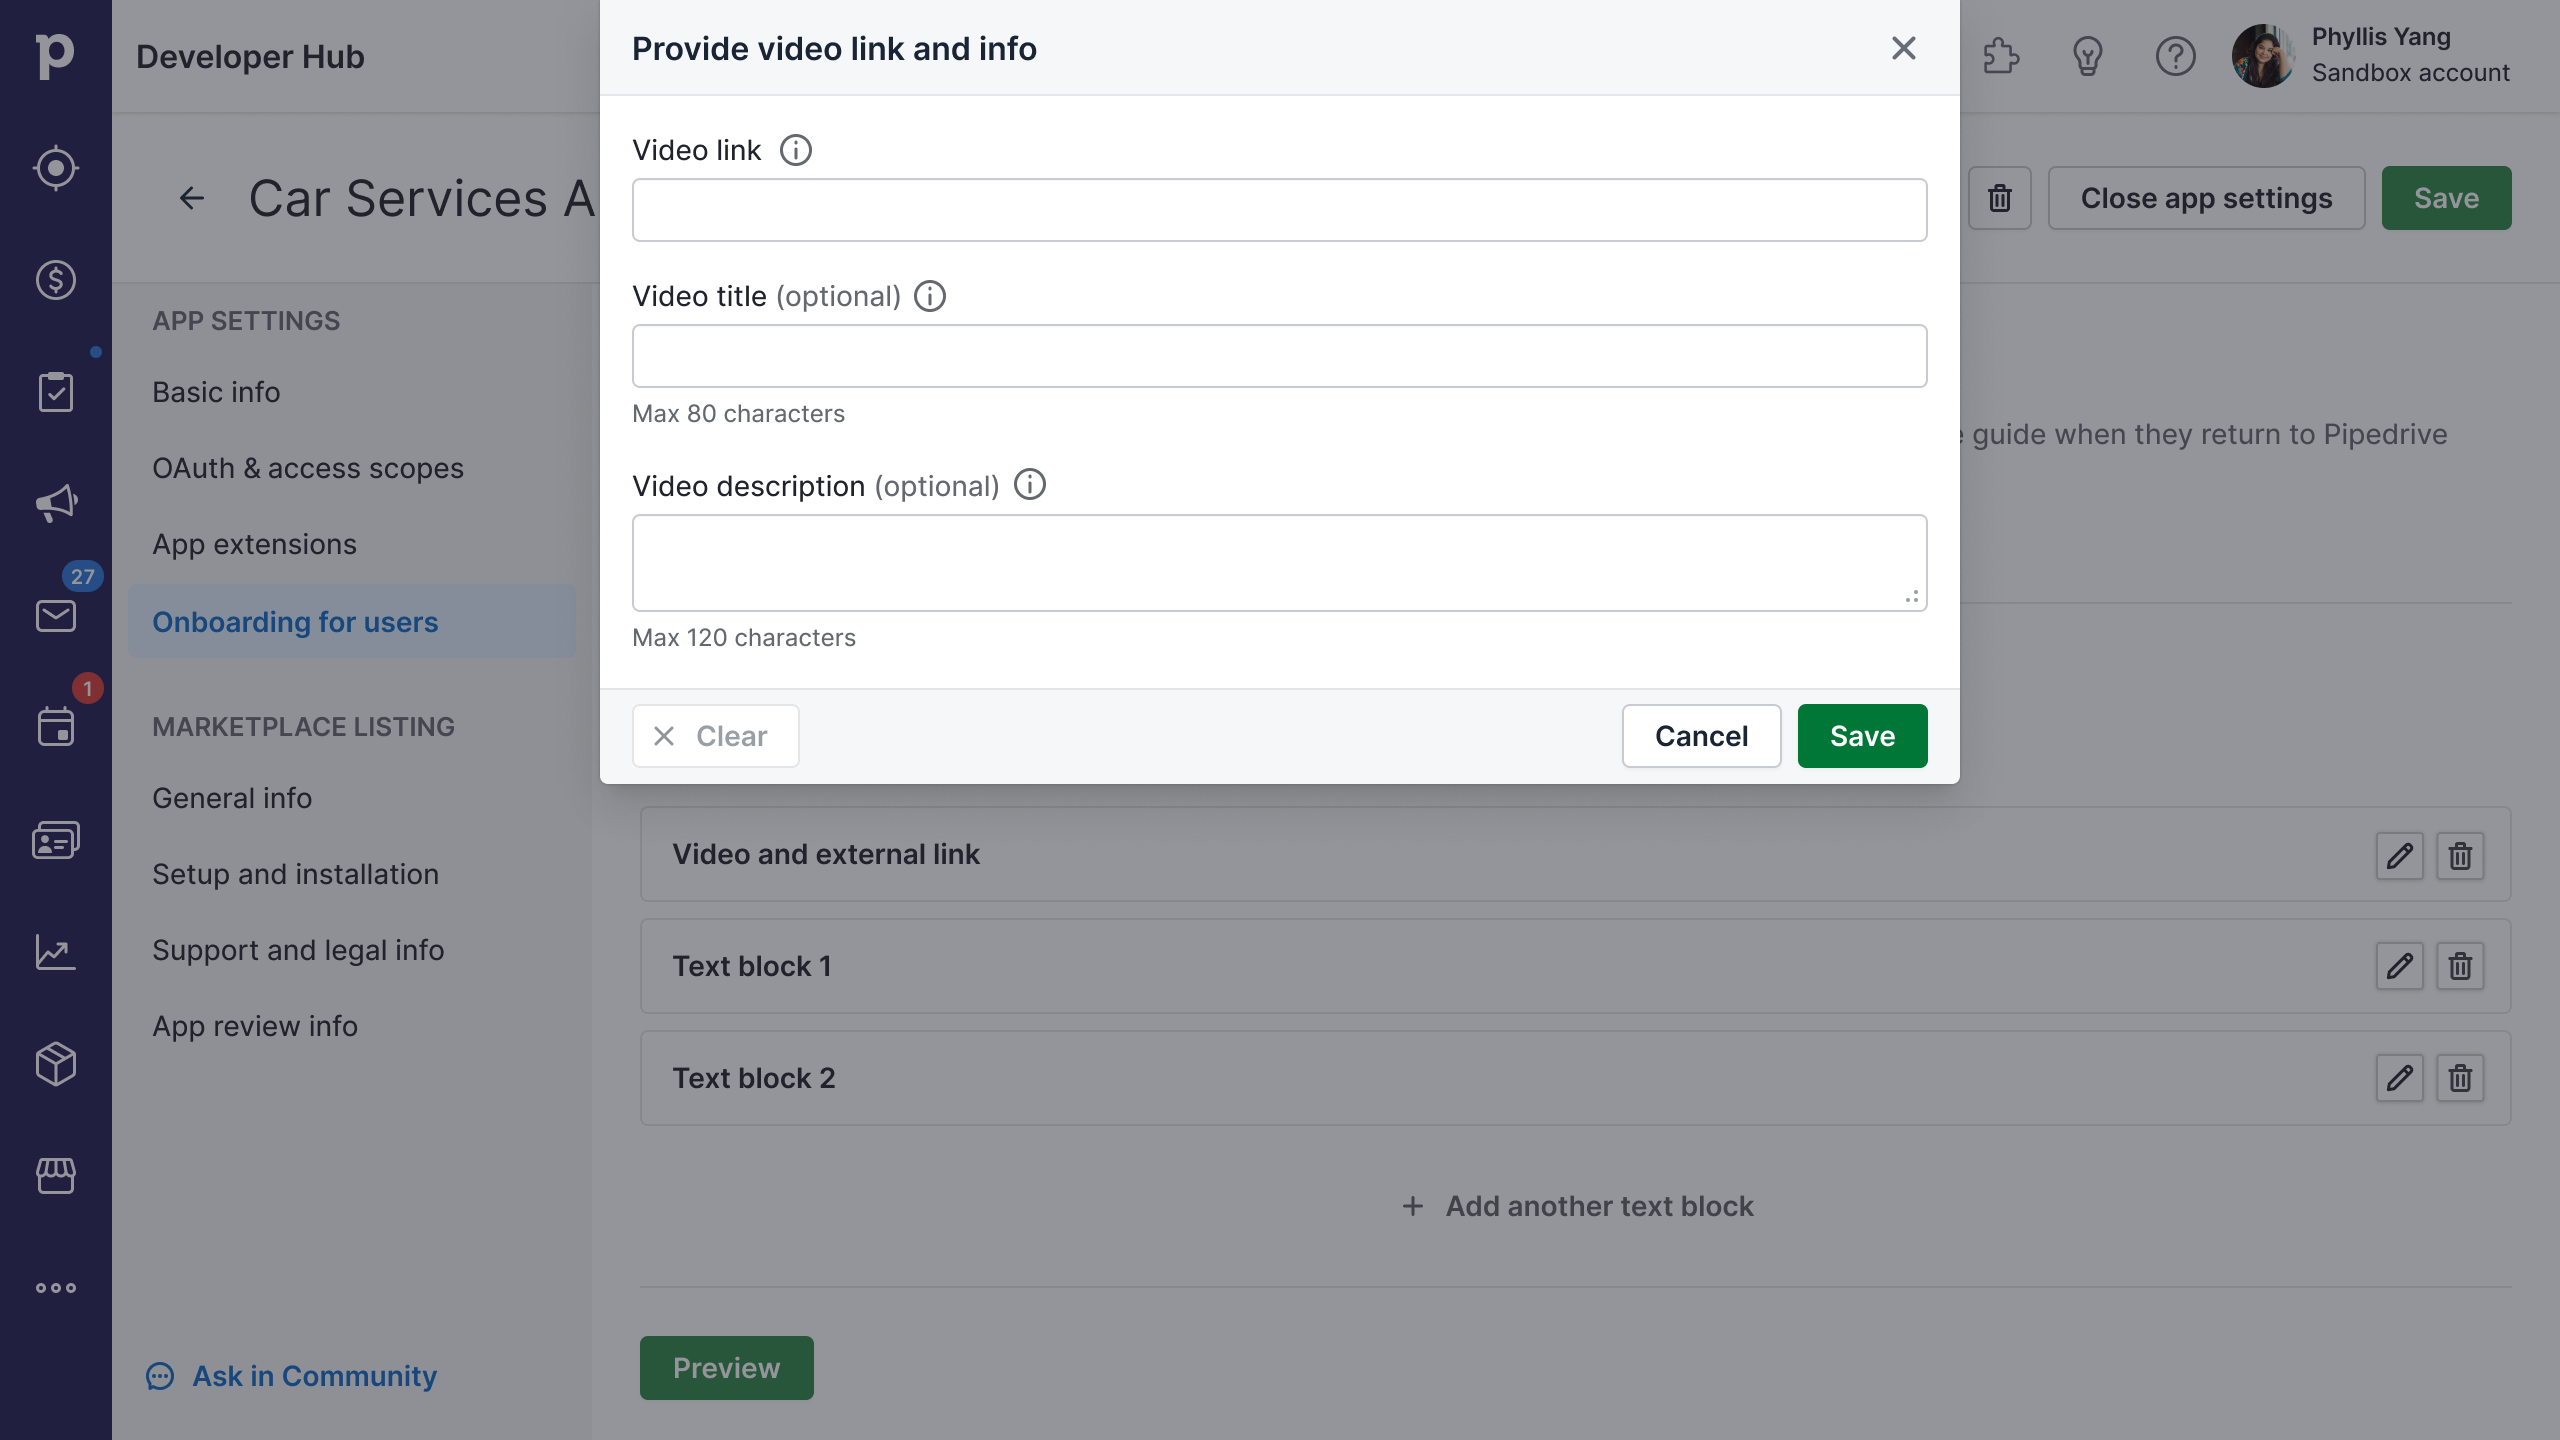
| Field | Description |
|---|---|
| Video link | The video should demonstrate your onboarding process or the most important features of your solution, helping new users get started using your tool. We currently support links to the following video hosting platforms: YouTube, Vimeo, Vidyard and Wistia. General guidelines: If your app integrates Pipedrive with another tool, your video should clearly explain your solution’s benefits and unique features. |
| Video title (optional) | The video title should be short (max 80 characters) and descriptive. It will be displayed as the text block’s title at the bottom of the video player overlay. Example: Get started with Car Project Managers app in Pipedrive |
| Video description (optional) | The video description should clearly describe the video’s content and what the viewer can gain from watching it (max 120 characters). It will be displayed as the body text block at the bottom of the video player overlay. Example: Watch this explanatory video on how to get started with this app and where to find the key functionalities. |
Learn article link
Optional: Add an onboarding article link. The article will open in a new tab.
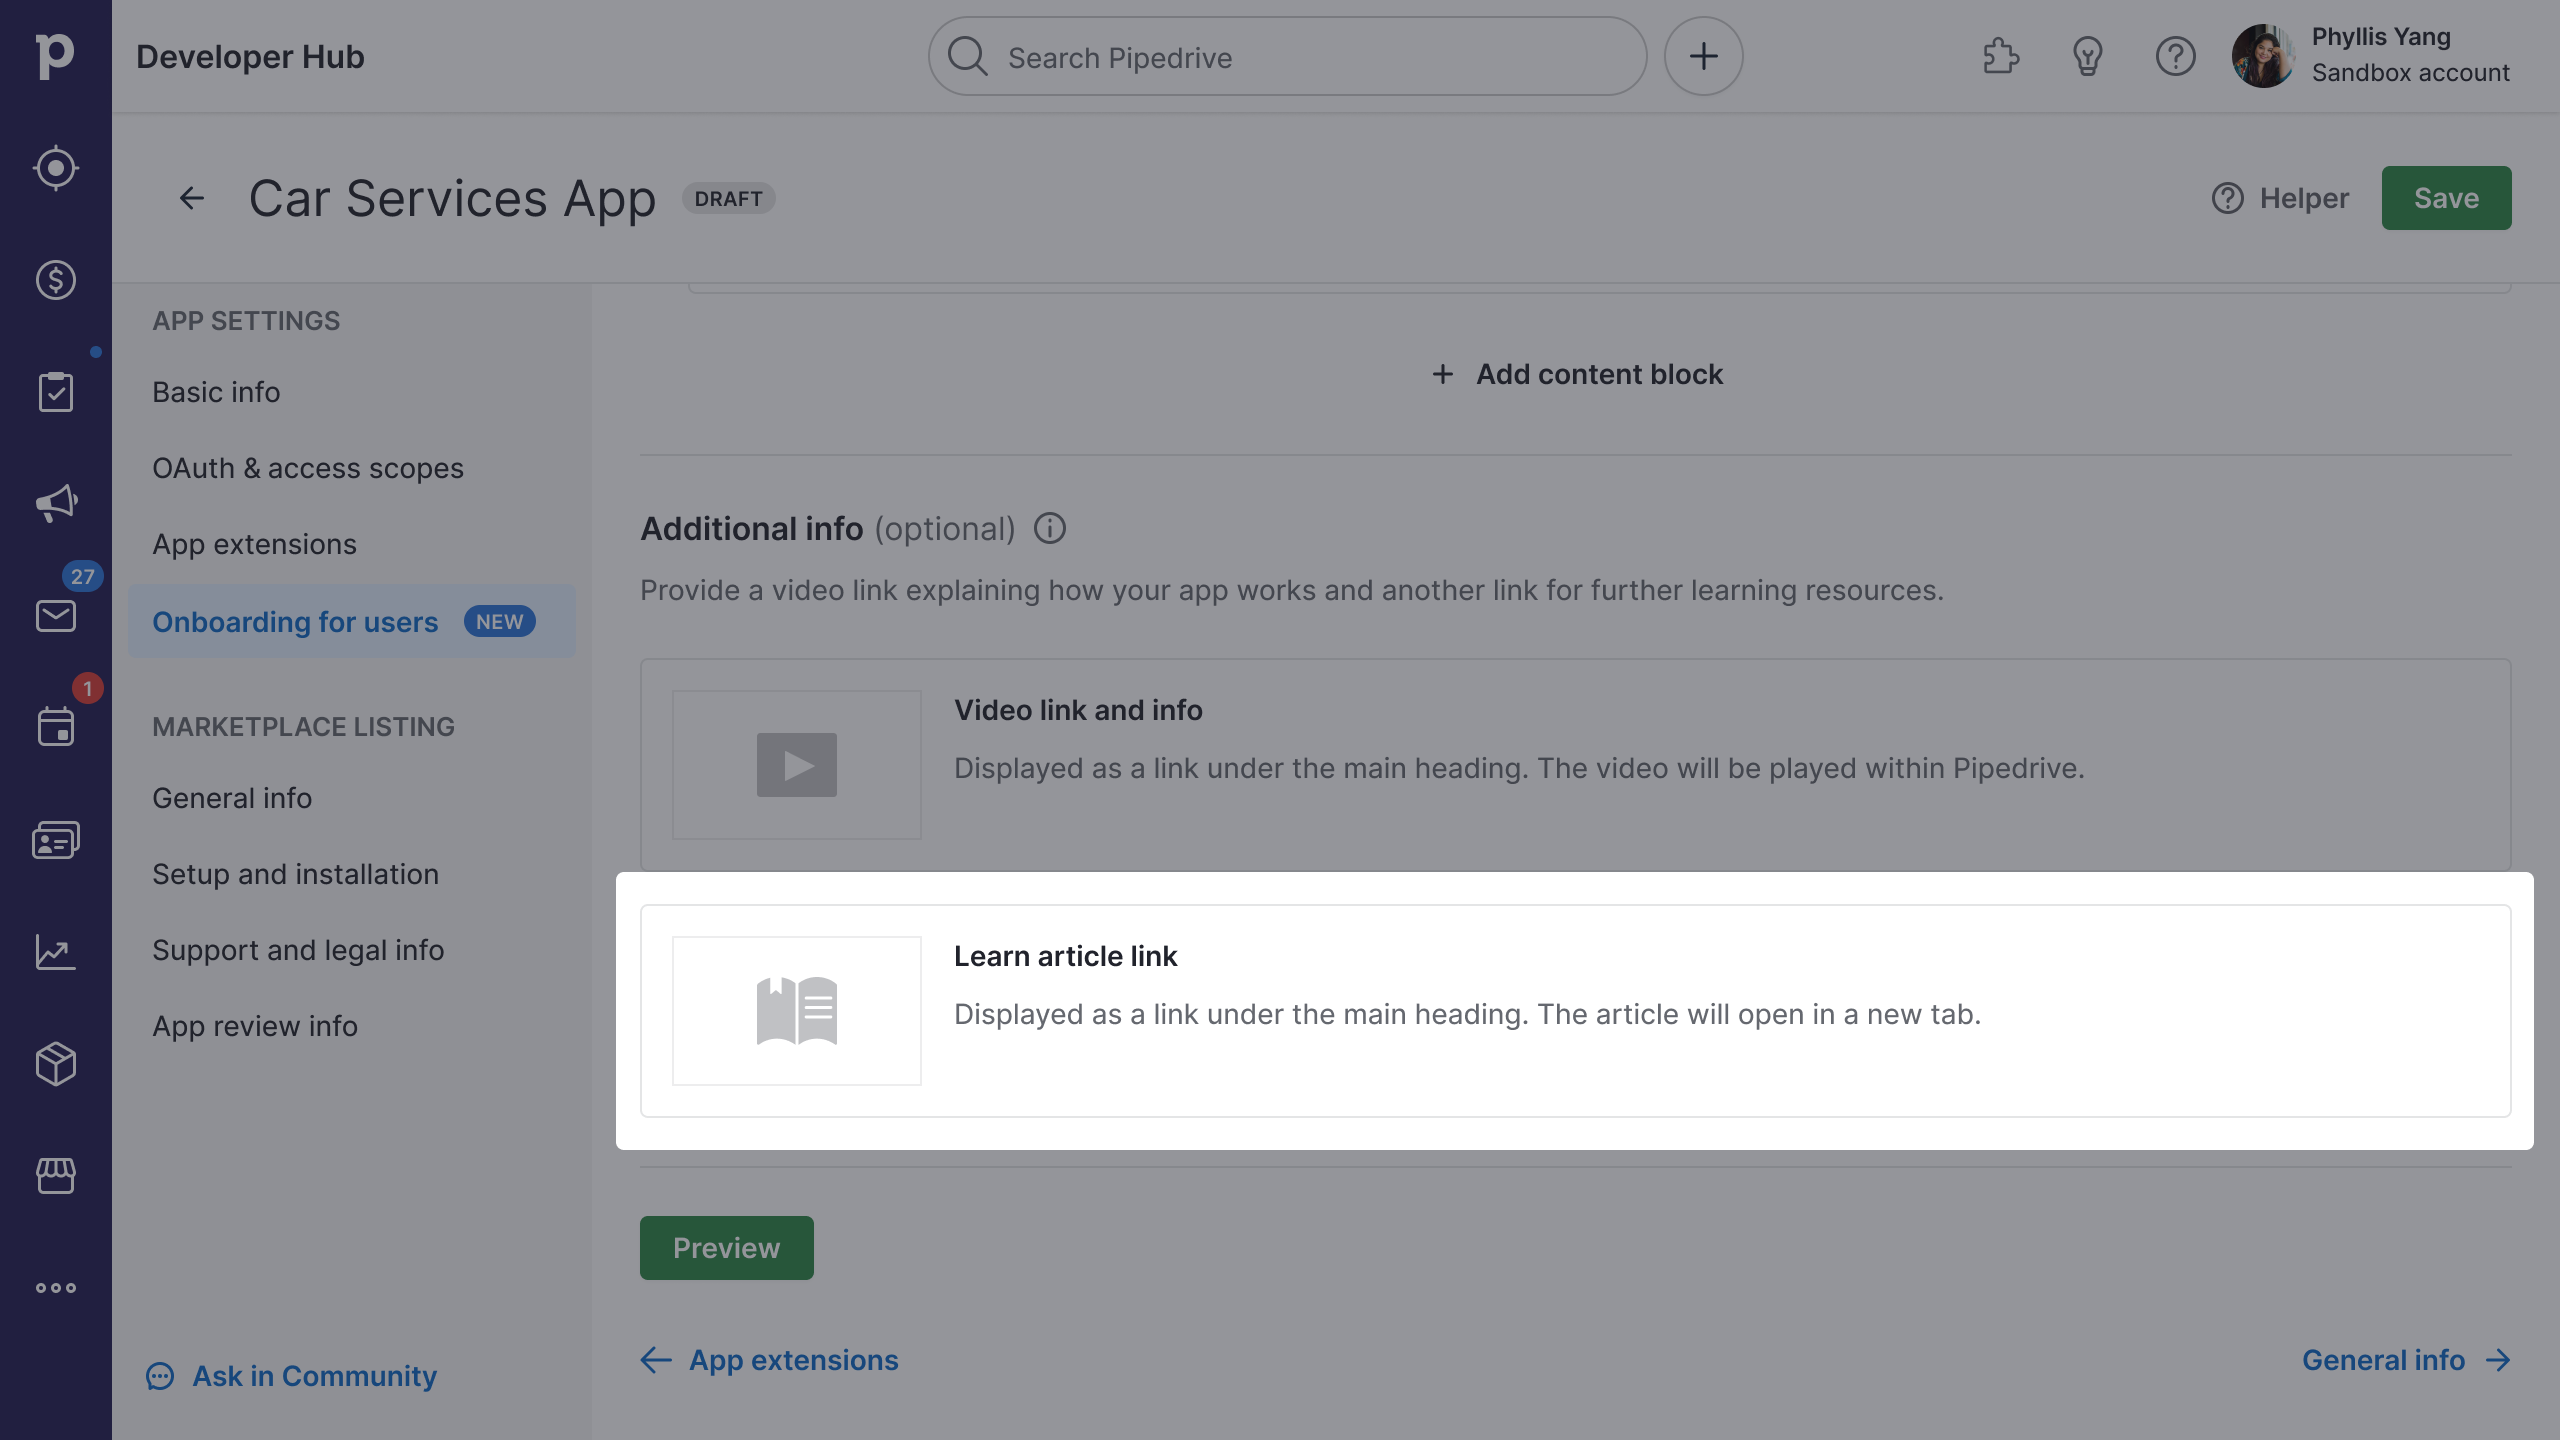
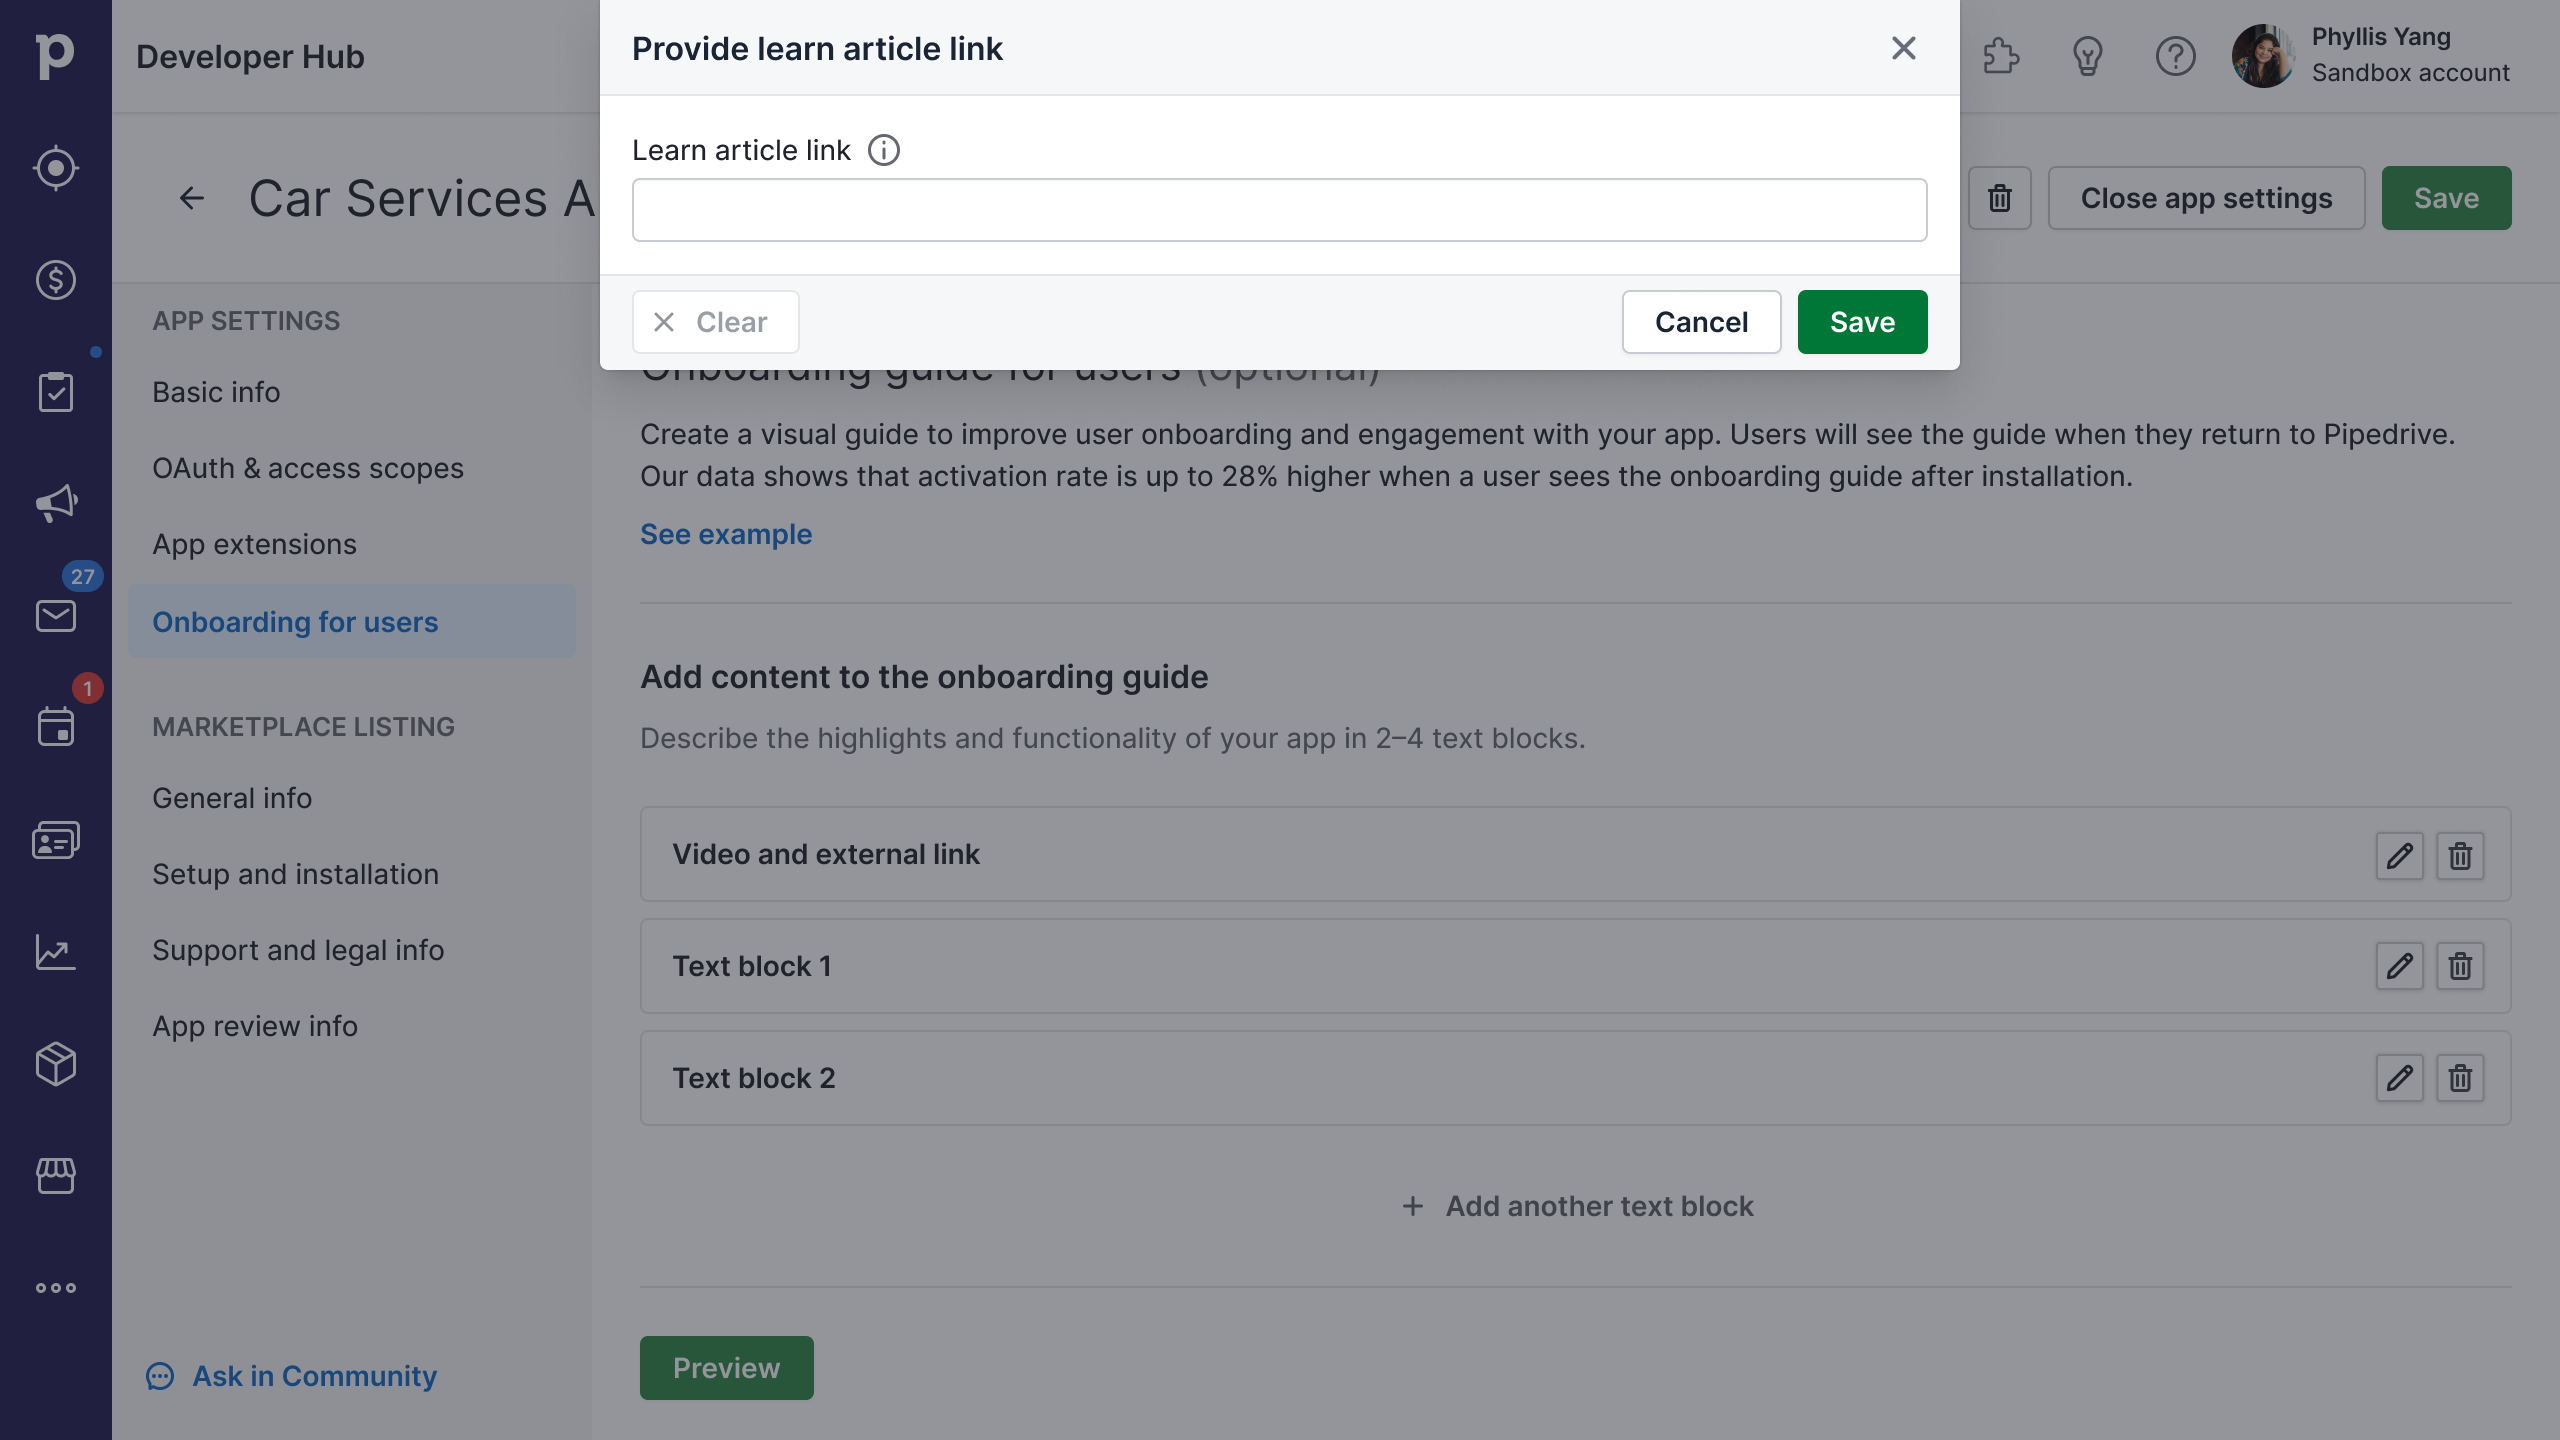
| Field | Description | |
|---|---|---|
| Learn article link | Add a link to an article about your onboarding flow or features overview. The article should explain either the first steps users need to take to experience the benefits of your tool or delve into your app’s key features. Example: https://support.carprojectmanagerapp.com/en/article/pipedrive-integration-winbridge | |
Once you've filled in your relevant information, click on the green "Preview" button at the bottom to preview your app onboarding guide and make sure everything is like it should.
The onboarding guide preview displays how your app will look after filling out the required fields.
General info
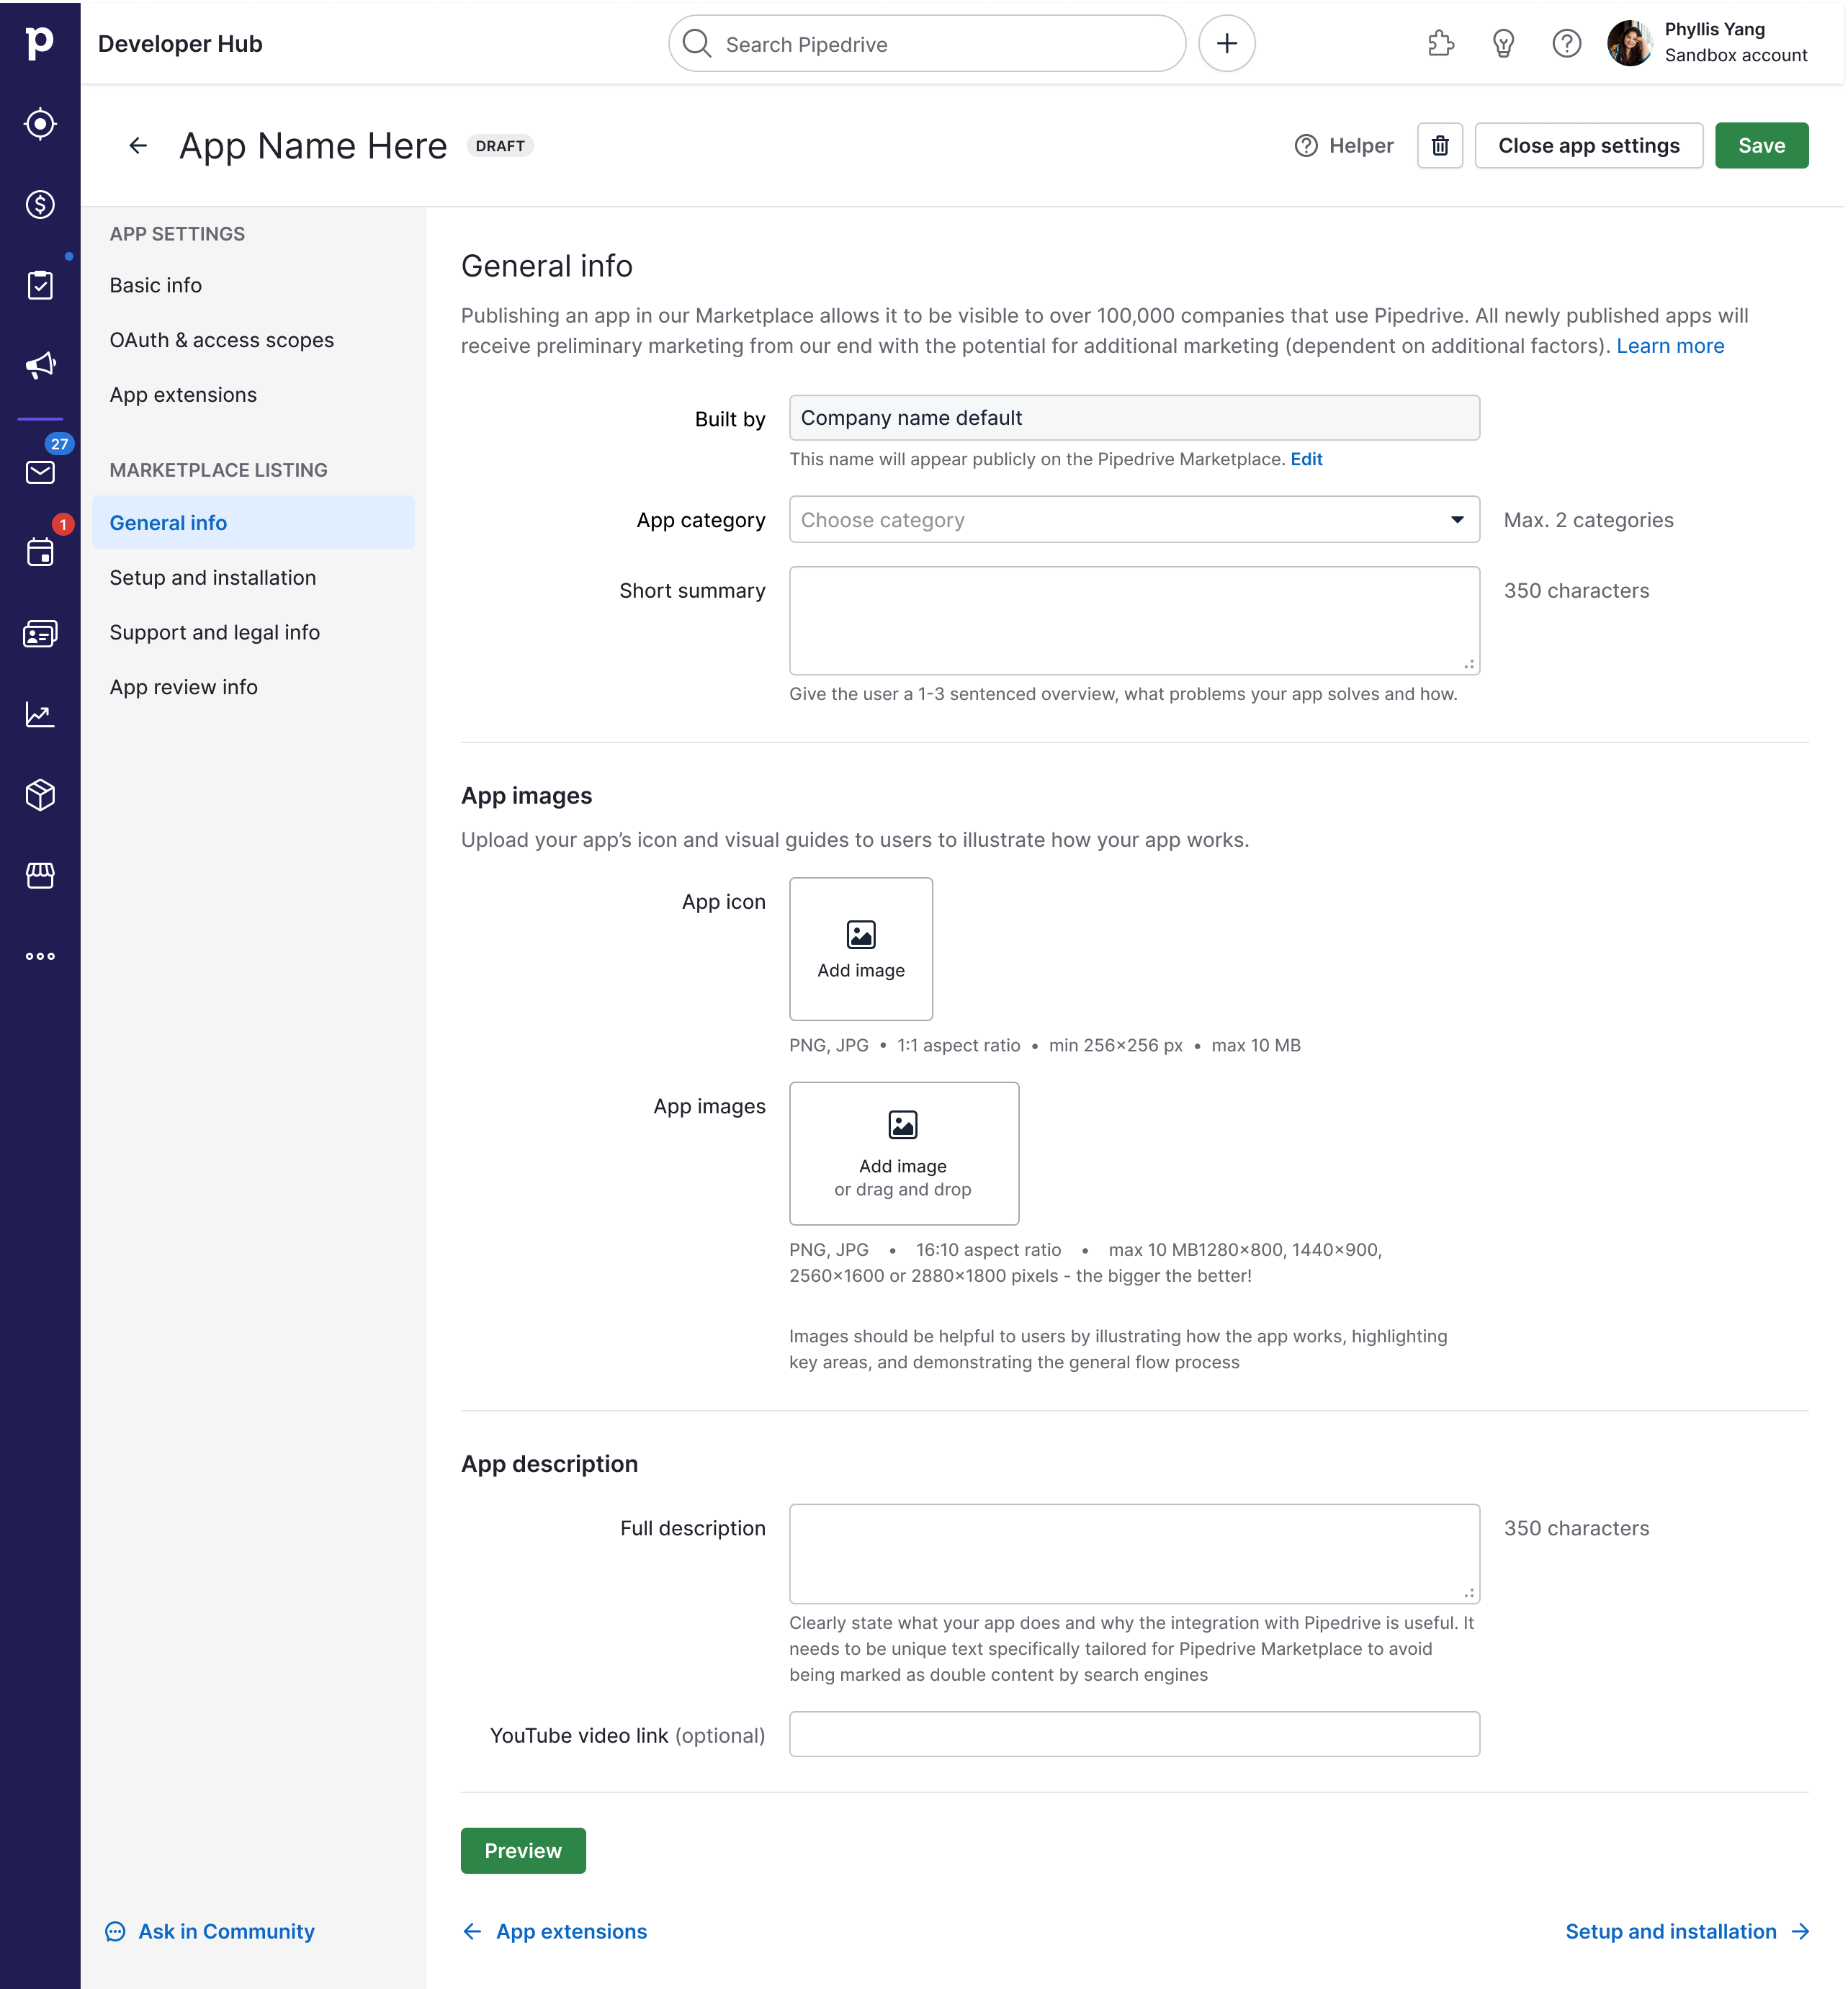
Basic info
| Field | Description |
|---|---|
| Built by | This will be the name of the company responsible for developing the app. It will appear publicly on the Pipedrive Marketplace. To change the company name, click “edit” under the company name, and you’ll be taken to Company settings. Example: Car Services Inc |
| App category (required) | Choose categories from the drop-down menu that best represent your app’s use case. Example: Task and workflow management |
| Short summary (required) | Summarize the essence of what your app does. It will be shown in the list views and other places where the full description cannot be shown in the Marketplace. Max 150 characters. Please include your app’s name and “Pipedrive” in the description if possible. Example: Car Services app helps you better manage your orders and workflows in Pipedrive and automatically syncs it across both platforms. |
App images
Pipedrive supports light and dark theme! Please make sure all content is visible from light and dark backgrounds. You can switch themes in Interface preferences.If your images are not well visible on both, we recommend uploading images with a white background.
| Field | Description |
|---|---|
| App icon (required) | Upload an icon that best represents your app (be aware of the file type and sizing requirements). Icon criteria: We recommend uploading an icon-only version as your logo is sometimes presented in a minimal size of 20x20px alongside your app name. Tip: To make your app listing more SEO-friendly, name your app icon file “app-pipedrive-integration”. For example, “carservices-pipedrive-integration” - all lowercase with dashes. |
| App listing images (1 required, max 5) | Upload max five images that should be helpful to users by illustrating how the app works, highlighting key areas and demonstrating the general flow process. Image criteria: Tip: To make your app listing more SEO-friendly, add numbers to the end of your image file's name. For example: |
App description
| Field | Description |
|---|---|
| Full description (required) | Clearly state what your app does and why the integration with Pipedrive is useful. It needs unique text tailored explicitly for the Pipedrive Marketplace to avoid being marked as double content by search engines. Max 1500 characters. If you have done your keyword research, please use SEO keywords throughout this section. If not, here are some SEO keyword recommendations that you can use: Please reach out to the Marketplace team if you need some SEO assistance. Example: Discover the Car Services-Pipedrive integration that helps you manage your orders and workflows! The Car Services app has received many excellent user reviews, among them Quinn Smith’s feedback: |
| YouTube video link (one link) | Add a link to a video that depicts the capabilities of your app with a specific demonstration of how it works together with Pipedrive. We recommend you use the video for marketing your app. We currently support only Youtube video links. |
Once you’ve filled in your relevant app information, click on the green “Preview” button at the bottom to preview your app listing page and make sure the information is accurate. The draft app listing will open in a hovering window.
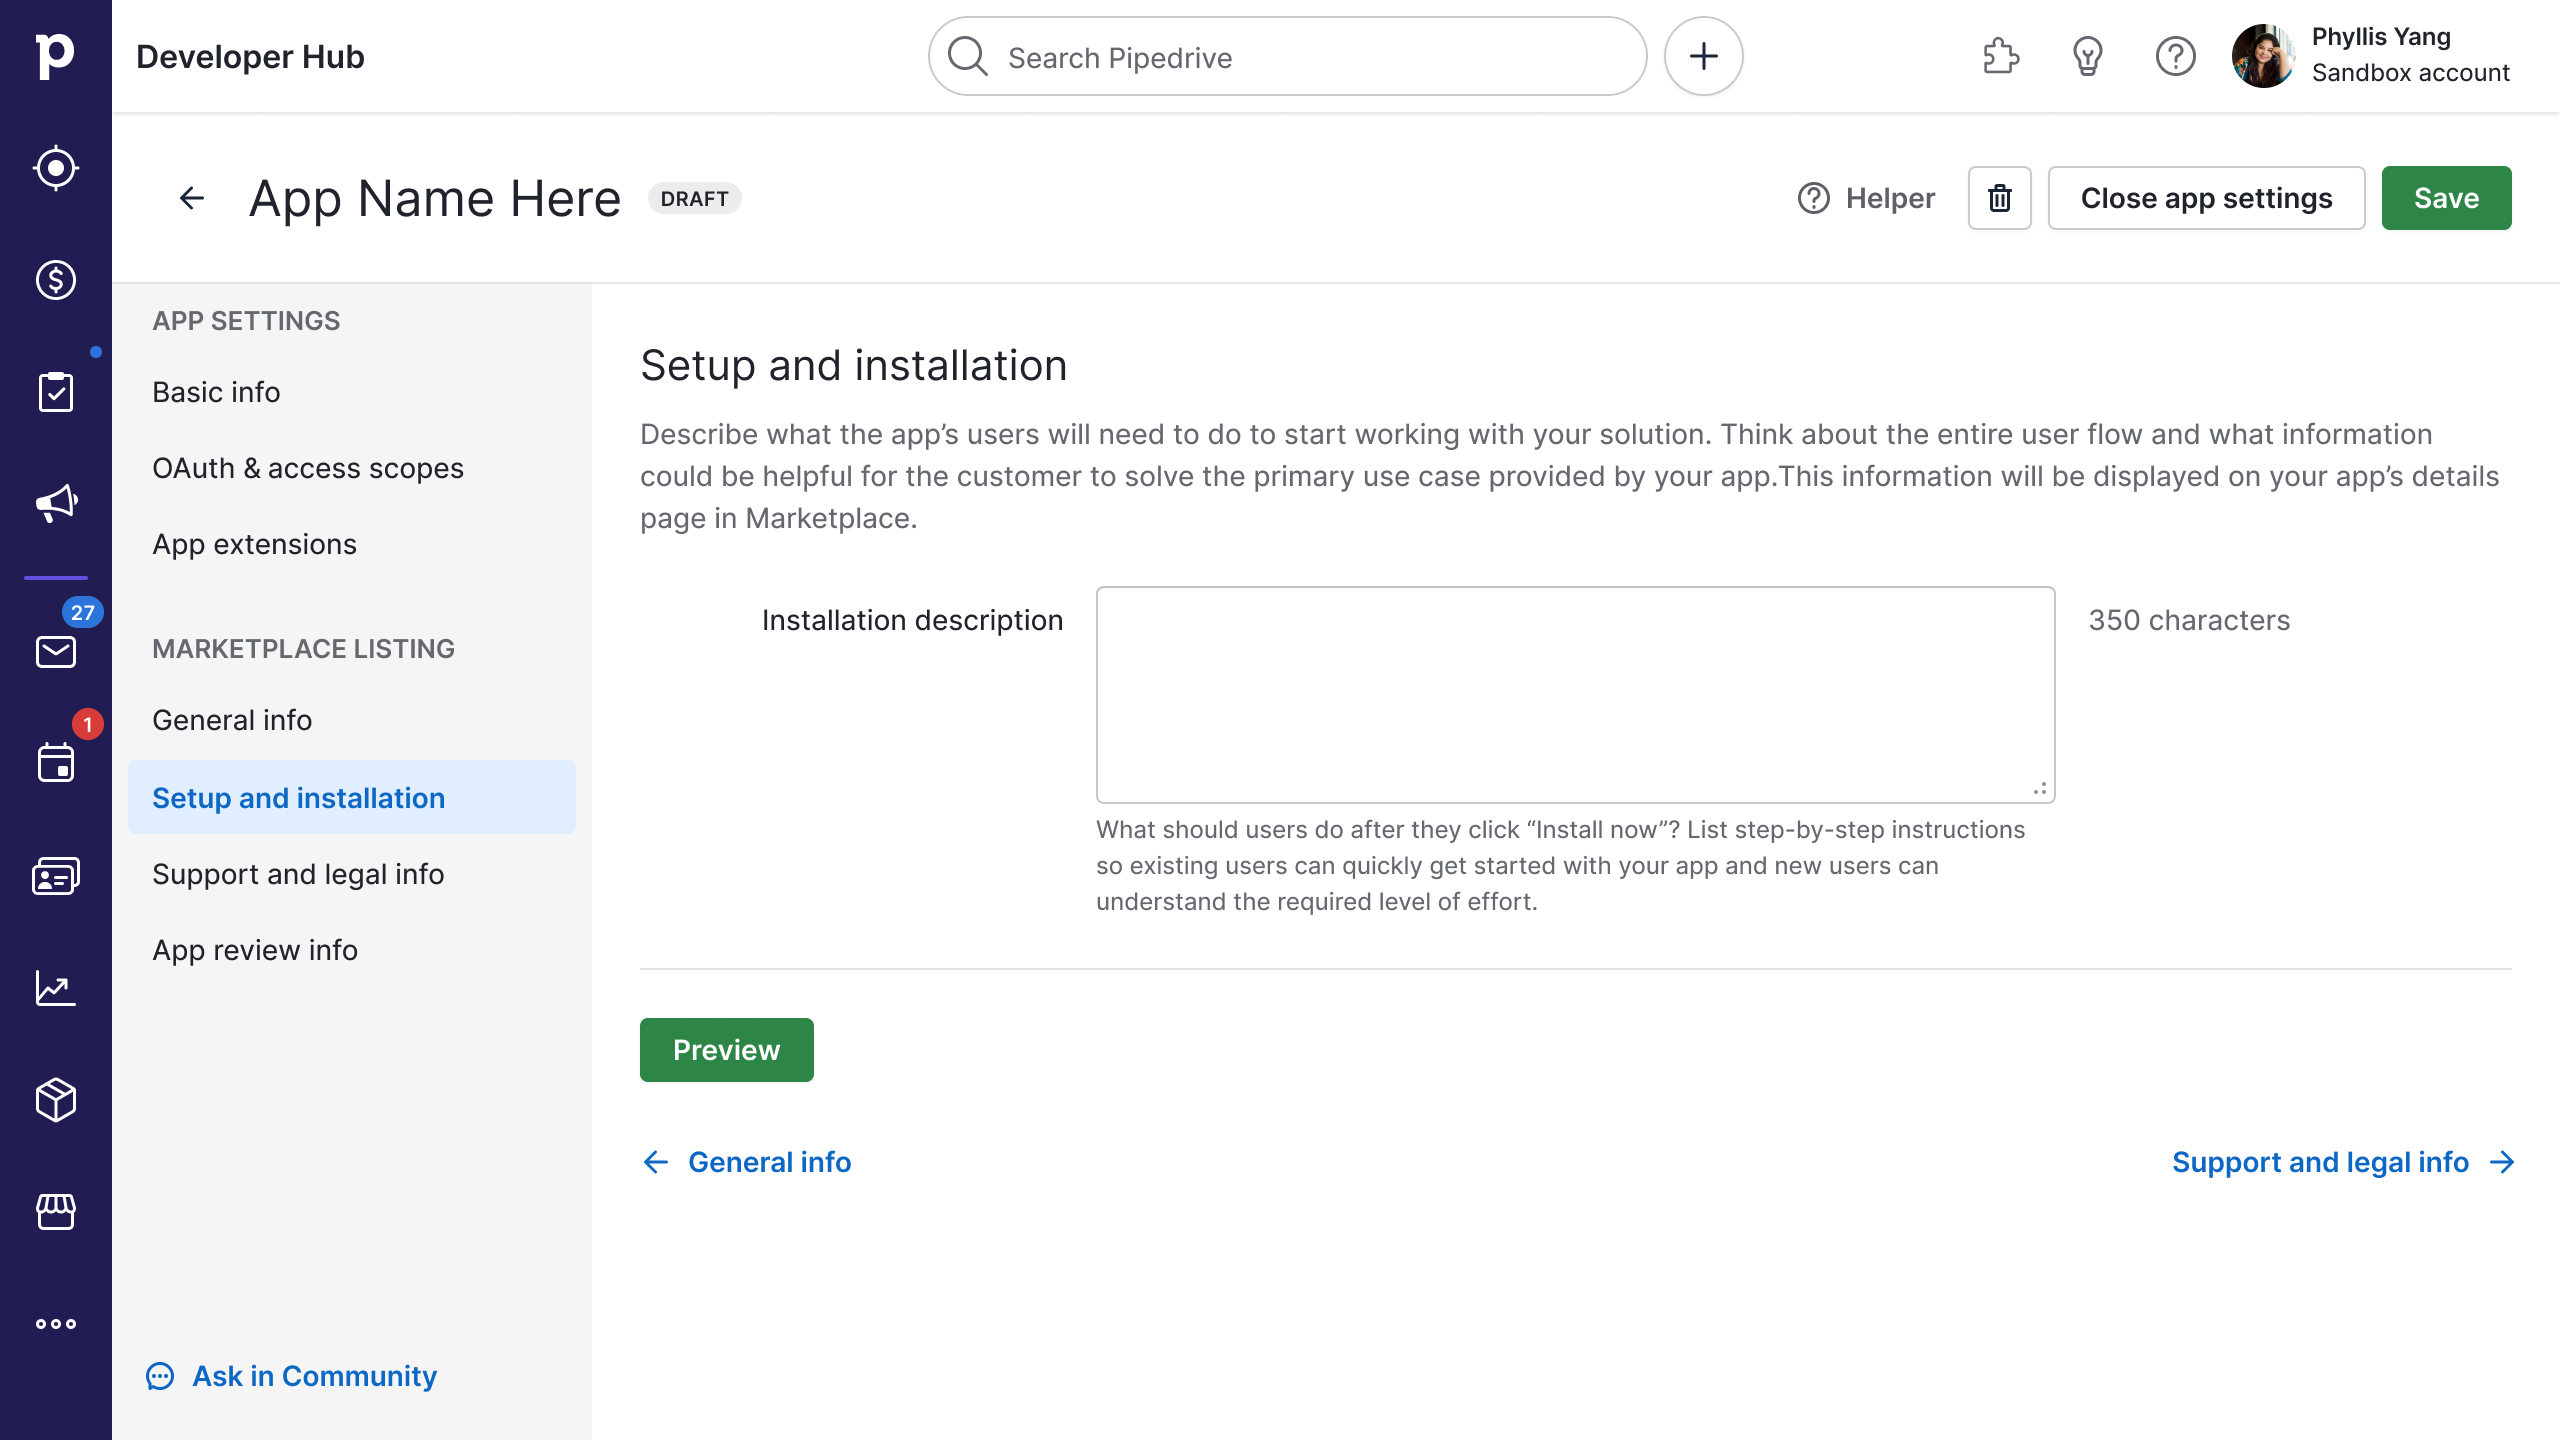
Setup and installation
| Field | Description |
|---|---|
| Instructions for users (max 1500 characters) | What should users do after they click “Install now”? What should they expect to see, and where should they navigate to next? List step-by-step instructions so existing users can quickly get started with your app and new users can understand the required level of effort. If you have done your keyword research, please use SEO keywords throughout this section. If not, here are some SEO keyword recommendations that you can use: In case a one-on-one set up is required, define in this section who should be contacted and how. |
Once you’ve filled in your relevant app information, click on the green “Preview” button at the bottom to preview your app listing page and make sure the information is accurate. The draft app listing will open in a hovering window.
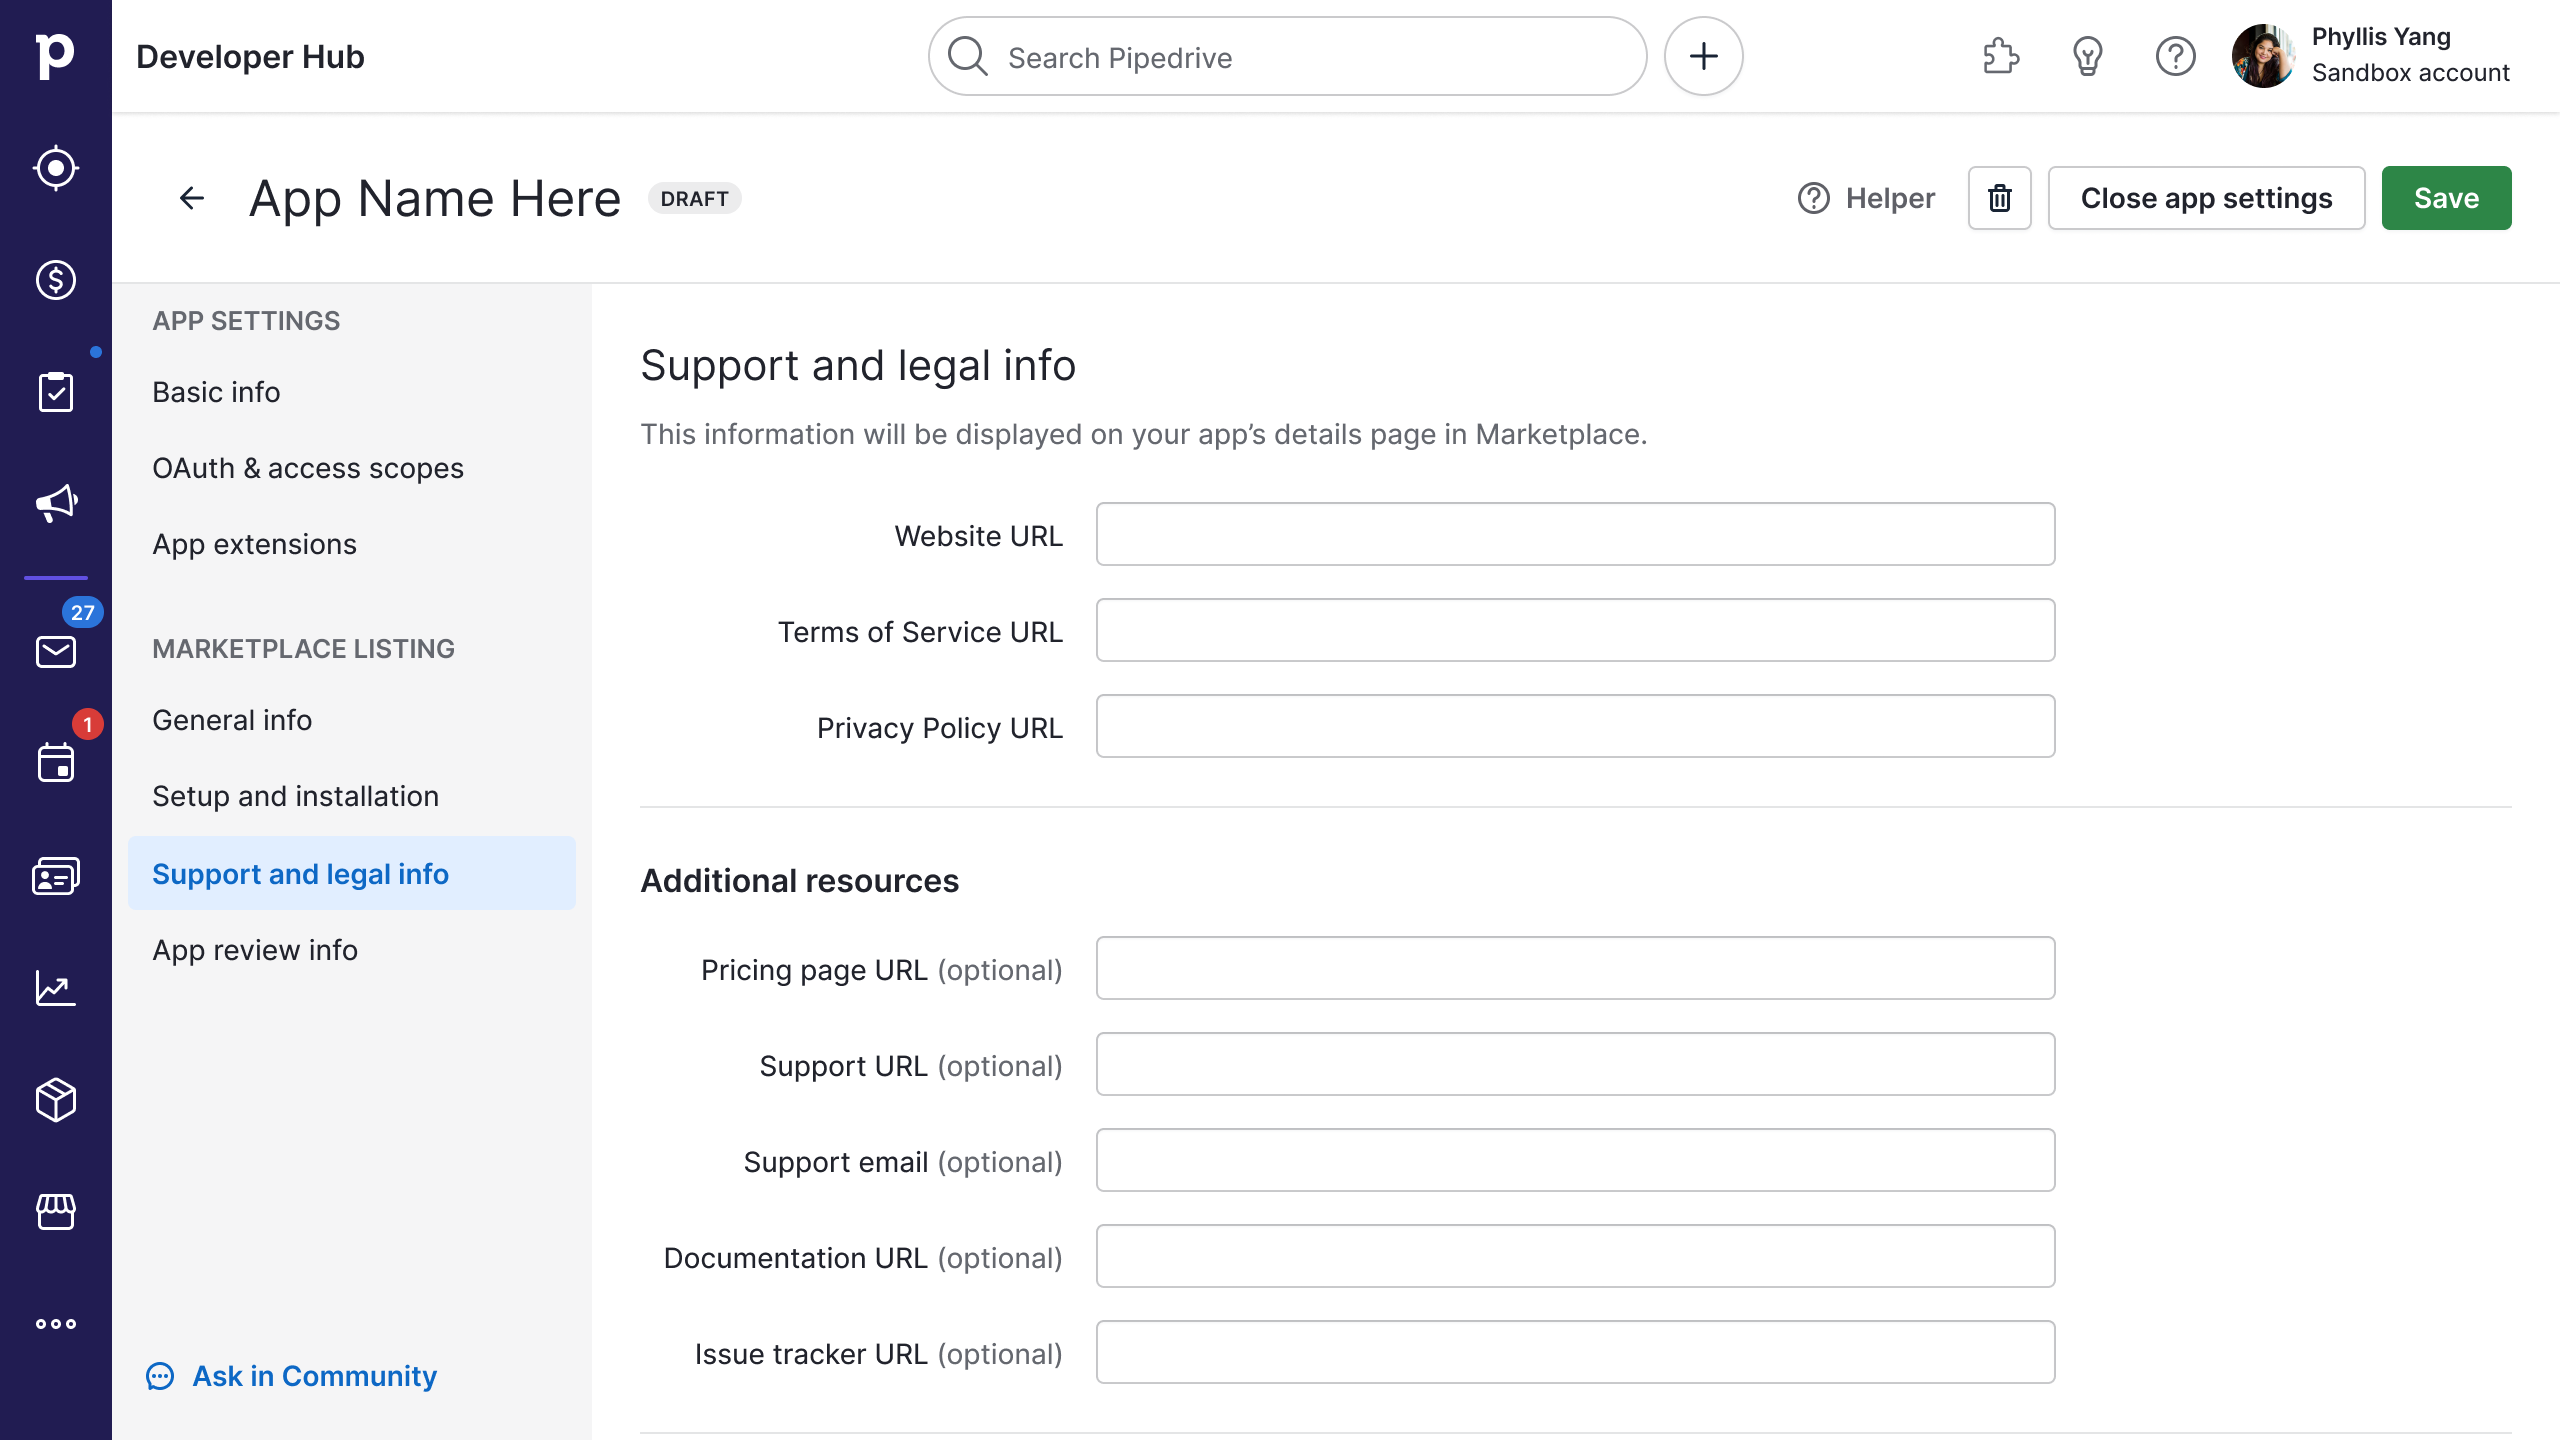
Support and legal info
Main resources
| Field | Description |
|---|---|
| Website URL (required) | Insert a link to your app’s website. Example: https://www.carservicesapp.com |
| Terms of Service URL (required) | Insert a link to your app’s Terms of Service webpage with rules that users must agree to abide by to use your service/app. |
| Privacy Policy URL (required) | Insert a link to your app’s Privacy Policy webpage of a legal document that has most or all the information of how users’ data is gathered, used, communicated and managed. |
Additional resources
| Field | Description |
|---|---|
| Pricing page URL | Insert a link to your app’s pricing page. |
| Support URL | Insert a link to your app’s support website’s main page, where a user with questions/problems can find answers about different support channels and their SLAs, FAQs, self-service support resources, and maybe even discover tips and tricks about your app, or get general help. |
| Support email | Insert an email address for your app’s Support contact if the user needs direct help. Example: [email protected] |
| Documentation URL | Insert a link to your app’s documentation website from where the user can familiarize themselves with your app’s features: a detailed description of what your app can do and how, tutorials/articles for getting started or specific use cases, etc. Example: https://www.carservicesapp.com/help |
| Issue tracker URL | Insert a link to your issue tracker website, where users can report bugs or any other issues noticed when using your app. |
Once you’ve filled in your relevant app information, click on the green “Preview” button at the bottom to preview your app listing page and make sure the information is accurate. The draft app listing will open in a hovering window.
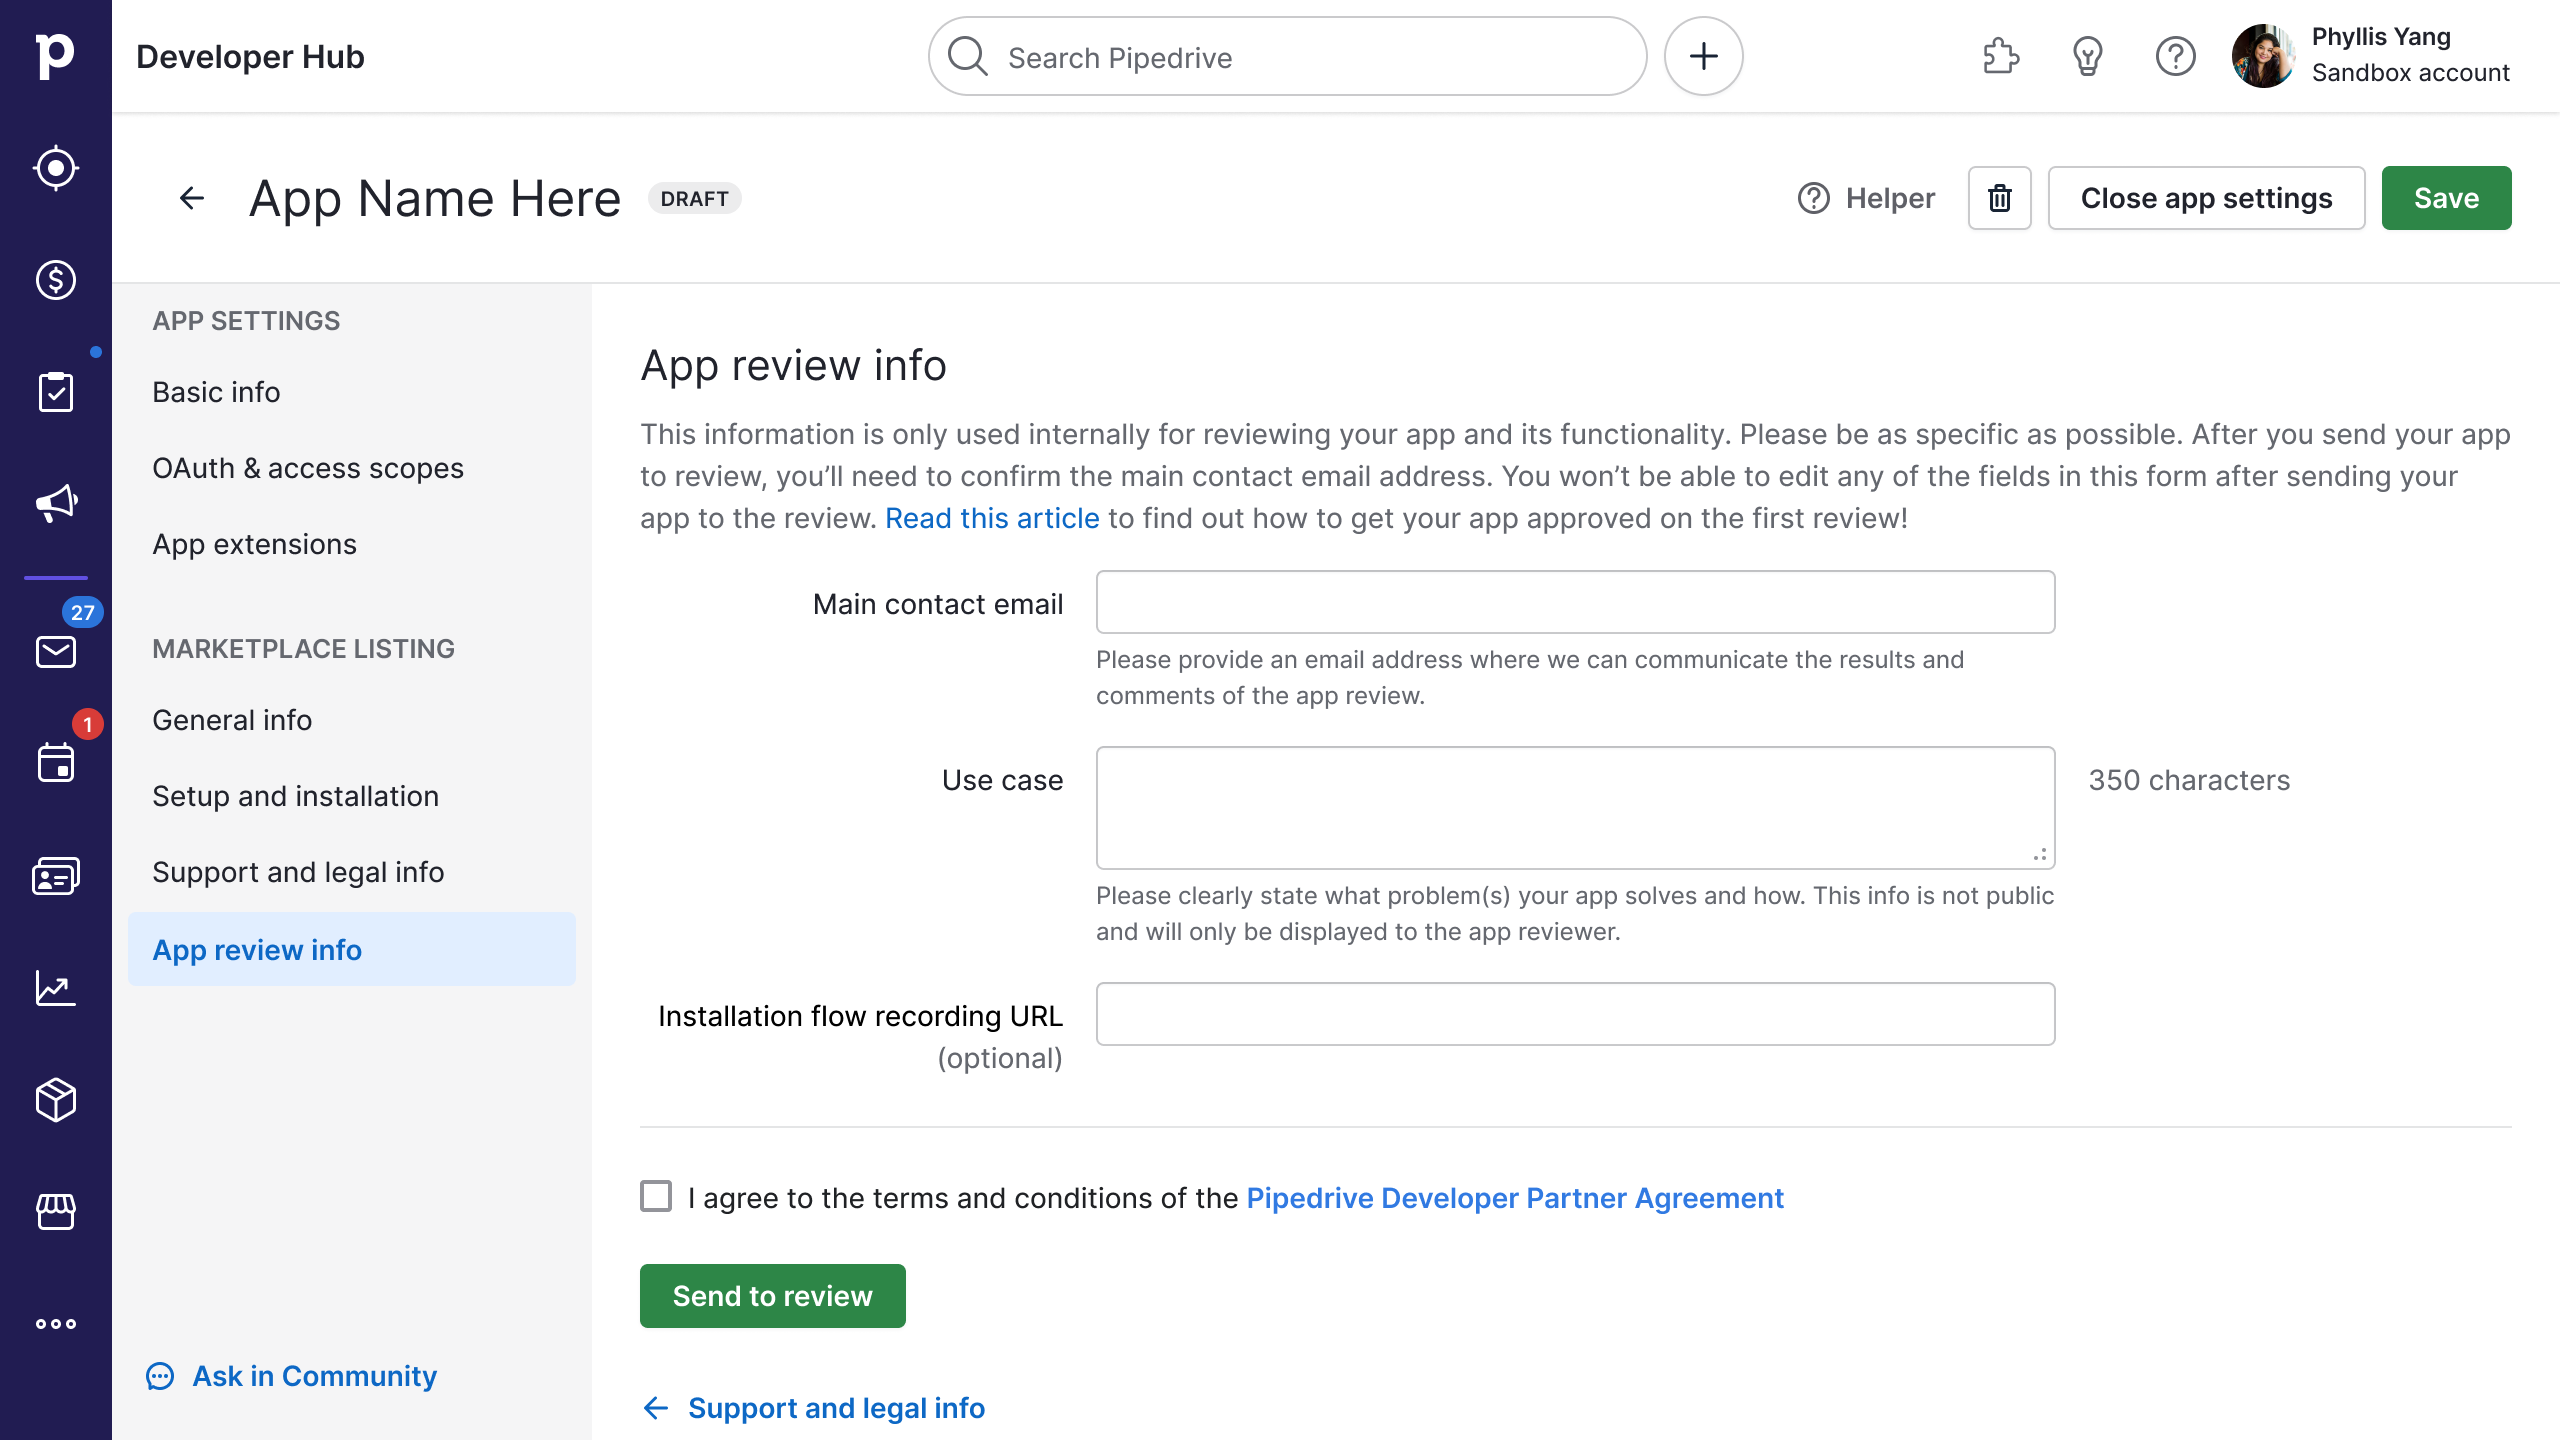
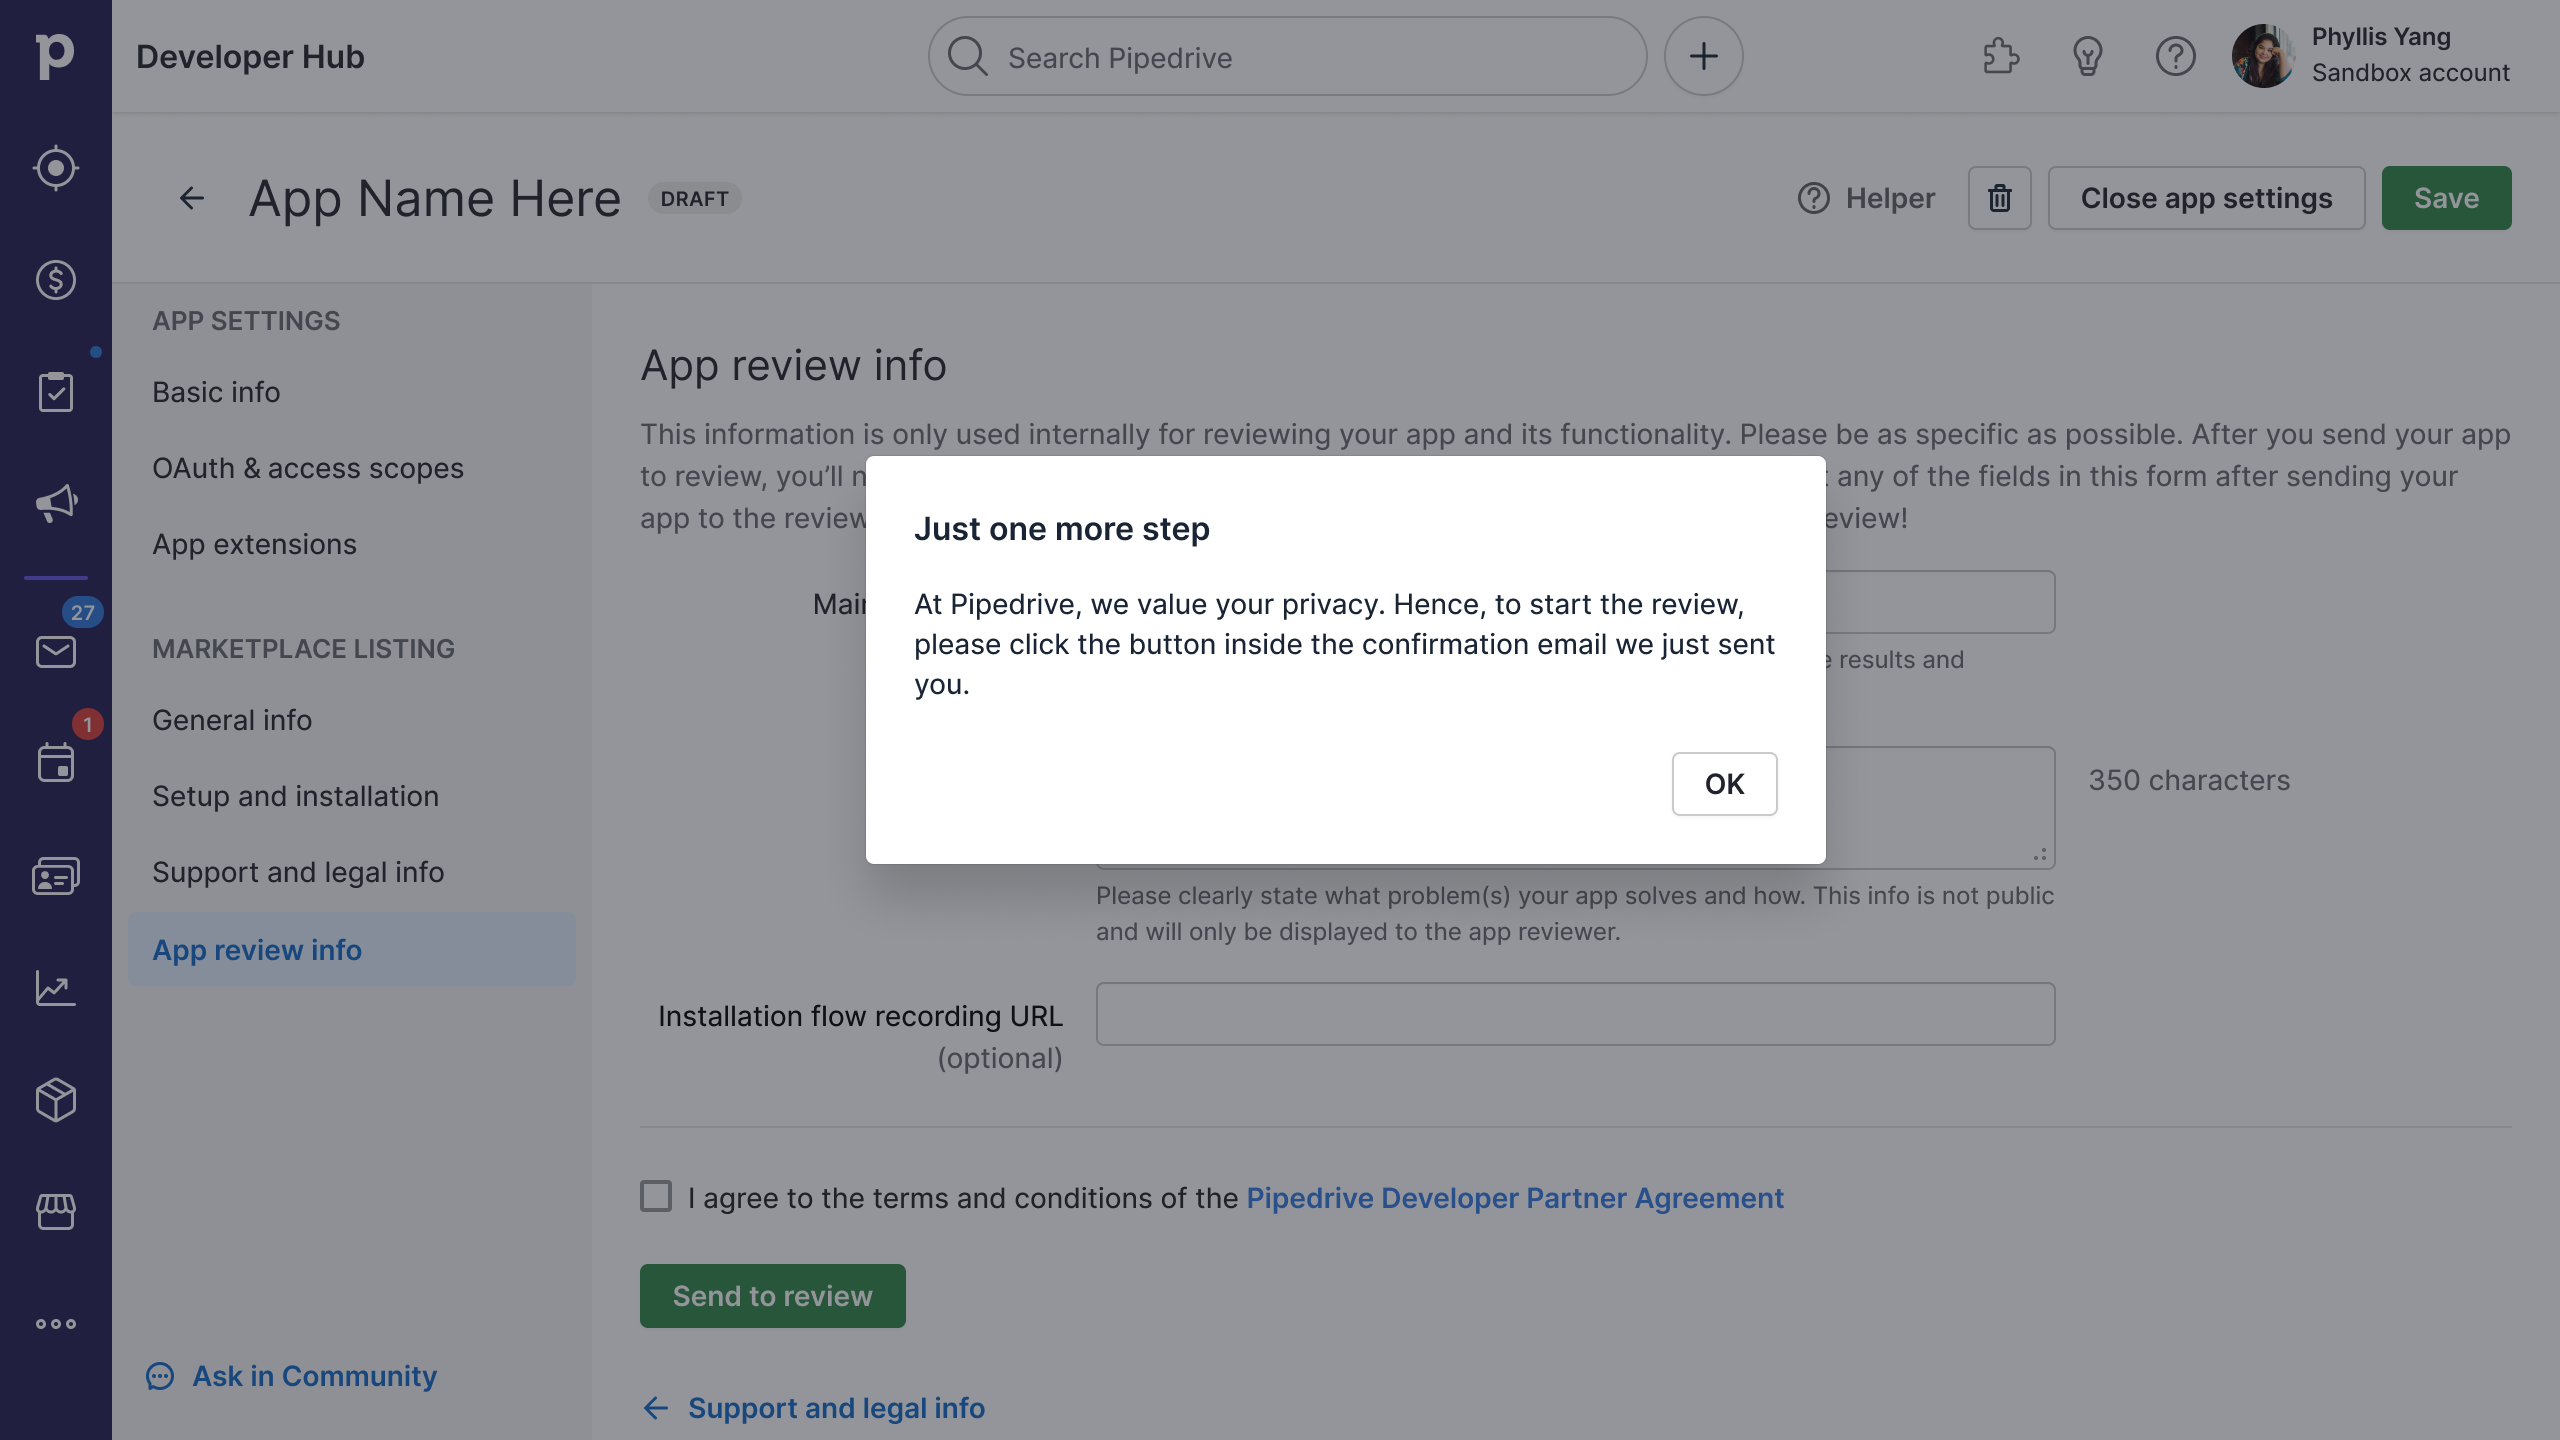
App review info
| Field | Description |
|---|---|
| Main contact email (required) | The main point of contact to receive – Results and comments of the app review – Notifications about user reviews – Technical updates and notifications from Pipedrive |
| Use case | Please clearly state what problem(s) your app solves and how. This info is not public and will only be displayed to the app reviewer. Max 350 characters. |
| Installation flow recording URL | Optional. If possible, please include a recording link to show how your app has covered the mandatory installation flows: Find out more about app installation flows |
To be published on the Marketplace, your app needs to pass our app approval process.
Install and test your draft app
Installing and testing your draft app is a crucial step before sending your app for review. It enables you to
- Ensure everything in your app runs smoothly
- Check that you've implemented the mandatory installation flows
- Identify and address potential issues early on
- Pass our app approval process faster
NB: app testing only works for users in your sandbox account and cannot be shared with external users.
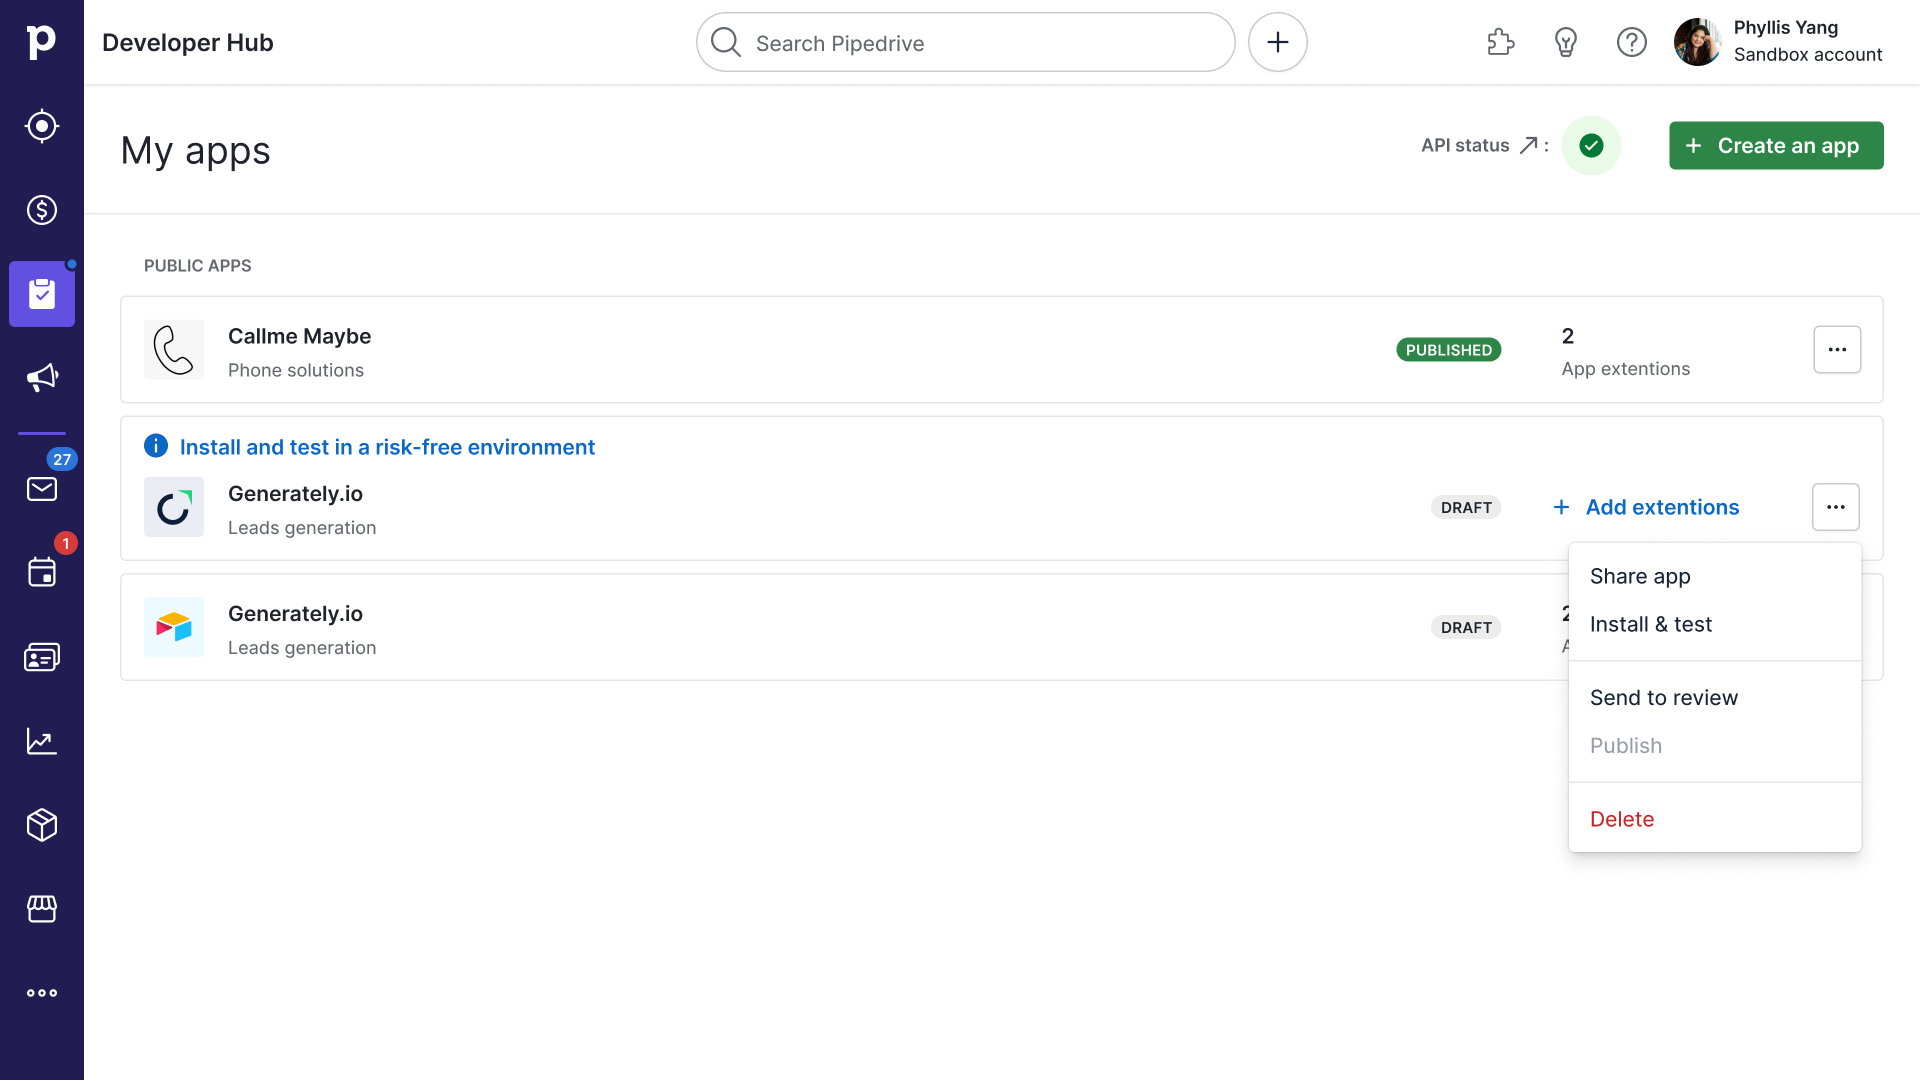
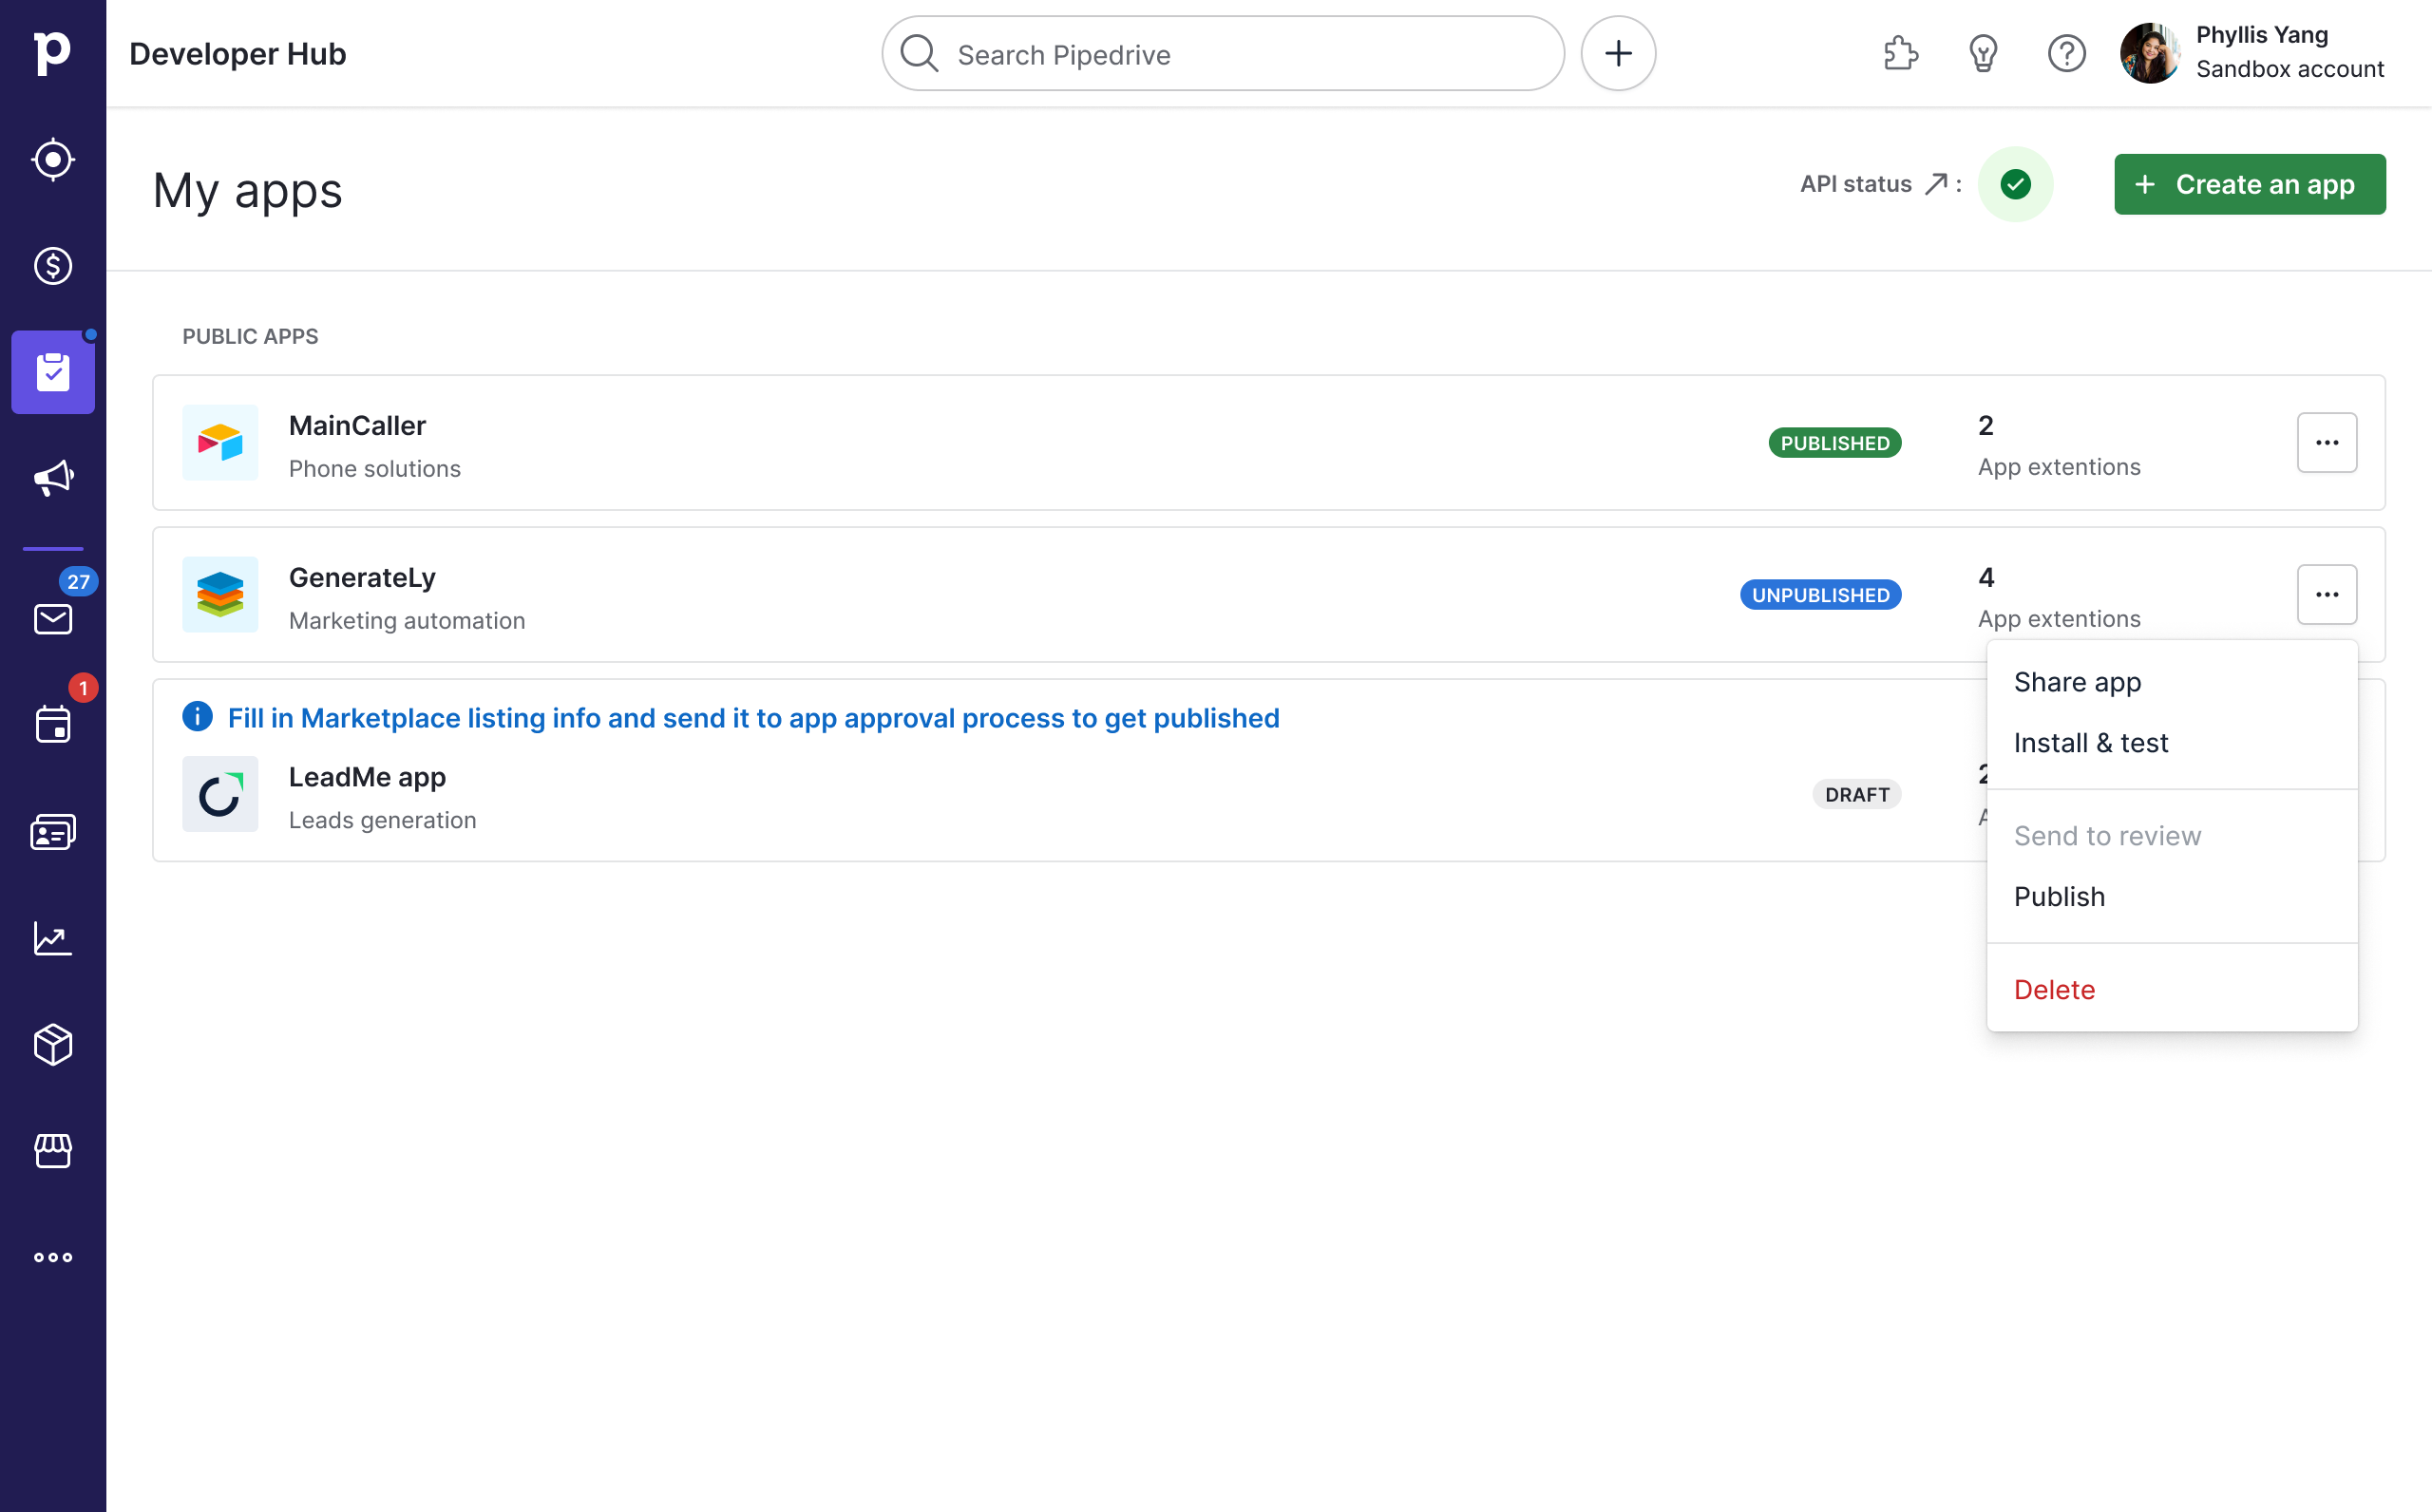
To install and test your app, click the “Install and test” notification above your app’s name or the “Install & test” option from the three-dot menu.
You can also click the green “Install & test” button at the bottom left of the OAuth & access scopes and App extensions tabs.
You will then be brought to the OAuth confirmation dialog where you can allow and install your app to begin testing it.
App listing in the Marketplace
This is how your app’s info from General info, Setup and installation and Support and legal info tabs in Developer Hub will be converted to the app listing page in the Marketplace.

Save your app and send it for review
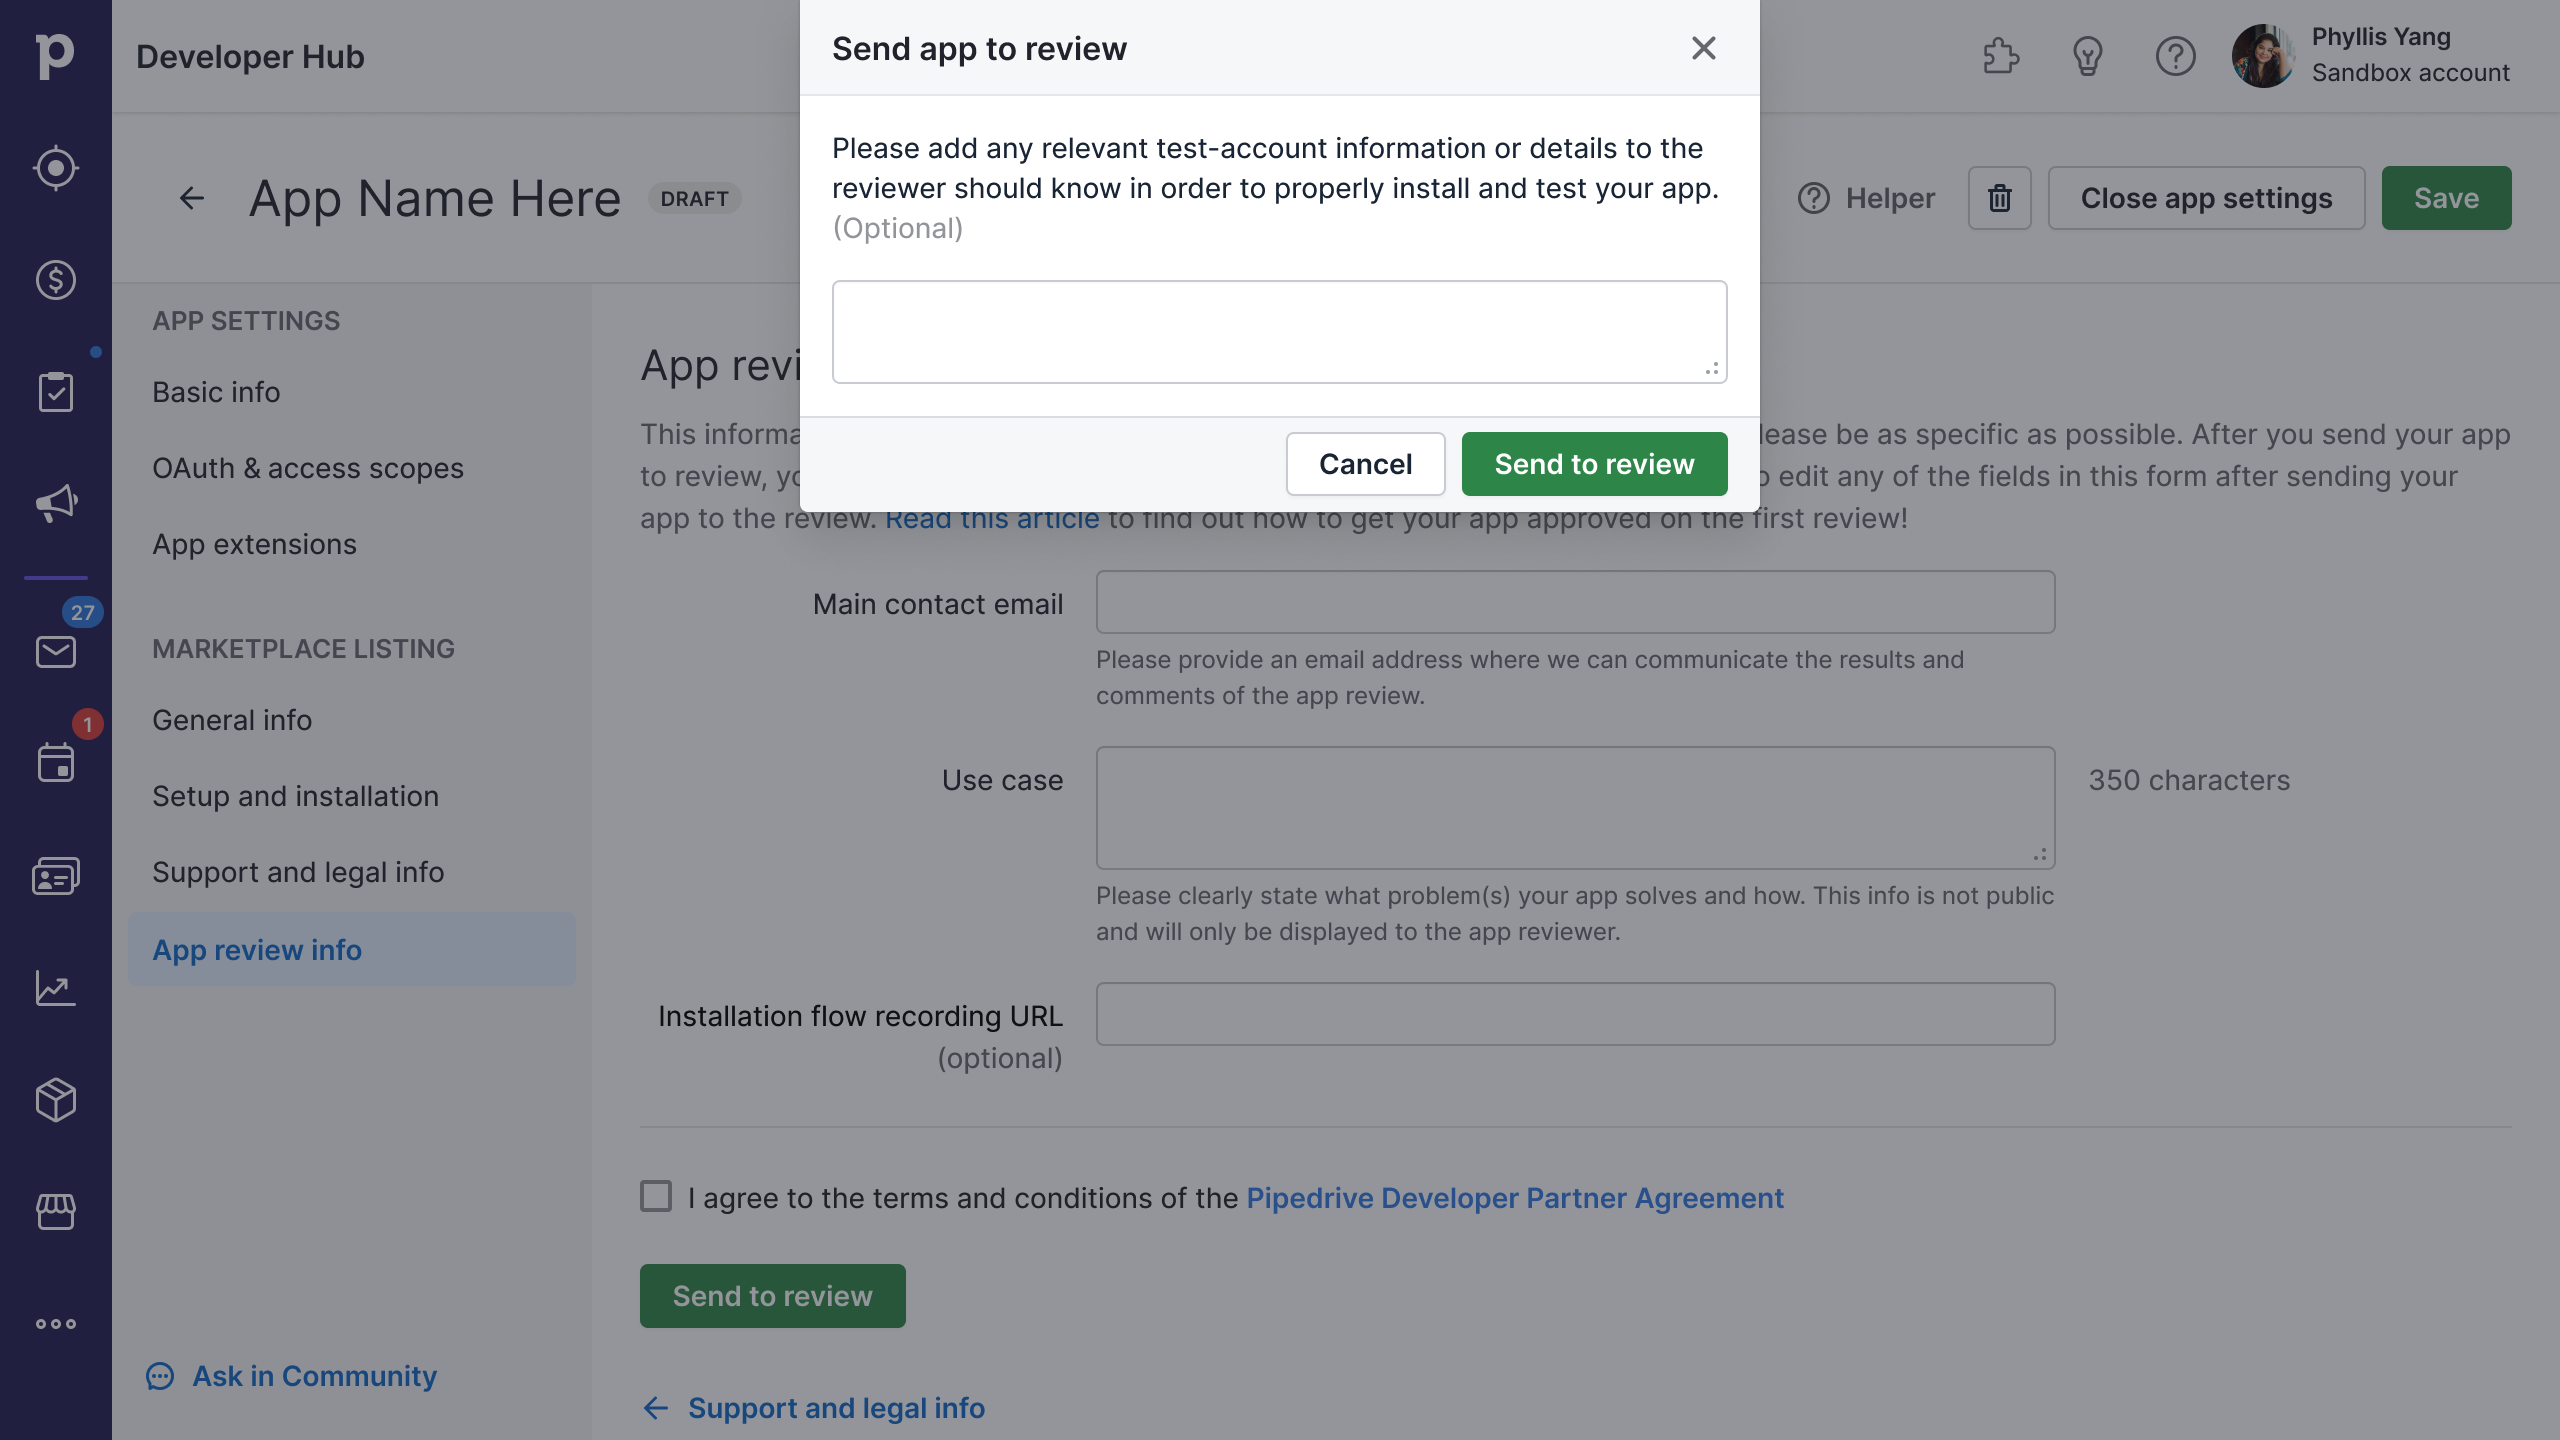
Ready with your app? Send it for review by agreeing to the terms and conditions of the Pipedrive Developer Partner Agreement and clicking on the green “Send to review” button.
You will then be asked to provide us with any test account information or details that the Marketplace team should know to properly install and test your app during approval.
The final step involves confirming your email address – a requirement for all public apps. You will receive the confirmation email in the main contact email you specified. Once you’ve confirmed your email address, your app will be sent to the Marketplace team for review, and its status in the Developer Hub dashboard will be changed to “In review”.
App status
The status of your app is displayed in a pill next to your app’s name in Developer Hub.
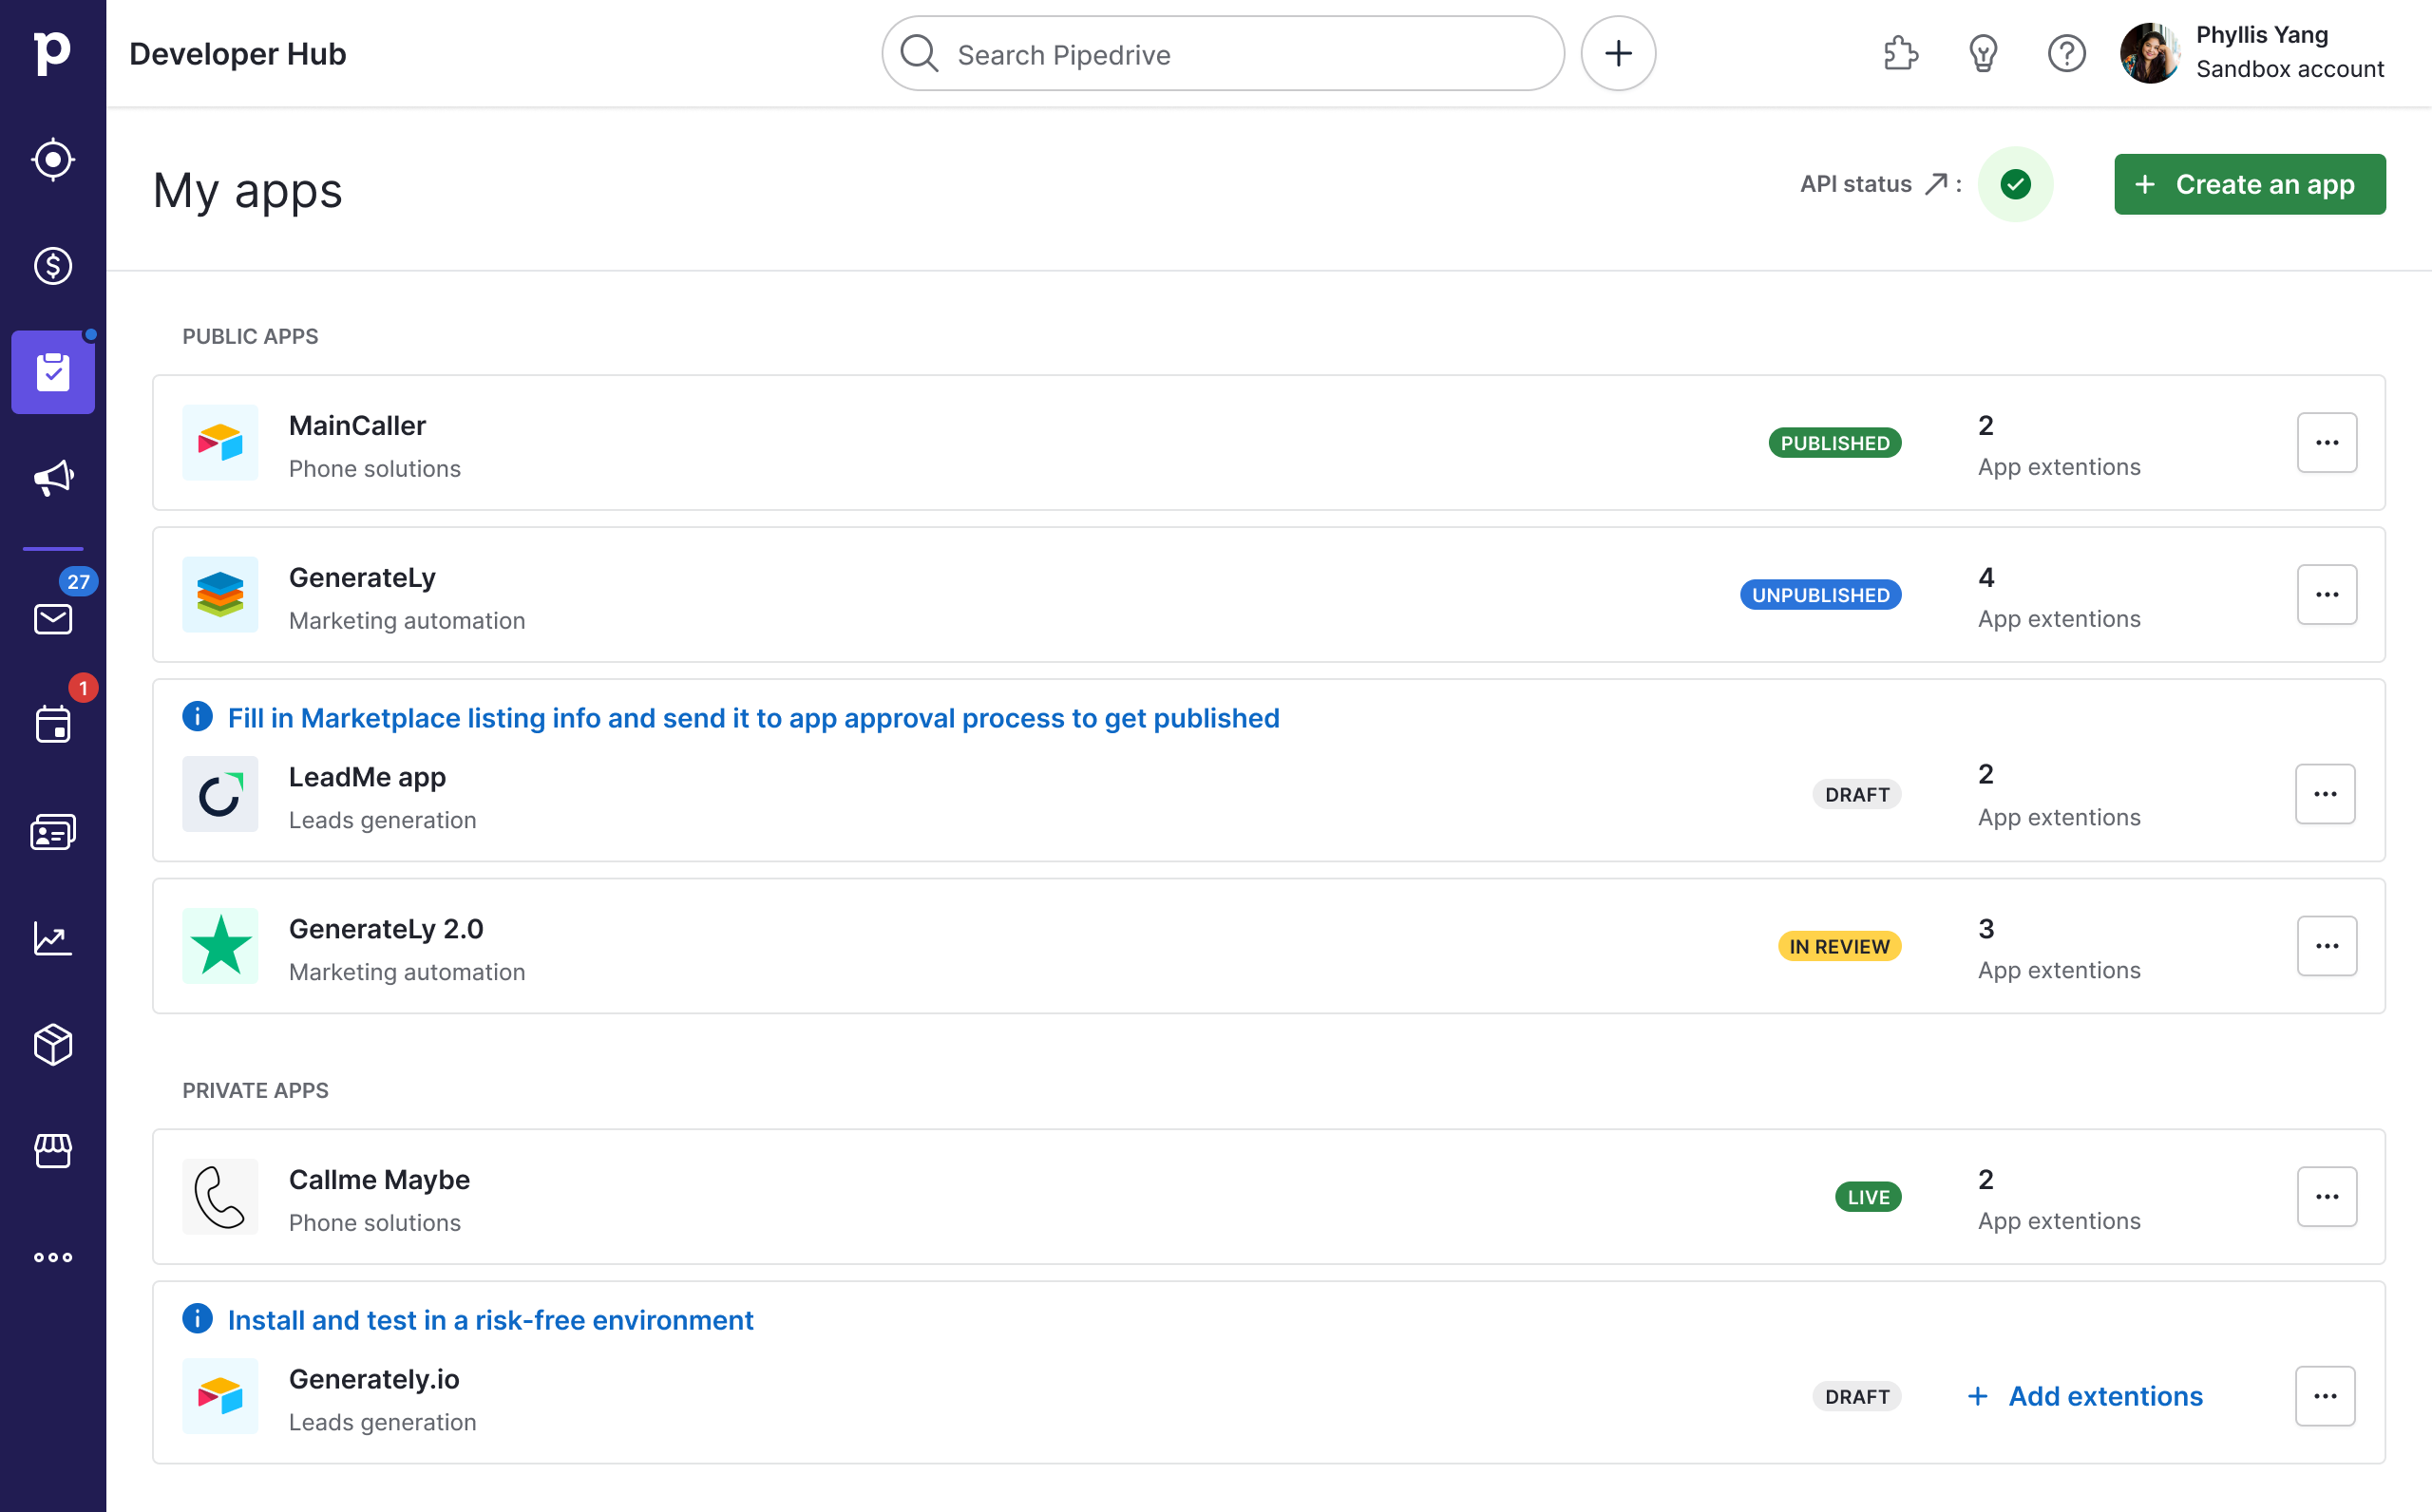
Public apps can have four different statuses:
| App status | Description |
|---|---|
 | Your app is in a draft state. Please start installing and testing it before sending it for review. |
 | Your app has been sent for review and is being reviewed by the Marketplace team. |
 | Your app is approved by the Marketplace team. It remains unpublished as you have to publish it yourself. |
 | Your app is published and publicly visible in the Pipedrive Marketplace. |
What happens after my app is approved?
After your app is approved, its status will be changed to “Unpublished” as you have to publish it yourself. To publish your app, go to the three-dot menu next to your approved app’s name and click “Publish”.
Congratulations, your app is now publicly available in the Pipedrive Marketplace!
Updated 8 months ago